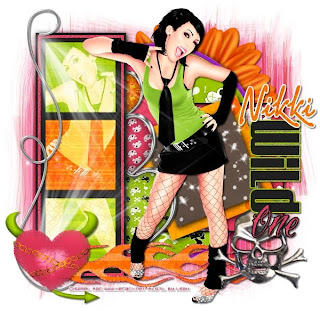
This tutorial is of my own creation and any resemblance to any other tuts is purely coincidental. This tutorial is for personal use only, using it for monetary gain is against our TOU's. Supplies: Gimp- Any version should work Fun PTU kit from Creative Intentionz called 'Retro Punk' HERE Tube of choice. I am using Ismael Rac. You must have a licence to use his tubes. You can purchase them HERE Template 29 by me on mine and Amy's blog HERE WSL_Mask117 HERE Fonts- Velvenda Cooler, VTC-Nuetattooscript & PR8 Charade Let's get started! -Open template. Delete credits and word art. Image>Canvas Size of 600x600 pixels. Make sure you click center. -Next we are going to add papers from the kit to the template layers. you will need to do the following to the layers I name below. First, right click the layer in the layer box and choose alpha to selection. Open paper and right click in layer box and choose add alpha channel. Layer>Scale Layer by 60%. Select>Invert. Press delete on your keyboard. Select>None. Circle- Paper 7. Rect- Paper 1. Filters>Light and Shadow>Drop shadow of 2, 2, 15, black, 100 Square 3- Paper Square 2- Paper 8. Filters>Repeat drop Shadow Square 1- Paper 6. Repeat drop shadow Sm square 1- Paper 3 Sm square 2- Paper 4 Sm square 3- Paper 11 -Mkae the square 3 layer active. Alpha to selection. Add new layer above this layer. Using the bucket fill tool and your foreground color set to black, fill the selection. Select none. Filters>Reshow Drop Shadow 2, 2, 2, black, 50. -Make the lrg rect frame layer active. Alpha to selection. Add new layer above this layer. fill with e73f5f. Select none,. Filters>Noise>RGB Noise on the default settings. -Make the lrg rect layer active. Alpha to selection. add new layer above this layer. Fill with black. Add a drop shadow of 2, 2, 15, black, 100. -Make the circle back layer active. Repeat drop shadow. -Make the top layer active (1st sm green square to the left of the tag). Layer>Merge down with the sm orange square. Merge again with the 2nd sm green square. Open your tube. using the flip tool flip the tube. Postion tube in the small squares. See my tag for placement. Make the small squares layer active. Alpha to selection. make the tube layer active and Invert. Press delete. Select none. Change the mode to screen. -Open up tube again. Postion in the middle of the tag. Add drop shadow of 2, 2, 2, black, 50. -Select your text tool. Using the velvenda cooler font, foreground color set to black and size at 110 type Wild. Using the rotate tool rotate by 90. Alpha to selection. Add new layer below the text layer. Select>Grow by 2. Fill with bbdf0c. Select none. Add the same noise as before. Repeat drop shadow. -Using the VTC-Nuetattooscript font, foreground set to e73f5f and the size set to 75 type One. Repeat noise. Alpha to selection. Add new layer below. Grow by 2. Fill with black. Select none and repeat drop shadow. Elements Add drop shadow of 2, 2, 2, black, 50 to all elements. See my tag for placement. -chained heart scale 50% -flame scale 75% -wire doodle no scale -skull charm no scale -light ray scale 75% duplicate no drop shadow using flip tool press ctrl on keyboard & click canvas -flower 3 no scale -heart brad 2 scale 50% -heart brad 1 scale 40% -heart brad 3 scale 30% -sparkles scale 75% no drop shadow -Open paper 9. Move to bottom in the layer box. Apply mask. If you need help applying the mask go HERE. -Add your name with the PR8 Charade font. Add proper copyright and crop. All finished!!
Labels
Chit Chat
Blog Archive
-
▼
2011
(337)
-
▼
January
(24)
- Mardi Gras Templates
- New PTU tut "My Gorjuss Valentine"
- FTU tut- Martini
- New PTU tut "Sweet Temptation"
- OMG!!!! I just had to share!!!!
- PTU Tut- XOXO
- New PTU tut "Love is Toxic"
- Some more templates!
- Tag Show Off
- New PTU tut "Je T'aime Paris"
- New PTU tut- Wild One
- WOOT, we got an AWARD!!!!!!!!!
- New Templates!
- PTU tut- Cupcake Dreams
- Divalicious
- New PTU tut "She's a Diva"
- New PTU tut "Gothic Love"
- New PTU tut "Gorjuss Gift"
- FTU tut- Intoxicating
- New PTU tut- Purple Fairy
- New FTU tut "Pour me a Double"
- Valentine Temps!
- New PTU tut "Crazy Girl"
- New PTU tut "Winter Heat"
-
▼
January
(24)


0 comments:
Post a Comment