Gimptastic Scraps Available Exclusively @

Gimptastic Scraps CT


Blog Trains

CU Licenses


 This tutorial is of my own creation and any resemblance to any other tuts is purely coincidental. This tutorial is for personal use only, using it for monetary gain is against our TOU's.
Supplies:
Gimp- Any version should work
Beautiful PTU kit from Addcitive Pleasures called Cinderella HERE
I am using the work of ELias Chatzoudis. You must have a license to use his tubes. You can purchase them HERE
Template # 50 by me HERE
WSL_Mask353 from weescotlass HERE
Font- Champignon Medium
Let's get started!
-Open the template. Delete the credits. Go to Image>Scale Image by 500x301 pixels. Image>Canvas Size of 600x600 pixels. Make sure to click center.
-Let's add some papers to the template layers. Make the template layer acvtie (see below). Right click the template layer in the layer box and choose alpha to selection. Open paper (see below). Right click paper layer in layer box and choose add alpha channel.
Layer>Scale Layer by 60%. Select>Invert. Press delete on your keyboard. Select>None.
square 3- paper 6
square 2- paper 11
square 1- paper 5
circle 3- paper 3-Filters>Light & Shadow>Drop Shadow of 2, 2, 15, black, 50
circle 1- paper 2-Filters>Repeat Drop Shadow
circle 2- paper 7- repeat drop shadow
-Make the frame 1 layer active. Firlter>Noise>RGB Noise on the default settings. Repeat noise on frame 2. Add drop shadow of 2, 2, 2, black, 25 to both frame layers.
-Open tube. Layer>Duplicate Layer. Select your flip tool. Click the canvas to flip the duplicate tube. Move the duplicate tube under the frame 2 layer in the layer box. Make paper below tube active (paper 11). Alpha to selection. Make duplicate tube active. Invert and delete.
Select none. Change the mode to value and lower the opacity to 60. Do the same to the other tube on the oppisite frame.
-Open tube again. Move layer underneath dreams back layer in the layer box. Filp. Repeat drop shadow. Duplicate tube. Filters>Blur>Gaussian Blur on default settings. Change the mode to multiply and lower the opacity to 50.
-Repeat drop shadows to word art back layers. Repeat noise on the word art layers.
Elements
Add drop shadow of 2, 2, 2, black, 25 to all element layers. See my tag for placement.
castle- scale 65%- Right click layer in layer box & choose layer to image size-duplicate-flip duplicate-Layer>Merge Layer
diamonds- no scale
glass slipper- scale 50% NO drop shadow-layer to image size-dulpicate-flip
pillow- scale 50%
pillow 2- scale 50%
hearts- no scale
decor- scale 50%
butterfly- scale 50%
bow 4- scale 65%
scroll- no scale
sparkles- scale 75% NO drop shadow
-Open paper 3. Move to bottom layer in the layer box. Apply mask.
-Add your name, prpoer copyright and crop.
You're finished!
This tutorial is of my own creation and any resemblance to any other tuts is purely coincidental. This tutorial is for personal use only, using it for monetary gain is against our TOU's.
Supplies:
Gimp- Any version should work
Beautiful PTU kit from Addcitive Pleasures called Cinderella HERE
I am using the work of ELias Chatzoudis. You must have a license to use his tubes. You can purchase them HERE
Template # 50 by me HERE
WSL_Mask353 from weescotlass HERE
Font- Champignon Medium
Let's get started!
-Open the template. Delete the credits. Go to Image>Scale Image by 500x301 pixels. Image>Canvas Size of 600x600 pixels. Make sure to click center.
-Let's add some papers to the template layers. Make the template layer acvtie (see below). Right click the template layer in the layer box and choose alpha to selection. Open paper (see below). Right click paper layer in layer box and choose add alpha channel.
Layer>Scale Layer by 60%. Select>Invert. Press delete on your keyboard. Select>None.
square 3- paper 6
square 2- paper 11
square 1- paper 5
circle 3- paper 3-Filters>Light & Shadow>Drop Shadow of 2, 2, 15, black, 50
circle 1- paper 2-Filters>Repeat Drop Shadow
circle 2- paper 7- repeat drop shadow
-Make the frame 1 layer active. Firlter>Noise>RGB Noise on the default settings. Repeat noise on frame 2. Add drop shadow of 2, 2, 2, black, 25 to both frame layers.
-Open tube. Layer>Duplicate Layer. Select your flip tool. Click the canvas to flip the duplicate tube. Move the duplicate tube under the frame 2 layer in the layer box. Make paper below tube active (paper 11). Alpha to selection. Make duplicate tube active. Invert and delete.
Select none. Change the mode to value and lower the opacity to 60. Do the same to the other tube on the oppisite frame.
-Open tube again. Move layer underneath dreams back layer in the layer box. Filp. Repeat drop shadow. Duplicate tube. Filters>Blur>Gaussian Blur on default settings. Change the mode to multiply and lower the opacity to 50.
-Repeat drop shadows to word art back layers. Repeat noise on the word art layers.
Elements
Add drop shadow of 2, 2, 2, black, 25 to all element layers. See my tag for placement.
castle- scale 65%- Right click layer in layer box & choose layer to image size-duplicate-flip duplicate-Layer>Merge Layer
diamonds- no scale
glass slipper- scale 50% NO drop shadow-layer to image size-dulpicate-flip
pillow- scale 50%
pillow 2- scale 50%
hearts- no scale
decor- scale 50%
butterfly- scale 50%
bow 4- scale 65%
scroll- no scale
sparkles- scale 75% NO drop shadow
-Open paper 3. Move to bottom layer in the layer box. Apply mask.
-Add your name, prpoer copyright and crop.
You're finished!

You can download them HERE
 This tutorial is of my own creation and any resemblance to any other tuts is purely coincidental. This tutorial is for personal use only, using it for monetary gain is against our TOU's.
Supplies Needed:
~Gimp (any version will do).
~Cute Lil Emo PTU scrapkit by Rieka Rafita which you can get HERE.
~Tubes of choice. I used the art of Celine, you must have a license to use this art which you can get HERE.
~Template of choice. I used Sarah's Emolicious template which you can get from Sarah's Tags N Things HERE.
~Mask of choice. I used WSL mask 302 which you can get HERE.
~Font of choice. I used Sick Capitol Vice.
Let's get started!!!
1. Open a new layer ( I prefer a large canvas, so I make mine 1050x656). Make your canvas transparent (Layer > Transparency > Color to Alpha).
2. Open template in PSD format, move layers of template around until they are the way you like them.
~Add paper from scrapkit to individual layers of the template (Right click on template layer in layer box > Alpha to Selection > CTRL I > Select paper layer in layer box > Delete).
These are the papers I used:
Paper 1
Paper 11
Paper 15
~I added noise to some of the template layers to make them look glittery (Filters > Noise > RGB Noise).
~I colorized some of the template layers to better match the scrapkit (Colors > Colorize > play with the setting until you get the desired color).
~Add drop shadow to template layers (Filters > Light & Shadow > Drop Shadow).
3. Open tubes, I used a full body and a close-up. I changed the mode on the close-up to Dodge (at the top of the layer box you will see a box marked Mode. Click on the arrow and pick Dodge from the drop down menu. See the image below). Add drop shadow to full body tube.
4. Open and place the following elements:
Sparkle 1
Flame
Skull 3
Skull 4
Flower 3
Star
HeartWing
Shoes
Belt
~Some of the elements may need to be sized down. Using your scale tool in your tool box adjust the pixel size until element is the correct size~
~Add drop shadow to all elements~
5. Open Paper 14
6. Open mask
7. Add mask to paper
8. Merge Layers (Image > Merge Visible Layers).
9. Crop Image (Image > Autocrop Image).
10. Scale image to desired size (Image > Scale Image).
11. Add copyright info and name
12. Save as .png
ALL DONE!!!!!!!!!!
This tutorial is of my own creation and any resemblance to any other tuts is purely coincidental. This tutorial is for personal use only, using it for monetary gain is against our TOU's.
Supplies Needed:
~Gimp (any version will do).
~Cute Lil Emo PTU scrapkit by Rieka Rafita which you can get HERE.
~Tubes of choice. I used the art of Celine, you must have a license to use this art which you can get HERE.
~Template of choice. I used Sarah's Emolicious template which you can get from Sarah's Tags N Things HERE.
~Mask of choice. I used WSL mask 302 which you can get HERE.
~Font of choice. I used Sick Capitol Vice.
Let's get started!!!
1. Open a new layer ( I prefer a large canvas, so I make mine 1050x656). Make your canvas transparent (Layer > Transparency > Color to Alpha).
2. Open template in PSD format, move layers of template around until they are the way you like them.
~Add paper from scrapkit to individual layers of the template (Right click on template layer in layer box > Alpha to Selection > CTRL I > Select paper layer in layer box > Delete).
These are the papers I used:
Paper 1
Paper 11
Paper 15
~I added noise to some of the template layers to make them look glittery (Filters > Noise > RGB Noise).
~I colorized some of the template layers to better match the scrapkit (Colors > Colorize > play with the setting until you get the desired color).
~Add drop shadow to template layers (Filters > Light & Shadow > Drop Shadow).
3. Open tubes, I used a full body and a close-up. I changed the mode on the close-up to Dodge (at the top of the layer box you will see a box marked Mode. Click on the arrow and pick Dodge from the drop down menu. See the image below). Add drop shadow to full body tube.
4. Open and place the following elements:
Sparkle 1
Flame
Skull 3
Skull 4
Flower 3
Star
HeartWing
Shoes
Belt
~Some of the elements may need to be sized down. Using your scale tool in your tool box adjust the pixel size until element is the correct size~
~Add drop shadow to all elements~
5. Open Paper 14
6. Open mask
7. Add mask to paper
8. Merge Layers (Image > Merge Visible Layers).
9. Crop Image (Image > Autocrop Image).
10. Scale image to desired size (Image > Scale Image).
11. Add copyright info and name
12. Save as .png
ALL DONE!!!!!!!!!!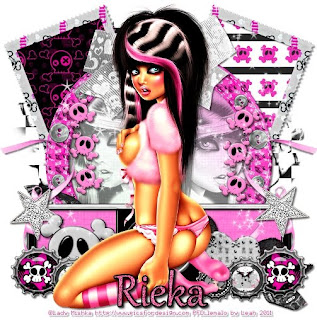
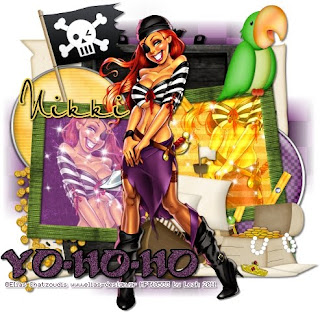
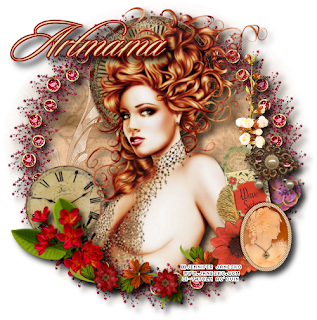
This tutorial is of my own creation and any resemblance to any other tuts is purely coincidental. This tutorial is for personal use only, using it for monetary gain is against our TOU's. Supplies: Gimp-Any version should work I used an adorable PTU kit from Creative Intentionz called 'A Pirates Life'. Check out her blog HERE to see the stores she sells in. I used the art of Elias Chatzoudis. You must have a license to use his tubes. You may purchase them HERE Vix_Mask10 HERE Fonts- BlackBeard & petraScriptEF Let's get started!! -File>New and open a canvas with the size of 500x500 pixels. -Open frame 1. Layer>Scale Layer by 75%. Using the magic wand, click inside the 1st frame. Select>Grow by 5. Open paper 2. Right click paper layer in the layer box and choose add alpha channel. Scale by 50%. Select>Invert. Press delete on your keyboard. Select>None. Do the same for the 2nd frame, but use paper 4. On the frame layer go to Filters>Light & Shadow>Drop Shadow of 2, 2, 2, black, 50. -Open tube. Move her below frame layer. Layer>Duplcate Layer. Place one tube in each frame. I used the flip tool to flip the tube in the 1st frame. Make the purple paper avtive. Using the magic wand, click outside of the paper. Make the tube on top of the purple paper active. Press delete. Select none. Change the mode of this tube to screen. Repeat above with the other tube. Change this tubes mode to grain merge. \-Open tube again. Scale by 90%. Place in the center of the tag. Filters>Repeat Drop Shaodw. Duplicate the tube. On the duplicate layer go to Filters>Blur>Gaussian Blur on the default settings. Change the mode to soft light. Elements Add a drop shadow of 2, 2, 2, black, 50 to all element layers. See my tag for placement. brad 2- no scale brad 4- no scale map- scale 85% treasure chest- no scale parrot- scale 50% coins- scale 45% sparkles- no scale & no drop shadow I erased the parts of the sparkle sticking outside of the frame treasure- scale 40% ship- scale 40% -Open paper 8. Apply mask. If you don't know how to use masks click HERE. -Now we will add the words. using the BlackBeard font, size set at 60 and your foreground color 5e3455, type ' yo-ho-ho '. Go to Filters>RGB Noise on the default settings. Right click the word layer in the layer box and choose alpha to selection. Grow by 2. Add a new layer below this layer. Using the bucket tool and your foreground color set to black, fill the selection. Select none. Repeat drop shadow. -Add your name with the PetraScriptEF font. -Add proper copyright and crop. All finished! I hope you enjoyed my tutorial!
 This tutorial is of my own creation and any resemblance to any other tuts is purely coincidental. This tutorial is for personal use only, using it for monetary gain is against our TOU's.
Supplies Needed:
~Gimp (any version will do).
~Kitty PTU scrapkit which you can get from Addictive Pleasures HERE.
~Tube of choice. I used the art of Elias Chatzoudis, you must have a license to use this art which you can now get HERE.
~Template of choice. I used Template 37 by Leah which you can get on our blog HERE.
~Font of choice. I used Velvenda Heavy.
Let's get started!!!
1. Open a new layer ( I prefer a large canvas, so I make mine 1050x656). Make your canvas transparent (Layer > Transparency > Color to Alpha).
2. Open template in PSD format, move layers of template around until they are the way you like them.
~Add paper from scrapkit to individual layers of the template (Right click on template layer in layer box > Alpha to Selection > CTRL I > Select paper layer in layer box > Delete).
These are the papers I used:
Paper 1
Paper 2
Paper 3
Paper 11
~I added noise to some of the template layers to make them look glittery (Filters > Noise > RGB Noise).
~I colorized some of the template layers to better match the scrapkit (Colors > Colorize > play with the setting until you get the desired color).
~Add drop shadow to template layers (Filters > Light & Shadow > Drop Shadow).
3. Open tube, add drop shadow.
4. Open and place the following elements:
Glitter
Circles
PawPrints
Splat
Handcuffs
Ribbon 4
Heart Charm
Bow 4
Bowl
Milk
Fluffy Heart
Whip
Butterfly 2
Slipper
Collar
~Some of the elements may need to be sized down. Using your scale tool in your tool box adjust the pixel size until element is the correct size~
~Add drop shadow to all elements~
5. Merge Layers (Image > Merge Visible Layers).
6. Crop Image (Image > Autocrop Image).
7. Scale image to desired size (Image > Scale Image).
8. Add copyright info and name
9. Save as .png
ALL DONE!!!!!!!!!!
This tutorial is of my own creation and any resemblance to any other tuts is purely coincidental. This tutorial is for personal use only, using it for monetary gain is against our TOU's.
Supplies Needed:
~Gimp (any version will do).
~Kitty PTU scrapkit which you can get from Addictive Pleasures HERE.
~Tube of choice. I used the art of Elias Chatzoudis, you must have a license to use this art which you can now get HERE.
~Template of choice. I used Template 37 by Leah which you can get on our blog HERE.
~Font of choice. I used Velvenda Heavy.
Let's get started!!!
1. Open a new layer ( I prefer a large canvas, so I make mine 1050x656). Make your canvas transparent (Layer > Transparency > Color to Alpha).
2. Open template in PSD format, move layers of template around until they are the way you like them.
~Add paper from scrapkit to individual layers of the template (Right click on template layer in layer box > Alpha to Selection > CTRL I > Select paper layer in layer box > Delete).
These are the papers I used:
Paper 1
Paper 2
Paper 3
Paper 11
~I added noise to some of the template layers to make them look glittery (Filters > Noise > RGB Noise).
~I colorized some of the template layers to better match the scrapkit (Colors > Colorize > play with the setting until you get the desired color).
~Add drop shadow to template layers (Filters > Light & Shadow > Drop Shadow).
3. Open tube, add drop shadow.
4. Open and place the following elements:
Glitter
Circles
PawPrints
Splat
Handcuffs
Ribbon 4
Heart Charm
Bow 4
Bowl
Milk
Fluffy Heart
Whip
Butterfly 2
Slipper
Collar
~Some of the elements may need to be sized down. Using your scale tool in your tool box adjust the pixel size until element is the correct size~
~Add drop shadow to all elements~
5. Merge Layers (Image > Merge Visible Layers).
6. Crop Image (Image > Autocrop Image).
7. Scale image to desired size (Image > Scale Image).
8. Add copyright info and name
9. Save as .png
ALL DONE!!!!!!!!!!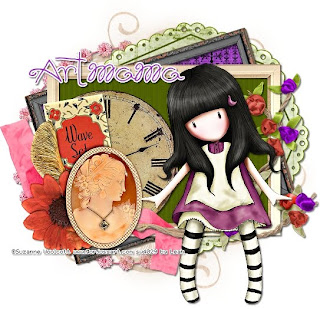
This tutorial is of my own creation and any resemblance to any other tuts is purely coincidental. This tutorial is for personal use only, using it for monetary gain is against our TOU's. Supplies Gimp- Any version should work Lovely PTU kit from Artmama called 'Yester Year'. Stop by her blog to see what stores she sells in HERE Tube of choice. I am using the fabulous work of Suzanne Woolcott. You must have a license to use her tubes. You can purchase them HERE Mask- WSL_Mask327 from weescotlass HERE Font- Schnookums Let's begin! -Go to File>New and open a canvas with the size of 600x600 pixels. -Open embellie 02. Go to Layer>Scale Layer by 65%. Using the magic wand click inside the frame. Select>Grow by 5. Open paper 7 and move layer below frame layer in layer box. Right click paper layer in the layer box and choose add alpha channel. Scale paper by 50%. Select>Invert. Press delete on your keyboard. Select>None. Make the frame layer active again. Go to filters>Light & Shadow>Drop Shadow of 2, 2, 2, black, 50. -Open tube. Move her to the right of the tag. Go to Filters>Repeat Drop Shadow. Next go to Layer>Duplicate Layer. On the duplicate tube layer go to FIlters>Blur>Gaussian Blur on the default settings. Change the mode to soft light. -Open embellie 07. Move this layer to the bottom. Scale by 60%. Select the rotate tool. Click the canvas. In the angle box put -17.44. Select your magic wand tool. Click inside the frame and grow by 5. Open paper 3 and move layer below frame. Add alpha channel. Scale by 60%. Invert and delete. Select none. Repeat drop shadow on frame layer. Elements Add a drop shadow of 2, 2, 2, black, 50 to each element layer. See my tag for placement. 01- no scale 49- scale 50% 14- no scale 11- scale 70% 20- scale 70% 47- scale 60% -Open paper 11. Apply mask. If you don't know how to use masks click HERE. Once you have the mask applied, scale by 85% and lower the opacity to 50. -Add your name, proper copyright and crop.
This tutorial is of my own creation and any resemblance to any other tuts is purely coincidental. This tutorial is for personal use only, using it for monetary gain is against our TOU's. Supplies Needed: ~Gimp (any version will do). ~Tube of choice. I used the artwork of Jennifer Janesko, you must have a license to use this art which you can now get HERE. ~Yester Year PTU scrapkit by Artmama Made. Please stop by her blog HERE to see what stores she sells in. ~Mask of choice. I used Monti's Circle Mask which you can get HERE. ~Font of choice. I used Sloop Script Three. Let's get started!!!!! 1. Open a new layer ( I prefer a large canvas, so I make mine 1050x656). Make your canvas transparent (Layer > Transparency > Color to alpha). 2. Open embellie 25 (frame), add drop shadow (Filters > Light & Shadow > Drop Shadow). 3. Open tube, add drop shadow. 4. Open and place the following elements: embellie 33 embellie 53 embellie 15 embellie 11 embellie 59 embellie 45 embellie 16 embellie 39 embellie 37 x2 embellie 1 embellie 10 ~Some elements may need to be sized down. Using the Scale Tool in your tool box adjust pixels to desired size~ ~Add drop shadow to all elements~ 5. Open Paper 5. 6. Open mask. 7. Add mask to paper (click HERE for a tut on using masks) 8. Merge layers (Image > Merge Visible Layer). 9. Crop image (Image > Autocrop Image). 10. Scale image to desired size (Image > Scale Image). 11. Add copyright info and name. 12. Save as .png You are finished :)
 This tutorial is of my own creation and any resemblance to any other tuts is purely coincidental. This tutorial is for personal use only, using it for monetary gain is against our TOU's.
Supplies:
Gimp- Any version should work
Ptu kit from Addictive Pleasures called 'Midnight Poison' HERE
Tube of choice. I am using the work of Keith Garvey. This tube was bought through MPT (which he no longer sells at). You may purchase his tubes at PTE HERE
Template 394 from Divine Intentionz HERE
WSL_Mask302 from weescotslass HERE
Font- Petra ScriptEF
Shall we get started?
-Open template. Delete the credits layer. go to Image>Scale Image by 500x391 pixels. Now go to Image>Canvas Size of 600x600 pixels. make sure to press center.
-Let's add papers to the template layers. Do the following for the layers/papers listed below.
Right click template layer in the layer box. Choose alpha to selection
Open paper
Right click paper layer in layer box and choose add alpha channel
Go to Layer>Scale Layer by 60%
Select>Invert
Press delete on your keyboard
Select>None
1. Raster 18- Paper 4 Go to Filters>Light & Shadow>Drop Shadow of 2, 2, 15, black, 100
2. Raster 8- Paper 3 Filters>Repeat drop shadow
3. Copy of raster 15- Paper 5 repeat drop shadow
4. Raster 20- Paper 8
5. Raster 19- Paper 12 repeat drop shadow
6. Rater 14- Paper 9 repeat drop shadow
-Make raster 23 active. Repeat drop shaodw.
-Open frame 2. Move to top layer in the layer box. Place in the middle of tag. (see mine) Scale by 65%. Using the magic wand tool, click inside the frame. Go to Select>Grow by 4. Open paper 11. Move layer below frame layer. Add alpha channel.
Scale by 50%. Invert and delete. Select none. Make the frame layer active and add a drop shadow of 2, 2, 2, black, 50.
-Open tube. Move to top layer. Scale by 90%. Move a little to the right. (see mine) Go to Layer>Duplicate Layer. On duplicate tube layer go to Filters>Blur>Gaussian Blur of 3. Change the mode to soft light. Repeat drop shadow on the bottom tube layer.
Elements
Add drop shadow of 2, 2, 2, black, 50 to all element layers. See my tag for placement.
doodle- scale 75%
flowers- scale 60%
flowers 2- scale 60%
bottle 2- scale 505
bottle 3- scale 50%
lace- scale 60% NO drop shadow flip using the flip tool
rose 3- no scale
spiderweb- scale 65% I erased part of the top
-Open paper 10. Apply mask to it. If you don't know how to use masks click HERE.
-Add your name, proper copyright and crop.
All finished!
This tutorial is of my own creation and any resemblance to any other tuts is purely coincidental. This tutorial is for personal use only, using it for monetary gain is against our TOU's.
Supplies:
Gimp- Any version should work
Ptu kit from Addictive Pleasures called 'Midnight Poison' HERE
Tube of choice. I am using the work of Keith Garvey. This tube was bought through MPT (which he no longer sells at). You may purchase his tubes at PTE HERE
Template 394 from Divine Intentionz HERE
WSL_Mask302 from weescotslass HERE
Font- Petra ScriptEF
Shall we get started?
-Open template. Delete the credits layer. go to Image>Scale Image by 500x391 pixels. Now go to Image>Canvas Size of 600x600 pixels. make sure to press center.
-Let's add papers to the template layers. Do the following for the layers/papers listed below.
Right click template layer in the layer box. Choose alpha to selection
Open paper
Right click paper layer in layer box and choose add alpha channel
Go to Layer>Scale Layer by 60%
Select>Invert
Press delete on your keyboard
Select>None
1. Raster 18- Paper 4 Go to Filters>Light & Shadow>Drop Shadow of 2, 2, 15, black, 100
2. Raster 8- Paper 3 Filters>Repeat drop shadow
3. Copy of raster 15- Paper 5 repeat drop shadow
4. Raster 20- Paper 8
5. Raster 19- Paper 12 repeat drop shadow
6. Rater 14- Paper 9 repeat drop shadow
-Make raster 23 active. Repeat drop shaodw.
-Open frame 2. Move to top layer in the layer box. Place in the middle of tag. (see mine) Scale by 65%. Using the magic wand tool, click inside the frame. Go to Select>Grow by 4. Open paper 11. Move layer below frame layer. Add alpha channel.
Scale by 50%. Invert and delete. Select none. Make the frame layer active and add a drop shadow of 2, 2, 2, black, 50.
-Open tube. Move to top layer. Scale by 90%. Move a little to the right. (see mine) Go to Layer>Duplicate Layer. On duplicate tube layer go to Filters>Blur>Gaussian Blur of 3. Change the mode to soft light. Repeat drop shadow on the bottom tube layer.
Elements
Add drop shadow of 2, 2, 2, black, 50 to all element layers. See my tag for placement.
doodle- scale 75%
flowers- scale 60%
flowers 2- scale 60%
bottle 2- scale 505
bottle 3- scale 50%
lace- scale 60% NO drop shadow flip using the flip tool
rose 3- no scale
spiderweb- scale 65% I erased part of the top
-Open paper 10. Apply mask to it. If you don't know how to use masks click HERE.
-Add your name, proper copyright and crop.
All finished!
 You can get them HERE
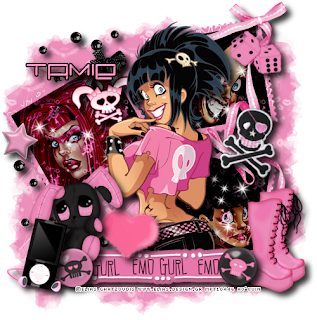
This tutorial is of my own creation and any resemblance to any other tuts is purely coincidental. This tutorial is for personal use only, using it for monetary gain is against our TOU's. Supplies Needed: ~Gimp (any version will do). ~Tubes of choice. I used the art of Elias Chatzoudis. You must have a license to use this art which you can now get HERE. ~Emo Gurl PTU scrapkit which you can get from Addictive Pleasures HERE. ~Mask of choice. I used WSL mask 323 which you can get HERE. ~Font of choice. I used Trancemission Medium. Let's get started!!!!! 1. Open a new layer ( I prefer a large canvas, so I make mine 1050x656). Make your canvas transparent (Layer > Transparency > Color to alpha). 2. Open Frame 3, add drop shadow (Filters > Light & Shadow > Drop Shadow). 3. Open Paper 11 center it behind the frame , remove excess paper a cutting tool or eraser from your tool box. 4. Open tubes, I used 3 close-ups and a full body tube. I changed the mode on the close-ups to Hard Light (at the top of the layer box you will see a box marked Mode. Click on the arrow and pick Hard Light from the drop down menu. See the image below). Add drop shadow to the full body tube. 5. Open and place the following elements: Dice Ribbon Bow 5 Skull 3 Skull 4 Star 2 Decor Fluffy Heart Bunny Button Button 2 Boots MP4 Shiny Sprinkle Sparkles ~Some of the elements may need to be sized down. Using your scale tool in your tool box adjust the pixel size until element is the correct size~ ~Add drop shadow to all elements~ 6. Open Paper 3. 7. Open mask. 8. Add mask to paper (click HERE for a tut on using masks) 9. Merge layers (Image > Merge Visible Layer). 10. Autocrop image (Image > Autocrop Image). 11. Scale image to desired size (Image > Scale Image). 12. Add copyright info and name. 13. Save as .png You are finished :)

 Get them HERE


 This tutorial is of my own creation and any resemblance to any other tuts is purely coincidental. This tutorial is for personal use only, using it for monetary gain is against our TOU's.
Supplies Needed:
~Gimp (any version will do).
~My Bloody Valentine PTU scrapkit which you can get from Addictive Pleasures HERE.
~Tube of choice. I used the art of Bam Bam, you must have a license to use this art which you can get HERE.
~Template of choice. I used Template 97 which you can get at Rose's Templates & More HERE.
~Font of choice. I used Soft Hits.
Let's get started!!!
1. Open a new layer ( I prefer a large canvas, so I make mine 1050x656). Make your canvas transparent (Layer > Transparency > Color to Alpha).
2. Open template in PSD format, move layers of template around until they are the way you like them.
~Add paper from scrapkit to individual layers of the template (Right click on template layer in layer box > Alpha to Selection > CTRL I > Select paper layer in layer box > Delete).
These are the papers I used:
Paper 2
Paper 9
Paper 10
~I added noise to some of the template layers to make them look glittery (Filters > Noise > RGB Noise).
~I colorized some of the template layers to better match the scrapkit (Colors > Colorize > play with the setting until you get the desired color).
~Add drop shadow to template layers (Filters > Light & Shadow > Drop Shadow).
3. Open tube, add drop shadow.
4. Open and place the following elements:
Netting
Blood
Blood Curtain
Labels
Chain
Bear
Bouquet
Polaroids
Razorblade
Cleaver
Handcuffs
Handprint
Wire 2
Rose 2
~Some of the elements may need to be sized down. Using your scale tool in your tool box adjust the pixel size until element is the correct size~
~Add drop shadow to all elements~
5. Merge Layers (Image > Merge Visible Layers).
6. Crop Image (Image > Autocrop Image).
7. Scale image to desired size (Image > Scale Image).
8. Add copyright info and name
9. Save as .png
ALL DONE!!!!!!!!!!
This tutorial is of my own creation and any resemblance to any other tuts is purely coincidental. This tutorial is for personal use only, using it for monetary gain is against our TOU's.
Supplies Needed:
~Gimp (any version will do).
~My Bloody Valentine PTU scrapkit which you can get from Addictive Pleasures HERE.
~Tube of choice. I used the art of Bam Bam, you must have a license to use this art which you can get HERE.
~Template of choice. I used Template 97 which you can get at Rose's Templates & More HERE.
~Font of choice. I used Soft Hits.
Let's get started!!!
1. Open a new layer ( I prefer a large canvas, so I make mine 1050x656). Make your canvas transparent (Layer > Transparency > Color to Alpha).
2. Open template in PSD format, move layers of template around until they are the way you like them.
~Add paper from scrapkit to individual layers of the template (Right click on template layer in layer box > Alpha to Selection > CTRL I > Select paper layer in layer box > Delete).
These are the papers I used:
Paper 2
Paper 9
Paper 10
~I added noise to some of the template layers to make them look glittery (Filters > Noise > RGB Noise).
~I colorized some of the template layers to better match the scrapkit (Colors > Colorize > play with the setting until you get the desired color).
~Add drop shadow to template layers (Filters > Light & Shadow > Drop Shadow).
3. Open tube, add drop shadow.
4. Open and place the following elements:
Netting
Blood
Blood Curtain
Labels
Chain
Bear
Bouquet
Polaroids
Razorblade
Cleaver
Handcuffs
Handprint
Wire 2
Rose 2
~Some of the elements may need to be sized down. Using your scale tool in your tool box adjust the pixel size until element is the correct size~
~Add drop shadow to all elements~
5. Merge Layers (Image > Merge Visible Layers).
6. Crop Image (Image > Autocrop Image).
7. Scale image to desired size (Image > Scale Image).
8. Add copyright info and name
9. Save as .png
ALL DONE!!!!!!!!!!Snag Our Blinkies


Don't Be A Pirate!

