Gimptastic Scraps Available Exclusively @

Gimptastic Scraps CT


Blog Trains

CU Licenses


Showing posts with label Basic tuts. Show all posts
Showing posts with label Basic tuts. Show all posts
Wednesday, April 24, 2013
We would really love to do some more animated tutorials, but to tell you the truth, it is a pain in the butt! Hopefully this tut will allow us to have more animated tuts on our blog.
I suggest heading over to Scrappy Bit Of Fun for your animations, because you are unable to use MNG files in gimp and she has both MNG and PSD files.
Supplies:
Gimp
Animation SimoneAni396-fairydust (we will be using the PSD file) from Scrappy Bit Of Fun
I am going to be using my tag Bubble Pop for this tutorial. You can find the tut for this tag HERE
Once you have finished your tag, you are ready for animation. DO NOT merge your layers together.
You need to decide which layer you want the animation to be under. I am going to place it just under the main tube layer. So, pick the layer your want to put your animation under. Now you need to merge that layer with all the layers above it. I have 3 layers above my main tube layer. So I will merge 4 layers together. Once I have merged these layers I like to rename the layer TOP so I don't get as confused.

Next, make the merged layer invisible (click on the eye next to it in the layer box). Make one of the visible layers active and right click that layer with your mouse. Choose Merge Visible Layers. Name this layer BOTTOM. You should have only 2 layers now, TOP & BOTTOM.

You can make the TOP layer visible now.
Make sure your BOTTOM layer is active and go to File> Open As Layers and open your animation. It should open up in between the TOP & BOTTOM layers.
You need to count how many frames the animation you have chose has. The one I am using has 16 frames. Now you need to duplicate your TOP layer 15 times so you have a total of 16. Repeat for the BOTTOM layer. Now I have 48 layers, but your number of layers will depend on the number of frames you have in the animation you picked.
Next you need to arrange the layers in groups of 3. It will go TOP, ANIMATION, BOTTOM. You need to do this with all the frames. Start with the 1st frame of the animation and move it under the first TOP layer. Move the first BOTTOM layer below these 2.

Do this with the rest of the layers. Make sure that you keep the animation frames in the right order.

Now we need to merge the groups of 3 together. Press on the TOP copy of the group and Layer>Merge Down 2 times. This will merge the TOP, ANIMATION & BOTTOM layer together. You need to do this with each group of three. Be careful not to merge ALL the layers together, just in groups of three.
With the animation I chose, I ended up with 16 frames (the amount of frame the original animation had).

Go to Filters>Animation>Playback to see your animation.
TO SAVE:
Go to File>Export. Make sure to save as GIF.

Press Export. You will get another pop up box. Make sure your settings are like mine. You can change the milliseconds if you need to.

Press Export and you're done!!!!
Here is my finished tag:

Monday, October 17, 2011
This tutorial is of my own creation and any resemblance to any other tuts is purely coincidental. This tutorial is for personal use only, using it for monetary gain is against our TOU's.
Using masks in Gimp is a little tricky. Here is a tutorial on how to use them. I am not going to add this to a tag, but if you would like to add a mask to a tag you need to move the layers to the bottom.
Supplies:
Mask 1 from our blog HERE
Here we go!
-Go to File>New and make the canvas size 600x600 pixels. Press okay.
This part won't be needed if you are adding a mask to a tag.
-Add a new layer by clicking the folded paper icon at the bottom of your layer box.
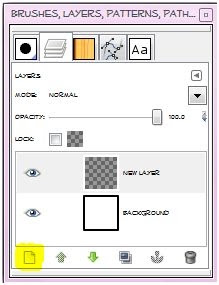
Using your bucket fill tool fill the new
layer with color of choice. I am using black. You can also do this with a paper from a scrap kit if you'd like. To
do that, just open the paper and move the paper layer to the bottom in your layer box and skip adding a new layer and filling it with color.
-Open your mask and make sure it is above the black layer in the layer box. You may get a pop up box like the one below. Just press convert.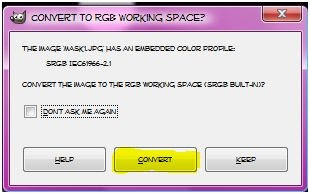
-Make your black layer (or paper layer) active and right click the layer in the layer box. Click add layer mask. Make sure black (full trancparency) is checked. Click add. 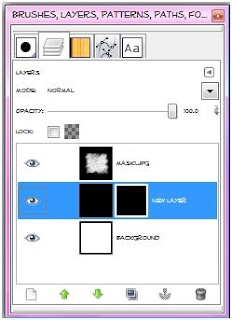
-Make sure there is a white outline on the 2nd box by your black layer in the layer box. If not, just click on it the layer box. 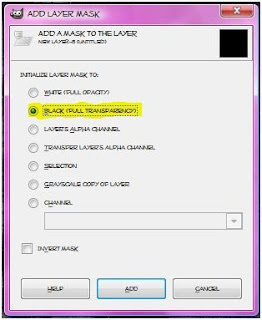
-Make your mask layer active. Go to Edit>Copy. Hide this layer by clicking the little eye next to the layer in the layer box. 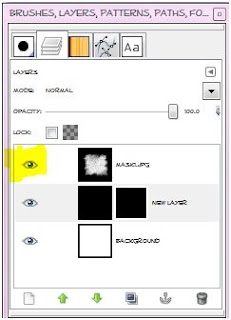
-Make your black layer (or paper layer) active. Go to Edit>Paste. Now you will have a floating section in your layer box. You need to anchor it. To do this click the little anchor icon at the bottom of the layer box. 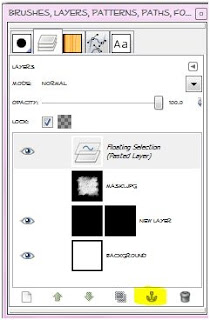
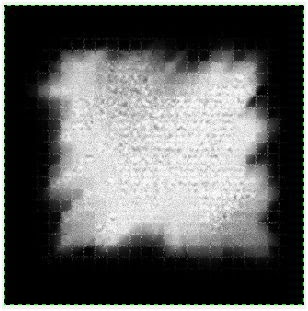
-You can delete the mask layer in the layer box. Now you should just see the mask. 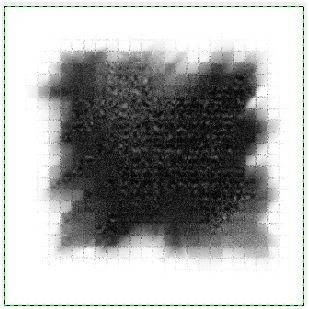
Wednesday, July 20, 2011

Supplies:
Gimp- Any version should work
Font of choice. I am using Gabriola.
-File>New 500x500 pixels.
-Select the path tool.

-Click in the center of your canvas. You should see a circle.

-Next click the right side of your canvas and drag your mouse up. Now your path should look like this:

-Now click the middle circle so it is not solid and just the outline of a circle.

-Now click the left side of the canvas and drag the mouse down.

-Click the middle circle again. This is what your canvas should look like now.

-Select your text tool and type your text. Your path will disapper, but it is still there. I used the font Gabriola, foreground color black and size 23.

-Right click your text layer in the layer box and choose TEXT ALONG PATH.

Your canvas should now look like this:

-Click on the paths tab in your layer box.

-Make sure your top layer in your paths tab is active. Click on the PATH TO SELECTION icon at the box of the layer box.

-Click on your layers tab and add a new layer. Make your current text layer invisible by clicking the eye next to it.

-Select your bucket fill tool. Fill the selection.

-Go to Select>None.
-Now go to the paths tab and delete both the path layers.
Here are my results:

Friday, December 3, 2010
 I am going to show you how to make text 'glitter' using gimp.
Supplies
Gimp- Any version should work
Bold Text- I am using velvenda cooler
Let's do this!
-Go to File>New and open a canvas with the size of 300x300 pixels.
-Type out your name using any color you wish. I am using 52126a. Right click your text layer in your layer box and choose layer to image size. Go to Layers>Duplicate Layer 2 times for a
total of 3 text layers.
-Make your top text layer active. Go to Filters>Noise>RGB Noise. The settings will depend on the color you are using. Just play around with the settings till you get something you like.
Here are the settings I used:
I am going to show you how to make text 'glitter' using gimp.
Supplies
Gimp- Any version should work
Bold Text- I am using velvenda cooler
Let's do this!
-Go to File>New and open a canvas with the size of 300x300 pixels.
-Type out your name using any color you wish. I am using 52126a. Right click your text layer in your layer box and choose layer to image size. Go to Layers>Duplicate Layer 2 times for a
total of 3 text layers.
-Make your top text layer active. Go to Filters>Noise>RGB Noise. The settings will depend on the color you are using. Just play around with the settings till you get something you like.
Here are the settings I used:
-Make your middle text layer active. Go to Filters>Re-Show RGB Noise and use these settings:

-Make your last text layer active. Re-Show RGB Noise using these settings:

-Right click on each layer in the layer box and choose remove alpha channel to add a white background to each layer.
-Go to Filters>Animation>Playback to see the animation. If you are happy with it we need to save it. Be sure NOT to merge.
-Go to File>Save and save as gif.


 -Click save and your done!
Tuesday, October 19, 2010

I will teach you how to use text in Gimp. I will also show you how to make an outline for your text.
Supplies:
Gimp- Any version should work
Font- Designers
Let's get started!
-Open Gimp and go to File>New. Make your canvas 400x400 pixels.
-Select your text tool. It is the big A in your tool box.

-Now we want to pick the color we want our text to be. You need to change your foreground color which is the
top box.

I changed mine to blue. Just click the box to change the color.
-Now we want to choose the text we want to use. You will be able to select your text in your tool options box.

You can also change the size of your text in this same box. I change mine to 100 for this tut. All fonts are different, so you may
need to play with the size a bit till you get it the way you like it.

-Click on your canvas and you will see a little box pop up. Type your text in this box and then click close.

-Right click on your new text layer in the layer box and press leyer to image size.
The next part is going to show how to add an outline to your text
-Right click on your text layer in the layer box and choose alpha to selection. Your text will now be surrounded by
'marching ants'.

-Next you want to add a new layer below the text layer. To do this, click on the little folded paper icon on your layer box.
To move the layer below the text layer, just click on it in the layer box and drag under the text layer.

-Now go to Select>Grow by 3 (or whatever looks best with your font). You will need to change your foreground color again. I just
changed mine to a lighter shade of blue. Using your bucket fill tool, click inside the marching ants.
-Go to Select>None. Now the 'marching ants' will be gone.

-If you'd like you can add a drop shadow. To do that go to Filters>Light and Shadow>Drop Shadow.
I used 2, 2, 2, black, 50.

There you have it! I hope this tut has helped you out:)
Subscribe to:
Posts
(Atom)
Snag Our Blinkies


Don't Be A Pirate!

