Gimptastic Scraps Available Exclusively @

Gimptastic Scraps CT


Blog Trains

CU Licenses


 This tutorial is of my own creation and any resemblance to any other tuts is purely coincidental. This tutorial is for personal use only, using it for monetary gain is against our TOU's.
Supplies Needed:
~Gimp (any version will do).
~Tube of choice. I used the artwork of Suzanne Woolcott. You must have a license to use this art which you can get HERE.
~Love Story PTU scrapkit which you can get from Sweet Cravings Scraps HERE.
~Mask of choice. I used WSL mask 364 which you can get HERE.
~Font of choice. I used Whipper Basic.
Let's get started!!!!!
1. Open a new layer ( I prefer a large canvas, so I make mine 1050x656). Make your canvas transparent (Layer > Transparency > Color to alpha).
2. Open Frame 2, add drop shadow (Filters > Light & Shadow > Drop Shadow).
3. Open Paper 2 center it behind circular portion of the frame, remove excess paper using circular cutting tool or eraser from your Tool Box.
4. Open your tube, add drop shadow.
5. Open and place the following elements:
Hearts in the Wind
Mushroom Patch
Tree
Cute Frog
Cute Red Ant
Cute Butterfly 1
Cute Butterfly 2
Love Dust 2
Leaf
Rose Petal 2
Rose Petal 3
Rose 3
~Some elements may need to be sized down, use the Scale Tool in your tool box to adjust pixel size~
~Add drop shadow to all elements~
6. Open Paper 14.
7. Open mask.
8. Add mask to paper (click HERE for a tut on using masks).
9. Merge layers (Image > Merge Visible Layer).
10. crop image (Image > Autocrop Image).
11. Scale image to desired size (Image > Scale Image).
12. Add copyright info and name.
13. Save as .png
You are finished :)
This tutorial is of my own creation and any resemblance to any other tuts is purely coincidental. This tutorial is for personal use only, using it for monetary gain is against our TOU's.
Supplies Needed:
~Gimp (any version will do).
~Tube of choice. I used the artwork of Suzanne Woolcott. You must have a license to use this art which you can get HERE.
~Love Story PTU scrapkit which you can get from Sweet Cravings Scraps HERE.
~Mask of choice. I used WSL mask 364 which you can get HERE.
~Font of choice. I used Whipper Basic.
Let's get started!!!!!
1. Open a new layer ( I prefer a large canvas, so I make mine 1050x656). Make your canvas transparent (Layer > Transparency > Color to alpha).
2. Open Frame 2, add drop shadow (Filters > Light & Shadow > Drop Shadow).
3. Open Paper 2 center it behind circular portion of the frame, remove excess paper using circular cutting tool or eraser from your Tool Box.
4. Open your tube, add drop shadow.
5. Open and place the following elements:
Hearts in the Wind
Mushroom Patch
Tree
Cute Frog
Cute Red Ant
Cute Butterfly 1
Cute Butterfly 2
Love Dust 2
Leaf
Rose Petal 2
Rose Petal 3
Rose 3
~Some elements may need to be sized down, use the Scale Tool in your tool box to adjust pixel size~
~Add drop shadow to all elements~
6. Open Paper 14.
7. Open mask.
8. Add mask to paper (click HERE for a tut on using masks).
9. Merge layers (Image > Merge Visible Layer).
10. crop image (Image > Autocrop Image).
11. Scale image to desired size (Image > Scale Image).
12. Add copyright info and name.
13. Save as .png
You are finished :) 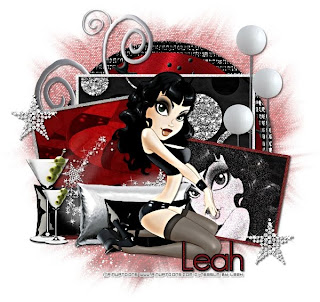
This tutorial is of my own creation and any resemblance to any other tuts is purely coincidental. This tutorial is for personal use only, using it for monetary gain is against our TOU's. Supplies: Gimp- Any version should work FTU scrapkit from Scraps By Jessica called 'Platinum' HERE Tube of choice. I am using Pinuptoons. You must have a license to use them. My license for this one is through CILM, but since they are no longer around you need to purchase them HERE. Template 310 by Divine Intentionz HERE Mask- WSL_Mask241 HERE Font- Maximo Thin Let's get started! -Open template. Delete all the word art layers and credits. Go to Image>Scale Image by 500x427 pixels. Next, go to Image>Canvas Size of 600x600 and be sure to click center. -Now we will be adding papers to the template layers. Do the following to the template layers I name below. Right click template layer in the layer box and choose alpha to selection. Open paper. Right click paper layer in layer box and choose add alpha channel. Layer>Scale Layer by 60%. Select>Invert. Press delete on your keyboard. Select>None. gradient background- paper 2 circle- paper 9 Go to Filters>Light & Shadow>Drop Shadow of 2, 2, 15, black, 100 glittered circle- paper 11 Filters>Repeat drop shadow frame 3 background- paper 6 frame 2 background- paper 13 -Make the frame 3 layer active. Go to Colors>Colorize with these settings: Hue 0 Saturation 0 Lightness -28 Next go to Filters>Noise>RGB Noise on the default settings. Add a drop shadow od 2, 2, 2, black, 50. -Make the frame 2 layer active. Colorize using these settings: Hue 360 Saturation 50 Lightness -66 Repeat noise and drop shdow. -Make frame 1 layer active. Repeat noise and drop shadow. -Make the rectangle 2 layer active. Colorize with these settings: Hue 360 Saturation 50 Lightness -66 -Make the rectangle 1 layer active. Colorize with these settings: Hue 0 Saturation 0 Lightness -70 -Open tube. Move layer to top layer in the layer box. Scale by 70%. Repeat drop shadow. -Open tube again. Go to Layers>Duplicate Layer. Move 1 of the tubes in the black square and the other in the red square. Move the tube layers so they are below the frames of the square they are in. I hope that makes since. See mine if you are confused. Using the flip tool, flip the tube inside of the black square. I'm going to start with the tube in the black square. So make the black square active. Right click and choose alpha to selection. Make the tube layer inside of this square active. Invert and press delete. Select none. Change the mode to value. Add some noise to the tube. Now repeat for the red square and the other tube, but don't add noise to it and change the mode to soft light. Elements Add a drop shadow of 2, 2, 2, black, 50 to all element layers. See my tag for placement. retro lamp- no scale pillow 2- scale 75% pillow 3- scale 75% star bling- scale 35% bling silver star dust- 75% there was a little bit of this element sticking out from under my tube. I didn't like how it looked so I erase it. martini- 45% Duplicate and scale 65% silver swirl- 65% -Open paper 5. Apply mask. If you don't know how to use masks go HERE. Lower the opacity to 50. -Add your name, proper copyright and crop. All finished!
 This tutorial is of my own creation and any resemblance to any other tuts is purely coincidental. This tutorial is for personal use only, using it for monetary gain is against our TOU's.
Supplies Needed:
~Gimp (any version will do).
~Sweet Temptation collab PTU scrapkit by Artmama Made available @ Stargazers Scraps HERE.
~Tubes of choice. I used the art of Elias Chatzoudis, you must have a license to use this art which you can get HERE.
~Template of choice. I used Missy template 142 which you can get at Divine Intentionz HERE.
~Mask of choice. I used MC mask 2 which you can get from Melissaz Creationz HERE.
~Font of choice. I used Segoe Script.
Let's get started!!!
1. Open a new layer ( I prefer a large canvas, so I make mine 1050x656). Make your canvas transparent (Layer > Transparency > Color to Alpha).
2. Open template in PSD format, move layers of template around until they are the way you like them.
~Add paper from scrapkit to individual layers of the template (Right click on template layer in layer box > Alpha to Selection > CTRL I > Select paper layer in layer box > Delete).
These are the papers I used:
Paper 4
Paper 8
Paper 15
~I added noise to some of the template layers to make them look glittery (Filters > Noise > RGB Noise).
~I colorized some of the template layers to better match the scrapkit (Colors > Colorize > play with the setting until you get the desired color).
~Add drop shadow to template layers (Filters > Light & Shadow > Drop Shadow).
3. Open tubes, I used a full body and a close-up. I changed the mode on the close-up to Hard Light (at the top of the layer box you will see a box marked Mode. Click on the arrow and pick Hard Light from the drop down menu. See the image below). Add drop shadow.
4. Open and place the following elements:
embellie 14
embellie 42
embellie 1
embellie 31
embellie 46
embellie 49
embellie 43
embellie 10
embellie 45
~Some of the elements may need to be sized down. Using your scale tool in your tool box adjust the pixel size until element is the correct size~
~Add drop shadow to all elements~
5. Open Paper 5
6. Open mask
7. Add mask to paper (click HERE for a tut on using masks)
8. Merge Layers (Image > Merge Visible Layers).
9. Crop Image (Image > Autocrop Image).
10. Scale image to desired size (Image > Scale Image).
11. Add copyright info and name
12. Save as .png
ALL DONE!!!!!!!!!!
This tutorial is of my own creation and any resemblance to any other tuts is purely coincidental. This tutorial is for personal use only, using it for monetary gain is against our TOU's.
Supplies Needed:
~Gimp (any version will do).
~Sweet Temptation collab PTU scrapkit by Artmama Made available @ Stargazers Scraps HERE.
~Tubes of choice. I used the art of Elias Chatzoudis, you must have a license to use this art which you can get HERE.
~Template of choice. I used Missy template 142 which you can get at Divine Intentionz HERE.
~Mask of choice. I used MC mask 2 which you can get from Melissaz Creationz HERE.
~Font of choice. I used Segoe Script.
Let's get started!!!
1. Open a new layer ( I prefer a large canvas, so I make mine 1050x656). Make your canvas transparent (Layer > Transparency > Color to Alpha).
2. Open template in PSD format, move layers of template around until they are the way you like them.
~Add paper from scrapkit to individual layers of the template (Right click on template layer in layer box > Alpha to Selection > CTRL I > Select paper layer in layer box > Delete).
These are the papers I used:
Paper 4
Paper 8
Paper 15
~I added noise to some of the template layers to make them look glittery (Filters > Noise > RGB Noise).
~I colorized some of the template layers to better match the scrapkit (Colors > Colorize > play with the setting until you get the desired color).
~Add drop shadow to template layers (Filters > Light & Shadow > Drop Shadow).
3. Open tubes, I used a full body and a close-up. I changed the mode on the close-up to Hard Light (at the top of the layer box you will see a box marked Mode. Click on the arrow and pick Hard Light from the drop down menu. See the image below). Add drop shadow.
4. Open and place the following elements:
embellie 14
embellie 42
embellie 1
embellie 31
embellie 46
embellie 49
embellie 43
embellie 10
embellie 45
~Some of the elements may need to be sized down. Using your scale tool in your tool box adjust the pixel size until element is the correct size~
~Add drop shadow to all elements~
5. Open Paper 5
6. Open mask
7. Add mask to paper (click HERE for a tut on using masks)
8. Merge Layers (Image > Merge Visible Layers).
9. Crop Image (Image > Autocrop Image).
10. Scale image to desired size (Image > Scale Image).
11. Add copyright info and name
12. Save as .png
ALL DONE!!!!!!!!!!
 This tutorial is of my own creation and any resemblance to any other tuts is purely coincidental. This tutorial is for personal use only, using it for monetary gain is against our TOU's.
Supplies:
Gimp- Any version should work
Beautiful PTU kit from Artmama called 'Sweet Temptation' HERE. Click HERE to visit Artmama's blog to see all the stores she sells at.
Tube of Choice. I am using the art of Keith garvey. You must have a license to use his work. You can purchase his tubes HERE
Template #197 from Blissfully Beth HERE
Font- Montery BT
Let's get started!
-Open template. Go to Image>Scale Image by 500x286 pixels. Now go to Image>Canvas Size of 600x600 pixels and click center. Delete credits.
-Now we are going to add papers to the template layers. Here is what you will do to each layer I name below. Right click the template layer in the layer box and choose alpha to selection. Open paper. Right click paper layer in the layer box and choose add alpha channel. layer>Scale Layer by 65%. Select>Invert. Press delete on your keybord. Select>None.
Pink Circle- Paper 13
White Rect- Paper 6
Black Bowtie- Paper 8 Go to Filters>Light & Shadow>Drop Shadow 2, 2, 15, black, 100
White Circle- Paper 4
-Make the pink frame layer active. Go to Colors>Colorize:
Hue- 0
Saturation- 0
Lightness- -100
Now go to Filters>Repeat Drop Shadow
-Make the glitter frame active. Go to Filters>Reshow Drop Shadow 2, 2, 2, black, 50.
-Open tube. Scale by 75%. Move to top layer in the layer box. Position in the middle of the tag. Filters>Repeat Drop Shadow. Layer>Duplicate Layer. Filters>Blur>Gaussian Blur on the default settings.
Change the mode to soft light.
Elements
Add a drop shadow of 2, 2, 2, black, 50 to all element layers. See my tag for placement.
10- Scale 35%
12- Scale 75%. Right click in layer box and choose layer to image size. Duplicate. Select your flip tool. Click on canvas to flip. Now press ctrl on your keyboard and click the canvas again using the flip tool.
32- Scale 65%
38- Scale 90%
1- Scale 75%
27- no scale Select the rotate tool. Click on your canvas and a box will pop up. In the angle box put -20
31- No scale layer to image size, dulpicate and flip
-Add your name, proper copy right and crop.
All finished! I hope you enjoyed my tut!
This tutorial is of my own creation and any resemblance to any other tuts is purely coincidental. This tutorial is for personal use only, using it for monetary gain is against our TOU's.
Supplies:
Gimp- Any version should work
Beautiful PTU kit from Artmama called 'Sweet Temptation' HERE. Click HERE to visit Artmama's blog to see all the stores she sells at.
Tube of Choice. I am using the art of Keith garvey. You must have a license to use his work. You can purchase his tubes HERE
Template #197 from Blissfully Beth HERE
Font- Montery BT
Let's get started!
-Open template. Go to Image>Scale Image by 500x286 pixels. Now go to Image>Canvas Size of 600x600 pixels and click center. Delete credits.
-Now we are going to add papers to the template layers. Here is what you will do to each layer I name below. Right click the template layer in the layer box and choose alpha to selection. Open paper. Right click paper layer in the layer box and choose add alpha channel. layer>Scale Layer by 65%. Select>Invert. Press delete on your keybord. Select>None.
Pink Circle- Paper 13
White Rect- Paper 6
Black Bowtie- Paper 8 Go to Filters>Light & Shadow>Drop Shadow 2, 2, 15, black, 100
White Circle- Paper 4
-Make the pink frame layer active. Go to Colors>Colorize:
Hue- 0
Saturation- 0
Lightness- -100
Now go to Filters>Repeat Drop Shadow
-Make the glitter frame active. Go to Filters>Reshow Drop Shadow 2, 2, 2, black, 50.
-Open tube. Scale by 75%. Move to top layer in the layer box. Position in the middle of the tag. Filters>Repeat Drop Shadow. Layer>Duplicate Layer. Filters>Blur>Gaussian Blur on the default settings.
Change the mode to soft light.
Elements
Add a drop shadow of 2, 2, 2, black, 50 to all element layers. See my tag for placement.
10- Scale 35%
12- Scale 75%. Right click in layer box and choose layer to image size. Duplicate. Select your flip tool. Click on canvas to flip. Now press ctrl on your keyboard and click the canvas again using the flip tool.
32- Scale 65%
38- Scale 90%
1- Scale 75%
27- no scale Select the rotate tool. Click on your canvas and a box will pop up. In the angle box put -20
31- No scale layer to image size, dulpicate and flip
-Add your name, proper copy right and crop.
All finished! I hope you enjoyed my tut!
 This tutorial is of my own creation and any resemblance to any other tuts is purely coincidental. This tutorial is for personal use only, using it for monetary gain is against our TOU's.
Supplies Needed:
~Gimp (any version will do).
~Tubes of choice. I used the super hot artwork of Keith Garvey. You must have a license to use his art which you can get HERE.
~Toxic Love PTU scrapkit which you can get from Creative Intentionz HERE.
~Mask of choice. I used WSL mask 302 which you can get HERE.
~Font of choice. I used Satisfaction.
Let's get started!!!!!
1. Open a new layer ( I prefer a large canvas, so I make mine 1050x656). Make your canvas transparent (Layer > Transparency > Color to alpha).
2. Open ScallopedTag 3, tilt the tag slightly using the Rotate Tool in your tool box. Duplicate the tag so that you have 2 of them, flip one of them so that they are a mirror image of each other, you can use the Flip Tool in your tool box for this. Move the tags in to desired position, add drop shadow (Filters > Light & Shadow > Drop Shadow).
3. Open FilmStrip, add drop shadow.
4. Open Paper 8 center it behind the filmstrip, remove excess paper using the rectangular cutting tool in your tool box.
5. Open tubes, I used both a full body and close ups. Open the close ups behind the filmstrip, I lowered the opacity of the close ups to 50 (at the top of the layer box you will see a bar you can slide to change the opacity of the selected layer). Add drop shadow to the full body tube.
6. Open and place the following elements:
Flame2 (x2)
Sparkles
ToxicBrad2
WireHeart
LoveWord
ZippedHeart (x2)
BowRibbon1 (x2)
~Some of the elements may need to be sized down. Using your scale tool in your tool box adjust the pixel size until element is the correct size~
~Add drop shadow to all elements~
7. Open Paper 9.
8. Open mask.
9. Add mask to paper (click HERE for a tut on using masks)
10. Merge layers (Image > Merge Visible Layer).
11. Autocrop image (Image > Autocrop Image).
12. Scale image to desired size (Image > Scale Image).
13. Add copyright info and name.
14. Save as .png
You are finished :)
This tutorial is of my own creation and any resemblance to any other tuts is purely coincidental. This tutorial is for personal use only, using it for monetary gain is against our TOU's.
Supplies Needed:
~Gimp (any version will do).
~Tubes of choice. I used the super hot artwork of Keith Garvey. You must have a license to use his art which you can get HERE.
~Toxic Love PTU scrapkit which you can get from Creative Intentionz HERE.
~Mask of choice. I used WSL mask 302 which you can get HERE.
~Font of choice. I used Satisfaction.
Let's get started!!!!!
1. Open a new layer ( I prefer a large canvas, so I make mine 1050x656). Make your canvas transparent (Layer > Transparency > Color to alpha).
2. Open ScallopedTag 3, tilt the tag slightly using the Rotate Tool in your tool box. Duplicate the tag so that you have 2 of them, flip one of them so that they are a mirror image of each other, you can use the Flip Tool in your tool box for this. Move the tags in to desired position, add drop shadow (Filters > Light & Shadow > Drop Shadow).
3. Open FilmStrip, add drop shadow.
4. Open Paper 8 center it behind the filmstrip, remove excess paper using the rectangular cutting tool in your tool box.
5. Open tubes, I used both a full body and close ups. Open the close ups behind the filmstrip, I lowered the opacity of the close ups to 50 (at the top of the layer box you will see a bar you can slide to change the opacity of the selected layer). Add drop shadow to the full body tube.
6. Open and place the following elements:
Flame2 (x2)
Sparkles
ToxicBrad2
WireHeart
LoveWord
ZippedHeart (x2)
BowRibbon1 (x2)
~Some of the elements may need to be sized down. Using your scale tool in your tool box adjust the pixel size until element is the correct size~
~Add drop shadow to all elements~
7. Open Paper 9.
8. Open mask.
9. Add mask to paper (click HERE for a tut on using masks)
10. Merge layers (Image > Merge Visible Layer).
11. Autocrop image (Image > Autocrop Image).
12. Scale image to desired size (Image > Scale Image).
13. Add copyright info and name.
14. Save as .png
You are finished :)  You can get them HERE
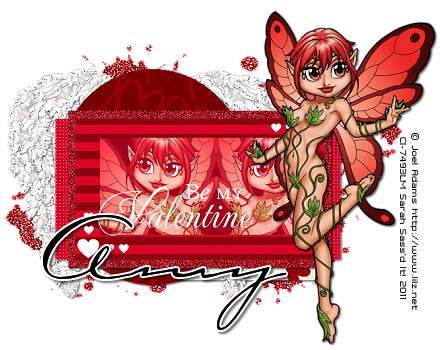
 This tutorial is of my own creation and any resemblance to any other tuts is purely coincidental. This tutorial is for personal use only, using it for monetary gain is against our TOU's.
Supplies Needed:
~Gimp (any version will do).
~Je T'aime PTU scrapkit which you can purchase from Addictive Pleasures HERE.
~Tube of choice. I used the art of PinUpToons, you must have a license to use this art which you can now get HERE.
~Template of choice. I used MC template 76 which you can get at Melissaz Creationz HERE.
~Mask of choice. I used DBV mask 14 which you can get Designs by Vaybs HERE.
~Font of choice. I used Carlotta.
Let's get started!!!
1. Open a new layer ( I prefer a large canvas, so I make mine 1050x656). Make your canvas transparent (Layer > Transparency > Color to Alpha).
2. Open template in PSD format, move layers of template around until they are the way you like them.
~Add paper from scrapkit to individual layers of the template (Right click on template layer in layer box > Alpha to Selection > CTRL I > Select paper layer in layer box > Delete).
These are the papers I used:
Paper 2
Paper 4
Paper 9
Paper 11
~I added noise to some of the template layers to make them look glittery (Filters > Noise > RGB Noise).
~I colorized some of the template layers to better match the scrapkit (Colors > Colorize > play with the setting until you get the desired color).
~Add drop shadow to template layers (Filters > Light & Shadow > Drop Shadow).
3. Open tube, add drop shadow
4. Open and place the following elements:
lace 2
eiffel tower
luggage
parasol
text
lovebox
wireheart
rose
hanging heart
heart
dragon-fly
butterfly
bow 3
~Some of the elements may need to be sized down. Using your scale tool in your tool box adjust the pixel size until element is the correct size~
~Add drop shadow to all elements~
5. Open Paper 1
6. Open mask
7. Add mask to paper (click HERE for a tut on using masks)
8. Merge Layers (Image > Merge Visible Layers).
9. Crop Image (Image > Autocrop Image).
10. Scale image to desired size (Image > Scale Image).
11. Add copyright info and name
12. Save as .png
ALL DONE!!!!!!!!!!
This tutorial is of my own creation and any resemblance to any other tuts is purely coincidental. This tutorial is for personal use only, using it for monetary gain is against our TOU's.
Supplies Needed:
~Gimp (any version will do).
~Je T'aime PTU scrapkit which you can purchase from Addictive Pleasures HERE.
~Tube of choice. I used the art of PinUpToons, you must have a license to use this art which you can now get HERE.
~Template of choice. I used MC template 76 which you can get at Melissaz Creationz HERE.
~Mask of choice. I used DBV mask 14 which you can get Designs by Vaybs HERE.
~Font of choice. I used Carlotta.
Let's get started!!!
1. Open a new layer ( I prefer a large canvas, so I make mine 1050x656). Make your canvas transparent (Layer > Transparency > Color to Alpha).
2. Open template in PSD format, move layers of template around until they are the way you like them.
~Add paper from scrapkit to individual layers of the template (Right click on template layer in layer box > Alpha to Selection > CTRL I > Select paper layer in layer box > Delete).
These are the papers I used:
Paper 2
Paper 4
Paper 9
Paper 11
~I added noise to some of the template layers to make them look glittery (Filters > Noise > RGB Noise).
~I colorized some of the template layers to better match the scrapkit (Colors > Colorize > play with the setting until you get the desired color).
~Add drop shadow to template layers (Filters > Light & Shadow > Drop Shadow).
3. Open tube, add drop shadow
4. Open and place the following elements:
lace 2
eiffel tower
luggage
parasol
text
lovebox
wireheart
rose
hanging heart
heart
dragon-fly
butterfly
bow 3
~Some of the elements may need to be sized down. Using your scale tool in your tool box adjust the pixel size until element is the correct size~
~Add drop shadow to all elements~
5. Open Paper 1
6. Open mask
7. Add mask to paper (click HERE for a tut on using masks)
8. Merge Layers (Image > Merge Visible Layers).
9. Crop Image (Image > Autocrop Image).
10. Scale image to desired size (Image > Scale Image).
11. Add copyright info and name
12. Save as .png
ALL DONE!!!!!!!!!!
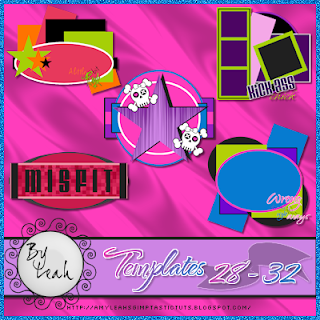
This tutorial is of my own creation and any resemblance to any other tuts is purely coincidental. This tutorial is for personal use only, using it for monetary gain is against our TOU's. Supplies: Gimp- Any version should work Fun PTU kit from Creative Intentionz called 'Retro Punk' HERE Tube of choice. I am using Ismael Rac. You must have a licence to use his tubes. You can purchase them HERE Template 29 by me on mine and Amy's blog HERE WSL_Mask117 HERE Fonts- Velvenda Cooler, VTC-Nuetattooscript & PR8 Charade Let's get started! -Open template. Delete credits and word art. Image>Canvas Size of 600x600 pixels. Make sure you click center. -Next we are going to add papers from the kit to the template layers. you will need to do the following to the layers I name below. First, right click the layer in the layer box and choose alpha to selection. Open paper and right click in layer box and choose add alpha channel. Layer>Scale Layer by 60%. Select>Invert. Press delete on your keyboard. Select>None. Circle- Paper 7. Rect- Paper 1. Filters>Light and Shadow>Drop shadow of 2, 2, 15, black, 100 Square 3- Paper Square 2- Paper 8. Filters>Repeat drop Shadow Square 1- Paper 6. Repeat drop shadow Sm square 1- Paper 3 Sm square 2- Paper 4 Sm square 3- Paper 11 -Mkae the square 3 layer active. Alpha to selection. Add new layer above this layer. Using the bucket fill tool and your foreground color set to black, fill the selection. Select none. Filters>Reshow Drop Shadow 2, 2, 2, black, 50. -Make the lrg rect frame layer active. Alpha to selection. Add new layer above this layer. fill with e73f5f. Select none,. Filters>Noise>RGB Noise on the default settings. -Make the lrg rect layer active. Alpha to selection. add new layer above this layer. Fill with black. Add a drop shadow of 2, 2, 15, black, 100. -Make the circle back layer active. Repeat drop shadow. -Make the top layer active (1st sm green square to the left of the tag). Layer>Merge down with the sm orange square. Merge again with the 2nd sm green square. Open your tube. using the flip tool flip the tube. Postion tube in the small squares. See my tag for placement. Make the small squares layer active. Alpha to selection. make the tube layer active and Invert. Press delete. Select none. Change the mode to screen. -Open up tube again. Postion in the middle of the tag. Add drop shadow of 2, 2, 2, black, 50. -Select your text tool. Using the velvenda cooler font, foreground color set to black and size at 110 type Wild. Using the rotate tool rotate by 90. Alpha to selection. Add new layer below the text layer. Select>Grow by 2. Fill with bbdf0c. Select none. Add the same noise as before. Repeat drop shadow. -Using the VTC-Nuetattooscript font, foreground set to e73f5f and the size set to 75 type One. Repeat noise. Alpha to selection. Add new layer below. Grow by 2. Fill with black. Select none and repeat drop shadow. Elements Add drop shadow of 2, 2, 2, black, 50 to all elements. See my tag for placement. -chained heart scale 50% -flame scale 75% -wire doodle no scale -skull charm no scale -light ray scale 75% duplicate no drop shadow using flip tool press ctrl on keyboard & click canvas -flower 3 no scale -heart brad 2 scale 50% -heart brad 1 scale 40% -heart brad 3 scale 30% -sparkles scale 75% no drop shadow -Open paper 9. Move to bottom in the layer box. Apply mask. If you need help applying the mask go HERE. -Add your name with the PR8 Charade font. Add proper copyright and crop. All finished!!

You can download them HERE
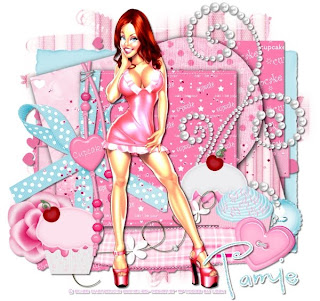
This tutorial is of my own creation and any resemblance to any other tuts is purely coincidental. This tutorial is for personal use only, using it for monetary gain is against our TOU's. Supplies: Gimp- Any version should do PTU scrap kit from Addictive Pleasures called 'Cupcake' HERE Template 378 from Divine Intentionz HERE Tube of Choice. I am using the work of Eliaz Chatzoudis. You must have a license to use his tubes. You can purchase them HERE Mask- WSL_Mask281 HERE Font- Pea Lovey Dovey Let's get started! -Open up template. Delete the credits. Image>Scale Image by 500x500 px. Image>Canvas Size of 600x600 px and make sure you click center. -Let's add some papers to our template layers. You will need to do the following for each layer we add paperto. Right click the layer in the layer box and choose alpha to selection. Open paper. Right click paper layer in layer box and choose add alpha channel. Layer>Scale layer by 60%. Select>Invert. Press delete on your keyboard. Select>None. Square 3- Paper 12 Filters>Light and Shadow>Drop Shadow of 2, 2, 15, black, 100 Circle 2- Paper 5 Filters>Repeat Drop Shadow Circle 1- Paper 6 Repeat drop shadow Sqaure 2- Paper 3 Repeat drop shadow Square 1- Paper 1 Repeat drop shadow Square 5- Paper 9 Filters>Reshow Drop Shadow 2, 2, 2, black, 50 Sqaure 4- Paper 11 Repeat drop shadow Thin Rectangle- Paper 2 Scale by 70% DON'T Select none. Instead go to Select>Invert. Add new layer above this layer. Using the bucket fill tool, fill with fc7cae. Shelect>Shrink by 2. Press delete. Select none and repeat drop shadow. -Open your tube. Move tube layer to the top in the layer box. Repeat drop shadow. Layer>Duplicate Layer. Filters>Blur>Gaussian Blur of 3. Change the mode to grain merge. Elements Add a drop shadow of 2, 2, 2, black, 50 to all element layers. See my tag for placement. -Beads scale 75% -Cupcake scale 40% -Cupcake 3 scale 35% -Label no scale using the flip tool flip the element -Frame 3 no scale -Glitter no scale -Button 2 scale 65% -Pearls no scale -Frame scale 55% -Bow 3 no scale -Cupcake 3 scale 40% -Rose no scale -Hearts no scale -Wire no scale -Open paper 1. Apply mask. -Add your name, copyright and scale. All finished!

This tutorial is of my own creation and any resemblance to any other tuts is purely coincidental. This tutorial is for personal use only, using it for monetary gain is against our TOU's. Supplies: Gimp- Any version should do Fabulous PTU kit from ACDivas called 'Divas Collab' HERE Tube of choice. I am using Pinuptoons. You must have a license to use them. I got mine from CILM, but now they can be purchased from CDO HERE Template- EI#30 from Elegant Inspirations HERE Mask- WSL_mask259 HERE Fonts- Shelter Me and Sunshine in my Soul Let's Begin!!!! -Open template. Delete the credits. Image>Scale Image by 500x412 pixels. Change the x & y resolutions to 72. Image>Canvas Size of 600x600 pixels and click center. -Now we are going to add papers to the template layers. Here is what you'll need to do to every layer. Rightclick layer in layer box and choose alpha to selection. Then open the paper. Right click the paper layer in the layer box and choose add alpha channel. Layer>Scale layer by 50%. Select>Invert. Press delete on your keyboard. Select>None. White circle- Paper 6. Filters>Light and Shadow>Drop Shadow of 2, 2, 15, black, 100. Black circle- Paper 4. Filters>Repeat Drop Shadow. Vrectangle- Paper 7. Invert. Add new layer above this layer. Using the bucket fill tool fill selection with 88365a. Select>Shrink by 3. Press delete. Select none. Filters>Noise>RGB Noise on the default settings. Add drop shadow of 2, 2, 2, black, 50.' hrectangle1 (white)- Paper 5. Filters>Repeat Drop Shadow. hrectangle1 (teal)- Paper 10. Invert. Add new layer below. Fill with e8adc9. Add noise and drop shadow. Stirp- Paper 14. Invert. Add new layer above. Fill with white. Shrink by 2. Press delete. Add drop shadow. Mini rectangle- Paper 9. Add drop shadow. -Make the mini circle layer active. Alpha to selection. Fill with e8adc9. Add noise and drop shadow. -Open your tube. Scale by 90%. Repeat drop shadow. Elements- Add drop shadow of 2,2, 2, black, 50. See my tag for placement. -3 scale by 80% no drop shadow -12 scale by 80% -50 scale by 60% flip using the flip tool -54 scale by 50% no drop shadow -11 no scale -45 scale by 50% -37 scale by 35% -33 scale by 40% no drop shadow -59 scale by 35% no drop shadow -Open paper 13. Move to bottom in the layer box. Apply mask. -Using the Selter Me font, type the word 'divalicious' using color 88365a. Add some noise. Alpha to selection and grow by 2. Add new layer below. Fill selection with white. Select none. Repeat drop shadow. -Add your name using the Sunshine in my Soul font. -Add copyright and crop. All finished!
 This tutorial is of my own creation and any resemblance to any other tuts is purely coincidental. This tutorial is for personal use only, using it for monetary gain is against our TOU's.
Supplies Needed:
~Gimp (any version will do).
~Diva Collab PTU scrapkit by AC Divas which you can purchase from Exquisite Scraps HERE.
~Tubes of choice. I used the art of Elias Chatzoudis, you must have a license to use this art which you can get HERE.
~Template of choice. I used CBN template 65 which you can get at Creative by Nature HERE.
~Mask of choice. I used mask 12 which you can get Babes Designz HERE.
~Font of choice. I used SeamStress.
Let's get started!!!
1. Open a new layer ( I prefer a large canvas, so I make mine 1050x656). Make your canvas transparent (Layer > Transparency > Color to Alpha).
2. Open template in PSD format, move layers of template around until they are the way you like them.
~Add paper from scrapkit to individual layers of the template (Right click on template layer in layer box > Alpha to Selection > CTRL I > Select paper layer in layer box > Delete).
These are the papers I used:
Paper 4
Paper 8
Paper 10
Paper 13
~I added noise to some of the template layers to make them look glittery (Filters > Noise > RGB Noise).
~I colorized some of the template layers to better match the scrapkit (Colors > Colorize > play with the setting until you get the desired color).
~Add drop shadow to template layers (Filters > Light & Shadow > Drop Shadow).
3. Open tubes, I used a full body and a close-up. I changed the mode on the close-up to Hard Light (at the top of the layer box you will see a box marked Mode. Click on the arrow and pick Hard Light from the drop down menu. See the image below). Add drop shadow.
4. Open and place the following elements:
embellie 6
embellie 57
embellie 33
embellie 10
embellie 58
embellie 41
embellie 35
embellie 37
embellie 43
embellie 19
embellie 52
embellie 21
embellie 24
~Some of the elements may need to be sized down. Using your scale tool in your tool box adjust the pixel size until element is the correct size~
~Add drop shadow to all elements~
5. Open Paper 6
6. Open mask
7. Add mask to paper (click HERE for a tut on using masks)
8. Merge Layers (Image > Merge Visible Layers).
9. Crop Image (Image > Autocrop Image).
10. Scale image to desired size (Image > Scale Image).
11. Add copyright info and name
12. Save as .png
ALL DONE!!!!!!!!!!
This tutorial is of my own creation and any resemblance to any other tuts is purely coincidental. This tutorial is for personal use only, using it for monetary gain is against our TOU's.
Supplies Needed:
~Gimp (any version will do).
~Diva Collab PTU scrapkit by AC Divas which you can purchase from Exquisite Scraps HERE.
~Tubes of choice. I used the art of Elias Chatzoudis, you must have a license to use this art which you can get HERE.
~Template of choice. I used CBN template 65 which you can get at Creative by Nature HERE.
~Mask of choice. I used mask 12 which you can get Babes Designz HERE.
~Font of choice. I used SeamStress.
Let's get started!!!
1. Open a new layer ( I prefer a large canvas, so I make mine 1050x656). Make your canvas transparent (Layer > Transparency > Color to Alpha).
2. Open template in PSD format, move layers of template around until they are the way you like them.
~Add paper from scrapkit to individual layers of the template (Right click on template layer in layer box > Alpha to Selection > CTRL I > Select paper layer in layer box > Delete).
These are the papers I used:
Paper 4
Paper 8
Paper 10
Paper 13
~I added noise to some of the template layers to make them look glittery (Filters > Noise > RGB Noise).
~I colorized some of the template layers to better match the scrapkit (Colors > Colorize > play with the setting until you get the desired color).
~Add drop shadow to template layers (Filters > Light & Shadow > Drop Shadow).
3. Open tubes, I used a full body and a close-up. I changed the mode on the close-up to Hard Light (at the top of the layer box you will see a box marked Mode. Click on the arrow and pick Hard Light from the drop down menu. See the image below). Add drop shadow.
4. Open and place the following elements:
embellie 6
embellie 57
embellie 33
embellie 10
embellie 58
embellie 41
embellie 35
embellie 37
embellie 43
embellie 19
embellie 52
embellie 21
embellie 24
~Some of the elements may need to be sized down. Using your scale tool in your tool box adjust the pixel size until element is the correct size~
~Add drop shadow to all elements~
5. Open Paper 6
6. Open mask
7. Add mask to paper (click HERE for a tut on using masks)
8. Merge Layers (Image > Merge Visible Layers).
9. Crop Image (Image > Autocrop Image).
10. Scale image to desired size (Image > Scale Image).
11. Add copyright info and name
12. Save as .png
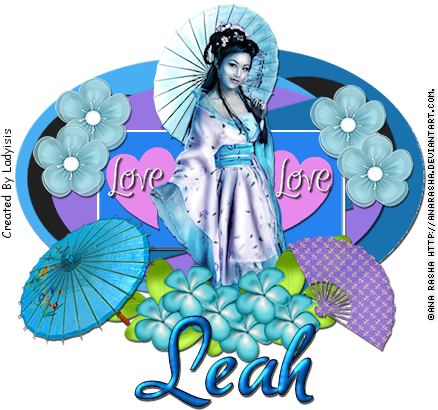
ALL DONE!!!!!!!!!! This tutorial is of my own creation and any resemblance to any other tuts is purely coincidental. This tutorial is for personal use only, using it for monetary gain is against our TOU's.
Supplies Needed:
~Gimp (any version will do).
~Tube of choice. I used the the artwork of Anna Marine. You must have a license to use this art which you can now get HERE.
~Bouquet for a Corpse PTU scrapkit which you can get from Addictive Pleasures HERE.
~Mask of choice. I used DBV mask 11 which you can get HERE.
~Font of choice. I used Monika Italic.
Let's get started!!!!!
1. Open a new canvas ( I prefer a large canvas, so I make mine 1050x656). Make your canvas transparent (Layer > Transparency > Color to alpha).
2. Open Frame 4, add drop shadow (Filters > Light & Shadow > Drop Shadow).
3. Open Paper 5, center it behind Frame 4. Remove excess paper using a cutting tool or eraser from your tool box.
4. Open tube, add drop shadow to tube.
5. Open and place the following elements:
Bow
Glasses
Winebox
Flower
Rose 2
Rose 4
Keys
Lock
Butterfly
Ribbon 2
SkullMound
Vine
~Some of the elements may need to be sized down. Using your scale tool in your tool box adjust the pixel size until element is the correct size~
~Add drop shadow to all elements~
6. Open Paper 6.
7. Open mask.
8. Add mask to paper
9. Merge layers (Image > Merge Visible Layer).
10. Autocrop image (Image > Autocrop Image).
11. Scale image to desired size (Image > Scale Image).
12. Add copyright info and name.
13. Save as .png
You are finished :)
This tutorial is of my own creation and any resemblance to any other tuts is purely coincidental. This tutorial is for personal use only, using it for monetary gain is against our TOU's.
Supplies Needed:
~Gimp (any version will do).
~Tube of choice. I used the the artwork of Anna Marine. You must have a license to use this art which you can now get HERE.
~Bouquet for a Corpse PTU scrapkit which you can get from Addictive Pleasures HERE.
~Mask of choice. I used DBV mask 11 which you can get HERE.
~Font of choice. I used Monika Italic.
Let's get started!!!!!
1. Open a new canvas ( I prefer a large canvas, so I make mine 1050x656). Make your canvas transparent (Layer > Transparency > Color to alpha).
2. Open Frame 4, add drop shadow (Filters > Light & Shadow > Drop Shadow).
3. Open Paper 5, center it behind Frame 4. Remove excess paper using a cutting tool or eraser from your tool box.
4. Open tube, add drop shadow to tube.
5. Open and place the following elements:
Bow
Glasses
Winebox
Flower
Rose 2
Rose 4
Keys
Lock
Butterfly
Ribbon 2
SkullMound
Vine
~Some of the elements may need to be sized down. Using your scale tool in your tool box adjust the pixel size until element is the correct size~
~Add drop shadow to all elements~
6. Open Paper 6.
7. Open mask.
8. Add mask to paper
9. Merge layers (Image > Merge Visible Layer).
10. Autocrop image (Image > Autocrop Image).
11. Scale image to desired size (Image > Scale Image).
12. Add copyright info and name.
13. Save as .png
You are finished :)  This tutorial is of my own creation and any resemblance to any other tuts is purely coincidental. This tutorial is for personal use only, using it for monetary gain is against our TOU's.
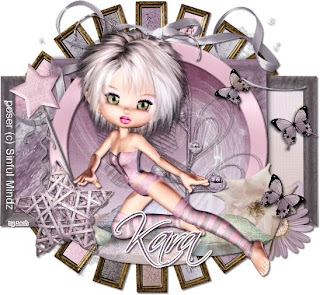
Supplies Needed:
~Gimp (any version will do).
~All This Time PTU scrapkit which you can get from Sweet Cravings Scraps HERE.
~Tubes of choice. I used the adorable art of Suzanne Woolcott, you must have a license to use this art which you can get HERE.
~Mask of choice. I used WSL mask 363 which you can get HERE.
~Font of choice. I used Skin Deep.
Let's get started!!!
1. Open a new layer ( I prefer a large canvas, so I make mine 1050x656). Make your canvas transparent (Layer > Transparency > Color to Alpha).
2. Open Frame 4, (tilt frame slightly using the Rotate Tool in your tool box) add drop shadow (Filters > Light & Shadow > Drop Shadow).
3. Open frame 1, add drop shadow.
4. Open Paper 13 & Paper 7, center papers behind frames , remove excess paper using a cutting tool oreraser from your tool box.
5. Open tubes, I used both a full body and 2 close-ups. I lowered the opacity on the close-ups to 50 (at the top of the layer box you will see a bar you can slide to change the opacity of the selected layer). Add drop shadow to the full body tube.
6. Open and place the following elements:
Air Doodles
Butterfly Swarm 1
Ribbon 3
Star
Gift
Mushroom 1
Mushroom 2
Flower 3
Flower 5
Flower 6
Flower 7
Flower 8
~Some elements may need to be sized down. Use the Scale Tool in your tool box to adjust the pixel size~
~Add drop shadow to all elements~
7. Open Paper 18
8. Open mask
9. Add mask to paper
10. Merge Layers (Image > Merge Visible Layers).
11. Crop Image (Image > Autocrop Image).
12. Scale image to desired size (Image > Scale Image).
13. Add name
14. Save as .png
YOU ARE DONE!!!!!!!!!!
This tutorial is of my own creation and any resemblance to any other tuts is purely coincidental. This tutorial is for personal use only, using it for monetary gain is against our TOU's.
Supplies Needed:
~Gimp (any version will do).
~All This Time PTU scrapkit which you can get from Sweet Cravings Scraps HERE.
~Tubes of choice. I used the adorable art of Suzanne Woolcott, you must have a license to use this art which you can get HERE.
~Mask of choice. I used WSL mask 363 which you can get HERE.
~Font of choice. I used Skin Deep.
Let's get started!!!
1. Open a new layer ( I prefer a large canvas, so I make mine 1050x656). Make your canvas transparent (Layer > Transparency > Color to Alpha).
2. Open Frame 4, (tilt frame slightly using the Rotate Tool in your tool box) add drop shadow (Filters > Light & Shadow > Drop Shadow).
3. Open frame 1, add drop shadow.
4. Open Paper 13 & Paper 7, center papers behind frames , remove excess paper using a cutting tool oreraser from your tool box.
5. Open tubes, I used both a full body and 2 close-ups. I lowered the opacity on the close-ups to 50 (at the top of the layer box you will see a bar you can slide to change the opacity of the selected layer). Add drop shadow to the full body tube.
6. Open and place the following elements:
Air Doodles
Butterfly Swarm 1
Ribbon 3
Star
Gift
Mushroom 1
Mushroom 2
Flower 3
Flower 5
Flower 6
Flower 7
Flower 8
~Some elements may need to be sized down. Use the Scale Tool in your tool box to adjust the pixel size~
~Add drop shadow to all elements~
7. Open Paper 18
8. Open mask
9. Add mask to paper
10. Merge Layers (Image > Merge Visible Layers).
11. Crop Image (Image > Autocrop Image).
12. Scale image to desired size (Image > Scale Image).
13. Add name
14. Save as .png
YOU ARE DONE!!!!!!!!!!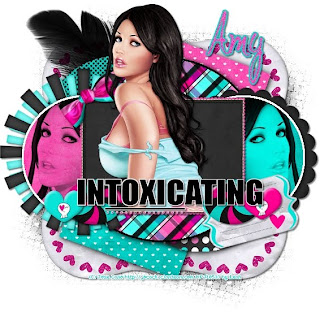
This tutorial is of my own creation and any resemblance to any other tuts is purely coincidental. This tutorial is for personal use only, using it for monetary gain is against our TOU's. Supplies: -Gimp- Any version should work -Tube of Choice. I am using the work of Jose Cano. You must have a license to use his work. You can purchase his tubes HERE FTU kit from Cinnamon Scraps called 'Toxic Candyland' HERE Template- Intoxicating by CrazyCakesScraps HERE Mask- WSL_Mask152 HERE Let's get started!! -Open template. Delete credits. Crop using the crop tool. Image>Scale Image by 500x500 pixels. Image>Canvas Size of 600x600 pixels and make sure to press center. Right click every layer in the layer box and click layer to image size. -Make the merged (black circle) layer active. Using the magic wand, click outside of the frame. Open paper 10. Right click paper layer in the layer box and choose add alpha channel. Layer>Scale Layer by 50%. Press delete on your keyboard. Select>Invert. Add new layerbelow this layer. Select>Grow by 3. Using the bucket fill tool and your foreground set to black, fill the selection. Select>None. Filters>Light and Shadow>Drop Shadow of 2, 2, 15, black, 100. -Make raster 1 (left pink circle) layer active. Click outside with magic wand. Open paper 4 and add alpha channel. Scale by 50%> Press delete. Invert and grow by 3. Add a new layer below this layer. Fill with white. Select none. Filters>Repeat Drop Shadow. -Make rater 2 (right pink circle) layer active. Click outside with magic wand. Open paper 4 and add alpha channel. Scale by 50%> Press delete. Invert and grow by 3. Add a new layer below this layer. Fill with white. Select none and repeat drop shadow.. -Make raster 4 (bottom grey circle) active. Click outside with magic wand. Open paper 11 and add alpha channel. Scale by 50%. Press delete and select none. Repeat drop shadow. -Make raster 5 (top grey circle) active. Click outside with magic wand. Open paper 13 and add alpha channel. Scale by 50%. Press delete and select none. Repeat drop shadow. .-Make raster 6 (bottom white square) layer active. Click outside with magic wand. Open paper 8 and add alpha channel. Scale by 60%. Press delete and select none. Repeat drop shadow. -Make raster 7 (top white square) layer active. Click outside with magic wand. Open paper 5 and add alpha channel. Scale by 60%. Press delete and select none. Repeat drop shadow. -Make merged #1 (words) layer active. Right click layer in layer box and choose alpha to selection. Fill selection with black. Grow by 1. Add new layer below this layer. Fill with white. Select none. Add a drop shadow of 2, 2, 2, black, 50. -Open frame 5. Scale by 50%. Click inside frame with magic wand. Grow by 3. Open paper 3 and add alpha channel. Scale by 50%. Invert and delete. Select none. Repeat drop shadow on frame. -Open tube. Scale by 70%. Repeat drop shadow. -Open tube again. Move layer above pink circle. Position inside pink circle. See mine. Layer to image size. Layer>Duplicate Layer. Using th flip tool, flip your duplicate tube. Move the duplicate tube above the blue circle. Make the pink circle layer avtive. Layer to image size. Click outside cirlce with magic wand. Make the tube inside this circle active. Press delete. Do the same with the other tube. Change the modes of both tube layers to value. Elements Add drop shadow of 2, 2, 2, black, 50 to all element layers. See my tag for placement. -flower 13 no scale -flower 11 scale 85% -bow 5 scale 35% -brackets 1 scale 75% -candy 4 scale 50% duplicate -feather 2 scale 65% -candy 9 scale 35% -candy 10 scale 35% -journal tag scale 50%. Using the rotate tool rotate by -15 -Open paper 9 and add alpha channel. Apply mask. Click HERE if you don't know how to add a mask. -Add your name, copyright and crop. You're finished! I hope you enjoyed this tut!
This tutorial is of my own creation and any resemblance to any other tuts is purely coincidental. This tutorial is for personal use only, using it for monetary gain is against our TOU's. Supplies: Gimp- Any version should work Pretty PTU kit by Sweet Cravings Scraps called 'All This Time' HERE Tube of choice- I am using a tube supplied in the kit Font- Scriptina Let's begin!! -Go to File>New and open a canvas with the size of 600x600 pixels. -Open frame 1. Go to Layer>Scale Layer by 50%. Using the magic wand, click inside the frame. Select>Grow by 4. Open paper 8. Right click paper layer in layer box and choose add alpha channel. Move paper layer below frame layer in the layer box. Scale by 50%. Select>Invert. Press delete on your keyboard. Select>None. Make frame layer active. Filters>Light and Shadow>Drop Shdow of 2, 2, 2, black, 50. -Open frame 5. Scale by 35%. Place on the left side of the circle frame. See mine. Right click layer in the layer box and choose layer to image size. Layer>Duplicate layer. Using the flip tool, flip the duplicate frame. You may need to move it a little. Make the left frame active. Click inside with the magic wand. Grow by 4. Open paper 16 and add alpha channel. Move below the frame layer. Scale by 50%. Invert and press delete. Do the same to the right frame, but use paper 17. Add same drop shadow as before to both frame layers. -Open frame 4. Using the rotate tool, rotate by 90. Scale by 50%. Add drop shadow of 2, 2, 15, black, 100. -Open fairy 2. Move layer to the top. Scale by 60%. Add drop shadow of 2, 2, 2, black, 50. Duplicate. Filters>Blur>Gaussian Blur of 3. Change the mode to soft light. Elements Add a drop shadow of 2, 2, 2, black, 50 to all element layers. See my tag for placement. -fairy wand scale 60% -butterfly swarm 2 scale 50% -pillows scale 50% -curly satin frame scale 65% -star scale 35% -glitter doodle 2 scale 50% -flower 6 scale 30% -flower 3 scale 25 -clock no scale -Add your name, copyright (if needed) and crop All done!!!!
 This tutorial is of my own creation and any resemblance to any other tuts is purely coincidental. This tutorial is for personal use only, using it for monetary gain is against our TOU's.
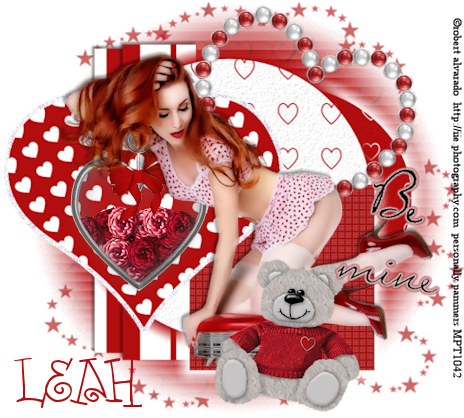
Supplies Needed:
~Gimp (any version will do).
~Corona Lime FTU scrapkit which you can get from Bad Girls Club Design HERE.
~Tubes of choice. I used the super HOT art of Robert Alvarado, you must have a license to use his art which you can get HERE.
~Template of choice. I used Tude 1 template which you can get at Sapphy'z Demented Hallucinationz HERE
~Mask of choice. I used WSL mask 363 which you can get HERE.
~Font of choice. I used QT Brush Strokes.
Let's get started!!!
1. Open a new layer ( I prefer a large canvas, so I make mine 1050x656). Make your canvas transparent (Layer > Transparency > Color to Alpha).
2. Open template in PSD format, move layers of template around until they are the way you like them.
~Add paper from scrapkit to individual layers of the template (Right click on template layer in layer box > Alpha to Selection > CTRL I > Select paper layer in layer box > Delete).
These are the papers I used:
Beer Paper
Beer Bottles Paper
Lemon Squirt Paper
Lime Squirt Paper
~I added noise to some of the template layers to make them look glittery (Filters > Noise > RGB Noise).
~I colorized some of the template layers to better match the scrapkit (Colors > Colorize > play with the setting until you get the desired color).
~Add drop shadow to template layers (Filters > Light & Shadow > Drop Shadow).
3. Open tubes, I used both a full body and close up. I lowered the opacity of the close up to 40 (at the top of the layer box you will see a bar you can slide to change the opacity of the selected layer). Add drop shadow to the full body tube.
4. Open and place the following elements:
Bottle Opener
Lemon Wedge
Lime Wedge
XXX Beer Bottle Empty (x2)
XXX Beer Bottle (x3)
Beer Bottles
Beer Box
Lemon Bottlecap
Lime Bottlecap
MexiBeer Bottlecap (x2)
Palm Tree
Palm Tree 2
~Some of the elements may need to be sized down. Using your scale tool in your tool box adjust the pixel size until element is the correct size~
~Add drop shadow to all elements~
5. Open Yellow/Green Striped Paper
6. Open mask
7. Add mask to paper (click HERE for a tut on using masks)
8. Merge Layers (Image > Merge Visible Layers).
9. Crop Image (Image > Autocrop Image).
10. Scale image to desired size (Image > Scale Image).
11. Add copyright info and name
12. Save as .png
ALL DONE!!!!!!!!!!
This tutorial is of my own creation and any resemblance to any other tuts is purely coincidental. This tutorial is for personal use only, using it for monetary gain is against our TOU's.
Supplies Needed:
~Gimp (any version will do).
~Corona Lime FTU scrapkit which you can get from Bad Girls Club Design HERE.
~Tubes of choice. I used the super HOT art of Robert Alvarado, you must have a license to use his art which you can get HERE.
~Template of choice. I used Tude 1 template which you can get at Sapphy'z Demented Hallucinationz HERE
~Mask of choice. I used WSL mask 363 which you can get HERE.
~Font of choice. I used QT Brush Strokes.
Let's get started!!!
1. Open a new layer ( I prefer a large canvas, so I make mine 1050x656). Make your canvas transparent (Layer > Transparency > Color to Alpha).
2. Open template in PSD format, move layers of template around until they are the way you like them.
~Add paper from scrapkit to individual layers of the template (Right click on template layer in layer box > Alpha to Selection > CTRL I > Select paper layer in layer box > Delete).
These are the papers I used:
Beer Paper
Beer Bottles Paper
Lemon Squirt Paper
Lime Squirt Paper
~I added noise to some of the template layers to make them look glittery (Filters > Noise > RGB Noise).
~I colorized some of the template layers to better match the scrapkit (Colors > Colorize > play with the setting until you get the desired color).
~Add drop shadow to template layers (Filters > Light & Shadow > Drop Shadow).
3. Open tubes, I used both a full body and close up. I lowered the opacity of the close up to 40 (at the top of the layer box you will see a bar you can slide to change the opacity of the selected layer). Add drop shadow to the full body tube.
4. Open and place the following elements:
Bottle Opener
Lemon Wedge
Lime Wedge
XXX Beer Bottle Empty (x2)
XXX Beer Bottle (x3)
Beer Bottles
Beer Box
Lemon Bottlecap
Lime Bottlecap
MexiBeer Bottlecap (x2)
Palm Tree
Palm Tree 2
~Some of the elements may need to be sized down. Using your scale tool in your tool box adjust the pixel size until element is the correct size~
~Add drop shadow to all elements~
5. Open Yellow/Green Striped Paper
6. Open mask
7. Add mask to paper (click HERE for a tut on using masks)
8. Merge Layers (Image > Merge Visible Layers).
9. Crop Image (Image > Autocrop Image).
10. Scale image to desired size (Image > Scale Image).
11. Add copyright info and name
12. Save as .png
ALL DONE!!!!!!!!!! You can download them HERE
 This tutorial is of my own creation and any resemblance to any other tuts is purely coincidental. This tutorial is for personal use only, using it for monetary gain is against our TOU's.
~Gimp (any version will do).
~Retro Punk PTU scrapkit which you can get from Creative Intentionz HERE.
~Tube of choice. I used the artwork of Elias Chatzoudis, you must have a license to use this art which you can get HERE.
~Template of choice. I used temp 67 from Addictive Templates which you can get HERE.
~Mask of choice. I used WSL mask 220 which you can get HERE.
~Font of choice. I used Kingsthings Wrote.
Let's get started!!!
1. Open a new layer ( I prefer a large canvas, so I make mine 1050x656). Make your canvas transparent (Layer > Transparency > Color to Alpha).
2. Open template in PSD format, move layers of template around until they are the way you like them.
~Add paper from scrapkit to individual layers of the template (Right click on template layer in layer box > Alpha to Selection > CTRL I > Select paper layer in layer box > Delete).
These are the papers I used:
Paper 1
Paper 3
Paper 7
Paper 8
Paper 10
~I added noise to some of the template layers to make them look glittery (Filters > Noise > RGB Noise).
~I colorized some of the template layers to better match the scrapkit (Colors > Colorize > play with the setting until you get the desired color).
~Add drop shadow to template layers (Filters > Light & Shadow > Drop Shadow).
3. Open tubes, I used both a full body and a close-up. I lowered the opacity of the close up to 50 (at the top of the layer box you will see a bar you can slide to change the opacity of the selected layer). Add drop shadow to the full body tube.
4. Open and place the following elements:
Clip 1
WireDoodle
Sparkles
EmoBunny
Flame
Flower 1
Flower 2
Flower 3
Cuffs
Lips 2
SkullCharm
Shoe
BarbWireHeart
~Some of the elements may need to be sized down. Using your scale tool in your tool box adjust the pixel size until element is the correct size~
~Add drop shadow to all elements~
4. Open Paper 4
5. Open mask
6. Add mask to paper
7. Merge Layers (Image > Merge Visible Layers).
8. Crop Image (Image > Autocrop Image).
9. Scale image to desired size (Image > Scale Image).
10. Add copyright info and name
11. Save as .png
YOU ARE ALL DONE!!!!!!!!!!
This tutorial is of my own creation and any resemblance to any other tuts is purely coincidental. This tutorial is for personal use only, using it for monetary gain is against our TOU's.
~Gimp (any version will do).
~Retro Punk PTU scrapkit which you can get from Creative Intentionz HERE.
~Tube of choice. I used the artwork of Elias Chatzoudis, you must have a license to use this art which you can get HERE.
~Template of choice. I used temp 67 from Addictive Templates which you can get HERE.
~Mask of choice. I used WSL mask 220 which you can get HERE.
~Font of choice. I used Kingsthings Wrote.
Let's get started!!!
1. Open a new layer ( I prefer a large canvas, so I make mine 1050x656). Make your canvas transparent (Layer > Transparency > Color to Alpha).
2. Open template in PSD format, move layers of template around until they are the way you like them.
~Add paper from scrapkit to individual layers of the template (Right click on template layer in layer box > Alpha to Selection > CTRL I > Select paper layer in layer box > Delete).
These are the papers I used:
Paper 1
Paper 3
Paper 7
Paper 8
Paper 10
~I added noise to some of the template layers to make them look glittery (Filters > Noise > RGB Noise).
~I colorized some of the template layers to better match the scrapkit (Colors > Colorize > play with the setting until you get the desired color).
~Add drop shadow to template layers (Filters > Light & Shadow > Drop Shadow).
3. Open tubes, I used both a full body and a close-up. I lowered the opacity of the close up to 50 (at the top of the layer box you will see a bar you can slide to change the opacity of the selected layer). Add drop shadow to the full body tube.
4. Open and place the following elements:
Clip 1
WireDoodle
Sparkles
EmoBunny
Flame
Flower 1
Flower 2
Flower 3
Cuffs
Lips 2
SkullCharm
Shoe
BarbWireHeart
~Some of the elements may need to be sized down. Using your scale tool in your tool box adjust the pixel size until element is the correct size~
~Add drop shadow to all elements~
4. Open Paper 4
5. Open mask
6. Add mask to paper
7. Merge Layers (Image > Merge Visible Layers).
8. Crop Image (Image > Autocrop Image).
9. Scale image to desired size (Image > Scale Image).
10. Add copyright info and name
11. Save as .png
YOU ARE ALL DONE!!!!!!!!!!
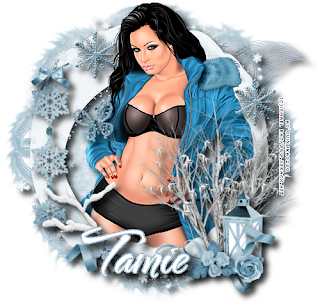
This tutorial is of my own creation and any resemblance to any other tuts is purely coincidental. This tutorial is for personal use only, using it for monetary gain is against our TOU's. Supplies Needed: ~Gimp (any version will do). ~Tube of choice. I used the art of Ismael Rac. You must have a license to use his art which you can get HERE. ~Winter is Here PTU scrapkit which you can get from Addictive Pleasures HERE. ~Mask of choice. I used mask 5 from Claudia's Creationz which you can get HERE. ~Font of choice. I used TheNautiGal. Let's get started!!!!! 1. Open a new layer ( I prefer a large canvas, so I make mine 1050x656). Make your canvas transparent (Layer > Transparency > Color to alpha). 2. Open element 39 (round frame), add drop shadow (Filters > Light & Shadow > Drop Shadow). 3. Open Paper 10 center it behind the frame , remove excess paper a cutting tool or eraser from your tool box. 4. Open tube, add drop shadow. 5. Open and place the following elements: ele 44 ele 15 ele 22 ele 27 ele 48 ele 33 (x2) ele 49 ele 40 ele 41 ele 28 ele 26 ele 3 ~Some of the elements may need to be sized down. Using your scale tool in your tool box adjust the pixel size until element is the correct size~ ~Add drop shadow to all elements~ 6. Open Paper 7. 7. Open mask. 8. Add mask to paper (click HERE for a tut on using masks) 9. Merge layers (Image > Merge Visible Layer). 10. Autocrop image (Image > Autocrop Image). 11. Scale image to desired size (Image > Scale Image). 12. Add copyright info and name. 13. Save as .png You are finished :)
Snag Our Blinkies


Don't Be A Pirate!

