Gimptastic Scraps Available Exclusively @

Gimptastic Scraps CT


Blog Trains

CU Licenses


This tutorial is of my own creation and any resemblance to any other tuts is purely coincidental. This tutorial is for personal use only, using it for monetary gain is against our TOU's. Supplies Needed: ~Gimp (any version will do). ~Nightmare PTU scrapkit which you can get from Addictive Pleasures HERE. ~Tube of choice. I used the super HOT art of Ismael Rac, you must have a license to use his art which you can get HERE. ~Template of choice. I used Crazy Bitch Template which you can get at CrazyCakesScraps HERE. ~Mask of choice. I used WSL mask302 which you can get HERE. ~Font of choice. I used Cold Night for Alligators. Let's get started!!! 1. Open a new layer ( I prefer a large canvas, so I make mine 1050x656). Make your canvas transparent (Layer > Transparency > Color to Alpha). 2. Open template in PSD format, move layers of template around until they are the way you like them. ~Add paper from scrapkit to individual layers of the template (Right click on layer in layer box > Alpha to Selection > CTRL I > Select paper layer in layer box > Delete). These are the papers I used: Paper 1 Paper 2 Paper 6 Paper 8 Paper 10 Paper 11 Paper 12 ~I added noise to some of the template layers to make them look glittery (Filters > Noise > RGB Noise). ~I colorized some of the template layers to better match the scrapkit (Colors > Colorize > play with the setting until you get the desired color). ~Add drop shadow to template layers (Filters > Light & Shadow > Drop Shadow). 3. Open tube, add drop shadow. 4. Open and place the following elements: Leaf Rose Rose 2 Rose 3 Skull 2 Skull 3 Skeleton Calla Lillies Sword Gravestone 2 Lightning ~Some of the elements may need to be sized down. Using your scale tool in your tool box adjust the pixel size until element is the correct size~ ~Add drop shadow to all elements~ 5. Open Paper 5 6. Open mask 7. Apply layer mask 8. Merge Layers (Image > Merge Visible Layers). 9. Crop Image (Image > Autocrop Image). 10. Scale image to desired size (Image > Scale Image). 11. Add copyright info and name 12. Save as .png ALL DONE!!!!!!!!!!
Supplies: Gimp- Any version should work Amazing PTU kit 'Dearest Friend' from Artmama's HERE Tube of choice. I am using the work of Suzanne Woolcott. You must have a licence to use her work. You can purchase her tubes HERE Template 73 from Punky Butts Tutorials HERE WSL Mask 167 HERE Font- Maximo Thin Let's Begin! -Open template up in Gimp. Delete credits and diamond 1 & 2 layers. Go to Image>Scale Image. Type 500 in the width column and press enter. Now press scale. Go to Image>Canvas Size. Put 600 in the width column and press enter. Press resize. -Make the oval layer active. Right click this layer in the layer box and choose Layer to image size. Using the magic wand tool, click outside of the oval. Open paper 11. Right click paper in layer box and choose Add Alpha Channel. Go to Layer>Scale Layer by 60%. Press delete on your keyboard. Go to Select>None. Layer to image size. Delete original oval layer. -Make the oval frame layer acvtive. Go to Filters>Light and Shadow>Drop Shadow of 2, 2, 2, black, 50. -Make the Circle 1 layer active. Layer to image size. Click outside circle with magic wand. Open paper 9. Right click layer in layer box and choose Add Alpha Channel. Scale by 50%. Press delete and select none. Delete the original circle 1 layer. -Make the circle frame layer 1 active. Add drop shadow. -Make the circle 2 layer active. Layer to image size and click outside with magic wand. Open paper 7 and add alpha channel. Scale by 50%. Press delete. Select none. Delete the original circle 2 layer. -Make the circle frame 2 layer active. Add drop shaow. -Make the rectangle layer active. Layer to image size. Click outside with magic wand. Open paper 1 and add alpha channel. Scale by 60%. Press delete and select none. Delete the original rectangle layer. -Make the rectangle frame layer active. Add drop shadow. -Open tube. Move to top layer. Scale (if needed). I scaled my tube by 75%. Move tube in the center of the tag. Add drop shadow. -Duplicate your tube layer. Move layer above the blue circle layer. Make the blue circle layer active. CLick outside with the magic wand. Make your duplicate tube layer active again. Press delete and select none. Layer to image size. Change the opacity to 50. Do the same as above, but place in the pink circle. Elements Add drop shadow to all element layers. See my tag as a reference for placement. --41 -27 Scale by 35% Duplicate -21 -12 scale by 75% -26 -20 Scale by 50% 49- Scale by 50% -24 Scale by 50% -30 Scale by 35% -32 Scale by 35% -Open paper 13 and apply mask. -Add your name and copyrights. -Go to Image>Merge Visible Layers. Next, go to Image>Autocrop. Save and you are finished!
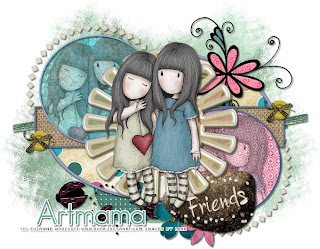
 Friendship
This tutorial is of my own creation and any resemblance to any other tuts is purely coincidental. This tutorial is for personal use only, using it for monetary gain is against our TOU's.
Supplies Needed:
~Gimp (any version will do).
~Dearest Friend PTU scrapkit by Artmama which you can get from Exquisite Scraps HERE.
~Tubes of choice. I used the art of PinUpToons, you must have a license to use this art which you can get HERE.
~Template of choice. I used Spring 1-Beautiful Spring template which you can get HERE.
~Mask of choice. I used WSL mask84 which you can get HERE.
~Font of choice. I used Pea Faith Dots.
Let's get started!!!
1. Open a new layer ( I prefer a large canvas, so I make mine 1050x656). Make your canvas transparent (Layer > Transparency > Color to Alpha).
2. Open template in PSD format, move layers of template around until they are the way you like them. I deleted the green flower and wordart layers of this template.
~Add paper from scrapkit to individual layers of the template (Right click on layer in layer box > Alpha to Selection > CTRL I > Select paper layer in layer box > Delete). (To add different papers to each square of the top layer on this template, use your Magic Wand tool in your tool box to select the individual square you would like to add the paper to instead of using the Alpha to Selection option. Then follow remaining directions for adding paper to template layers.)
These are the papers I used:
Paper 1
Paper 2
Paper 4
Paper 8
Paper 9
Paper 11
Paper 12
Paper 14
~I added noise to some of the template layers to make them look glittery (Filters > Noise > RGB Noise).
~I colorized some of the template layers to better match the scrapkit (Colors > Colorize > play with the setting until you get the desired color).
~Add drop shadow to template layers (Filters > Light & Shadow > Drop Shadow).
3. Open tubes, I used a full body and a close-ups. I lowered the opacity the close-ups to 50 (at the top of the layer box you will see a bar you can slide to change the opacity of the selected layer). Add drop shadow to full body tube.
4. Open and place the following elements:
embellie 8
embellie 6
embellie 50
embellie 46
embellie 42
embellie 2
embellie 47
embellie 32
embellie 34
embellie 28
embellie 30
embellie 22
embellie 23
embellie 51
~Some of the elements may need to be sized down. Using your scale tool in your tool box adjust the pixel size until element is the correct size~
~Add drop shadow to all elements~
5. Open Paper 13
6. Open mask
7. Add mask to paper
8. Merge Layers (Image > Merge Visible Layers).
9. Crop Image (Image > Autocrop Image).
10. Scale image to desired size (Image > Scale Image).
11. Add copyright info and name
12. Save as .png
ALL DONE!!!!!!!!!!
Friendship
This tutorial is of my own creation and any resemblance to any other tuts is purely coincidental. This tutorial is for personal use only, using it for monetary gain is against our TOU's.
Supplies Needed:
~Gimp (any version will do).
~Dearest Friend PTU scrapkit by Artmama which you can get from Exquisite Scraps HERE.
~Tubes of choice. I used the art of PinUpToons, you must have a license to use this art which you can get HERE.
~Template of choice. I used Spring 1-Beautiful Spring template which you can get HERE.
~Mask of choice. I used WSL mask84 which you can get HERE.
~Font of choice. I used Pea Faith Dots.
Let's get started!!!
1. Open a new layer ( I prefer a large canvas, so I make mine 1050x656). Make your canvas transparent (Layer > Transparency > Color to Alpha).
2. Open template in PSD format, move layers of template around until they are the way you like them. I deleted the green flower and wordart layers of this template.
~Add paper from scrapkit to individual layers of the template (Right click on layer in layer box > Alpha to Selection > CTRL I > Select paper layer in layer box > Delete). (To add different papers to each square of the top layer on this template, use your Magic Wand tool in your tool box to select the individual square you would like to add the paper to instead of using the Alpha to Selection option. Then follow remaining directions for adding paper to template layers.)
These are the papers I used:
Paper 1
Paper 2
Paper 4
Paper 8
Paper 9
Paper 11
Paper 12
Paper 14
~I added noise to some of the template layers to make them look glittery (Filters > Noise > RGB Noise).
~I colorized some of the template layers to better match the scrapkit (Colors > Colorize > play with the setting until you get the desired color).
~Add drop shadow to template layers (Filters > Light & Shadow > Drop Shadow).
3. Open tubes, I used a full body and a close-ups. I lowered the opacity the close-ups to 50 (at the top of the layer box you will see a bar you can slide to change the opacity of the selected layer). Add drop shadow to full body tube.
4. Open and place the following elements:
embellie 8
embellie 6
embellie 50
embellie 46
embellie 42
embellie 2
embellie 47
embellie 32
embellie 34
embellie 28
embellie 30
embellie 22
embellie 23
embellie 51
~Some of the elements may need to be sized down. Using your scale tool in your tool box adjust the pixel size until element is the correct size~
~Add drop shadow to all elements~
5. Open Paper 13
6. Open mask
7. Add mask to paper
8. Merge Layers (Image > Merge Visible Layers).
9. Crop Image (Image > Autocrop Image).
10. Scale image to desired size (Image > Scale Image).
11. Add copyright info and name
12. Save as .png
ALL DONE!!!!!!!!!! 

This tutorial is of my own creation and any resemblance to any other tuts is purely coincidental. This tutorial is for personal use only, using it for monetary gain is against our TOU's. Supplies Needed: ~Gimp (any version will do). ~Tube of choice. I used the super hot artwork of Ismael Rac. You must have a license to use this art which you can get HERE. ~Anna PTU scrapkit which you can get from Addictive Pleasures HERE. ~Mask of choice. I used Vix mask 431 which you can get HERE. ~Font of choice. I used Freebooter Script. Let's get started!!!!! 1. Open a new canvas ( I prefer a large canvas, so I make mine 1050x656). Make your canvas transparent (Layer > Transparency > Color to alpha). 2. Open Frame, rotate 90 degrees( Layer > Transform> Rotate 90 degrees), add drop shadow (Filters > Light & Shadow > Drop Shadow). 3. Open tube, I made the tube black & white (Colors > Desaturate > Luminosity). I also tinted the tube a slight shade of purple (Colors > Colorize > adjust to desired color). Add drop shadow to tube. 4. Open and place the following elements: Cross 2 Skull Skull 2 Skull 3 Flowers Butterflies2 Chain4 Box Rose x4 ~Some of the elements may need to be sized down. Using your scale tool in your tool box adjust the pixel size until element is the correct size~ ~Add drop shadow to all elements~ 5. Open Paper 5. 6. Open mask. 7. Add mask to paper 8. Merge layers (Image > Merge Visible Layer). 9. Autocrop image (Image > Autocrop Image). 10. Scale image to desired size (Image > Scale Image). 11. Add copyright info and name. 12. Save as .png You are finished :)
 This tutorial is of my own creation and any resemblance to any other tuts is purely coincidental. This tutorial is for personal use only, using it for monetary gain is against our TOU's.
Supplies Needed:
~Gimp (any version will do).
~Tube of choice. I used the awesome artwork of Ismael Rac, you must have a license to use his art which you can get HERE.
~Winter Wonderland PTU scrapkit which you can get from Creative Intentionz HERE.
~Mask of choice. I used WSL mask223 which you can get HERE.
~Font of choice. I used Saginaw.
Let's get started!!!!!
1. Open a new layer ( I prefer a large canvas, so I make mine 1050x656). Make your canvas transparent (Layer > Transparency > Color to alpha).
2. Open SnowFrame 3, add drop shadow (Filters > Light & Shadow > Drop Shadow).
3. Open Paper 12 center it behind the frame, remove excess paper using a cutting tool or eraser.
4. Open your tube, add drop shadow.
5. Open and place the following elements:
String 1
SnowFlake 1
SnowFlake 2
Brad 3
Flower 1
Flower 3
Star 1
SnowMan 1
Penguin 1
~Some elements may need to be sized down. Using the Scale Tool in your tool box adjust pixels to desired size~
~Add drop shadow to all elements~
6. Open Paper 7.
7. Open mask.
8. Add mask to paper (right click on paper layer in layer box > Add Layer Mask > Black Full Transparency).
~Select mask in layer box, right click on mask (on canvas) > copy.
~Make mask layer invisible (click on eye next to mask in layer box).
~Select paper in layer box, right click on paper (on canvas, all you will see is the outline of the paper) > Paste.
~Anchor layer (click on anchor next to trash can on layer box).
~Right click on paper layer (in layer box) > Apply Layer Mask.
~Delete mask layer from layer box.
9. Merge layers (Image > Merge Visible Layer).
10. Crop image (Image > Autocrop Image).
11. Scale image to desired size (Image > Scale Image).
12. Add copyright info and name.
13. Save as .png
You are finished :)
This tutorial is of my own creation and any resemblance to any other tuts is purely coincidental. This tutorial is for personal use only, using it for monetary gain is against our TOU's.
Supplies Needed:
~Gimp (any version will do).
~Tube of choice. I used the awesome artwork of Ismael Rac, you must have a license to use his art which you can get HERE.
~Winter Wonderland PTU scrapkit which you can get from Creative Intentionz HERE.
~Mask of choice. I used WSL mask223 which you can get HERE.
~Font of choice. I used Saginaw.
Let's get started!!!!!
1. Open a new layer ( I prefer a large canvas, so I make mine 1050x656). Make your canvas transparent (Layer > Transparency > Color to alpha).
2. Open SnowFrame 3, add drop shadow (Filters > Light & Shadow > Drop Shadow).
3. Open Paper 12 center it behind the frame, remove excess paper using a cutting tool or eraser.
4. Open your tube, add drop shadow.
5. Open and place the following elements:
String 1
SnowFlake 1
SnowFlake 2
Brad 3
Flower 1
Flower 3
Star 1
SnowMan 1
Penguin 1
~Some elements may need to be sized down. Using the Scale Tool in your tool box adjust pixels to desired size~
~Add drop shadow to all elements~
6. Open Paper 7.
7. Open mask.
8. Add mask to paper (right click on paper layer in layer box > Add Layer Mask > Black Full Transparency).
~Select mask in layer box, right click on mask (on canvas) > copy.
~Make mask layer invisible (click on eye next to mask in layer box).
~Select paper in layer box, right click on paper (on canvas, all you will see is the outline of the paper) > Paste.
~Anchor layer (click on anchor next to trash can on layer box).
~Right click on paper layer (in layer box) > Apply Layer Mask.
~Delete mask layer from layer box.
9. Merge layers (Image > Merge Visible Layer).
10. Crop image (Image > Autocrop Image).
11. Scale image to desired size (Image > Scale Image).
12. Add copyright info and name.
13. Save as .png
You are finished :)


This tutorial is of my own creation and any resemblance to any other tuts is purely coincidental. This tutorial is for personal use only, using it for monetary gain is against our TOU's. Supplies: Gimp- Any version should work Tube of choice. I am using the work of Ismael Rac. You must have a licence to use his art. You can purchase his tubes HERE. Beautiful PTU scrap kit 'Autumn Wind' from Artmama Made HERE. Wanna Puck template from CrazyCakesScraps HERE. WSL Mask 81 HERE Font- Aquarelle Let's begin! -Open your template in Gimp. Delete Raster 1, dotline1 & 2, star 1 & 2 and the copyright info. Using your crop tool, crop the template as closeto the edges as possible without cutting off any of the template. After you crop, go to Image>Scale Image. In the width column put in 425 and press enter on your keyboard. Then press scale. Now go to Image>Canvas Size. Make your canvas size 450x450 pixels. Press center. -Make your oval layer active. Right click the layer in the layer box and press layer to image size. Using your magic wand click outside the oval. Delete this layer by pressing the little trash can icon on the bottom of the layer box. Open paper 16. Right click the layer in the layer box and press add aloha channel. Now go to Layer>Scale Layer by 50%. Press delete on your keyboard to delete the excess paper. Go to Select>None. Layer to image size again. Right click the layer in the layer box and press alpha to selection. Go to Select>Grow by 3. Add a new layer above this layer. Using your bucket fill tool, fill with 7ba277. Now go to Select>Shrink by 5. Press delete on your keyboard. Select none. Go to Filters>Light and Shadow>Drop Shadow of 2, 2, 2, black, 40. -Make the backtangle layer active. Layer to image size and click outside using the magic wand.Open paper 5. Add alpha channel and scale by 50%. Select none. Layer to Image size. Alpha to selection and add new layer above this layer. Grow by 2. Fill new layer with the same green color as before. Shrink by 4. Select none and add same drop shadow. Delete the backtangle layer. -Make the circle layer active. Layer to image size and click outside using the magic wand. Open paper 19. Add alpha channel and scale by 50%. Press delete on your keyboard. Select none and layer to inage size. Delete the original circle layer. -Make the glitterframe layer active. Layer to image size and alpha to selection. Add new layer above this later. Fill with fdcd8e. Select none and add drop shadow. Delete the glitterframe layer. -Make the square layer active. Layer to image size. Click outside with magic wand. Open paper 18. Add alpha channel and scale by 50%. Press delete. Select none. Layer to image size and alpha to selection. Add new layer below this layer. Grow by 3 and fill with cream color used before. Select none. Delete the original square layer. -Make the backcircle layer active. Layer to image size. Using magic wand click outside circle. Open paper 1. Add alpha channel and scale by 50%. Press delete. Select none. Layer to image size and alpha to selection. Add new layer below this layer. Grow by 4. Fill with 573912. Select none. Add drop shadow. Delete back circle layer. -Make the frontangle layer active. Layer to image size. Click outside with magic wand. Open paper 11. Add alpha channel and scale by 50%. Press delete. Select none. Layer to image size. Alpha to selection. Add new layer above this layer. Grow by 3. Fill with same brown color. Shrink by 4 and press delete. Select none and add drop shadow. Delete frontangle layer. -Make the star 1 layer active. Layer to image size and using the magic wand click INSIDE the star. Add new layer above this layer and fill with green color from before. Select none. Add drop shadow. Delete the star1 layer. Do the same with the star 2 layer, but fill with cream color used before. -Open your tube. Move this layer to the top in the layer box. Go to Layer>Duplicate Layer and duplicate. Click the little eye next to one of your tube layers to hide the layer. Make sure your visible tube layer is active. Scale by 65%. Using your flip tool, flip your tube. Move this tube layer above the oval in the layer box. Make your oval layer active. Using the magic wand, click outside the oval. Make your tube layer active again. Press delete. Select none and layer to image size. Change the mode to grain merge. Unhide your other tube layer and make it active. Scale by 40%. Layer to image size and add drop shadow. Make your oval layer active agai and click outside with magic wand. Make your tube layer avtive again and erase the left side of the tube that is sticking out of the oval. See my tag as a reference. Select none. Element time! Add drop shadow to all element layers. See my tag as a reference as to where to place element layers. -Element 5 Move layer to the very bottom Scale by 65% -Element 29 Move layer to the top Scale by 50% -Element 46 Move layer to the bottom Scale by 40% -Element 34 Move layer below the rectangle layer Scale by 35% -Element 9 Scale by 50% -Element 31 Scale by 85% -Element 36 Move below main tube layer Scale by 35% -Element 8 Move layer below oval layer Scale by 35% Using the rotate tool, rotate by -50 -Element 32 Move above other ribbon Flip using the flip tool 85% -Element 6 Move to the bottom Scale by 50% -Element 23 Move to the bottom Scale by 50% -Element 40 Move to the top Scale by 35% Duplicate and flip -Next we are going to add a mask. -Now add your name. I used the brown we used earlier and the outline is the cream color we used before. Add drop shadow. -Add copyright. -Go to Image>Merge Visible Layers. Now go to Image>Autocrop Image. Save and you are finished!
 This tutorial is of my own creation and any resemblance to any other tuts is purely coincidental. This tutorial is for personal use only, using it for monetary gain is against our TOU's.
Supplies Needed:
~Gimp (any version will do).
~Tube of choice. I used the awesome artwork of Ismael Rac, you must have a license to use his art which you can get HERE.
~Autumn Wind PTU scrapkit which you can get from Artmama Made HERE.
~Mask of choice. I used WSL mask364 which you can get HERE.
~Font of choice. I used aka Dora.
Let's get started!!!!!
1. Open a new layer ( I prefer a large canvas, so I make mine 1050x656). Make your canvas transparent (Layer > Transparency > Color to alpha).
2. Open embellie 5 (frame), add drop shadow (Filters > Light & Shadow > Drop Shadow).
3. Open Paper 20 center it behind round portion of the frame, remove excess paper using a cutting tool or eraser.
4. Open your tube, add drop shadow.
5. Open and place the following elements:
embellie 41
embellie 42
embellie 43
embellie 44
embellie 8
embellie 2
embellie 25
embellie 52
embellie 40
embellie 11
embellie 48
embellie 54
embellie 22
~Some elements may need to be sized down. Using the Scale Tool in your tool box adjust pixels to desired size~
~Add drop shadow to all elements~
6. Open Paper 1.
7. Open mask.
8. Add mask to paper (right click on paper layer in layer box > Add Layer Mask > Black Full Transparency).
~Select mask in layer box, right click on mask (on canvas) > copy.
~Make mask layer invisible (click on eye next to mask in layer box).
~Select paper in layer box, right click on paper (on canvas, all you will see is the outline of the paper) > Paste.
~Anchor layer (click on anchor next to trash can on layer box).
~Right click on paper layer (in layer box) > Apply Layer Mask.
~Delete mask layer from layer box.
9. Merge layers (Image > Merge Visible Layer).
10. Crop image (Image > Autocrop Image).
11. Scale image to desired size (Image > Scale Image).
12. Add copyright info and name.
13. Save as .png
You are finished :)
This tutorial is of my own creation and any resemblance to any other tuts is purely coincidental. This tutorial is for personal use only, using it for monetary gain is against our TOU's.
Supplies Needed:
~Gimp (any version will do).
~Tube of choice. I used the awesome artwork of Ismael Rac, you must have a license to use his art which you can get HERE.
~Autumn Wind PTU scrapkit which you can get from Artmama Made HERE.
~Mask of choice. I used WSL mask364 which you can get HERE.
~Font of choice. I used aka Dora.
Let's get started!!!!!
1. Open a new layer ( I prefer a large canvas, so I make mine 1050x656). Make your canvas transparent (Layer > Transparency > Color to alpha).
2. Open embellie 5 (frame), add drop shadow (Filters > Light & Shadow > Drop Shadow).
3. Open Paper 20 center it behind round portion of the frame, remove excess paper using a cutting tool or eraser.
4. Open your tube, add drop shadow.
5. Open and place the following elements:
embellie 41
embellie 42
embellie 43
embellie 44
embellie 8
embellie 2
embellie 25
embellie 52
embellie 40
embellie 11
embellie 48
embellie 54
embellie 22
~Some elements may need to be sized down. Using the Scale Tool in your tool box adjust pixels to desired size~
~Add drop shadow to all elements~
6. Open Paper 1.
7. Open mask.
8. Add mask to paper (right click on paper layer in layer box > Add Layer Mask > Black Full Transparency).
~Select mask in layer box, right click on mask (on canvas) > copy.
~Make mask layer invisible (click on eye next to mask in layer box).
~Select paper in layer box, right click on paper (on canvas, all you will see is the outline of the paper) > Paste.
~Anchor layer (click on anchor next to trash can on layer box).
~Right click on paper layer (in layer box) > Apply Layer Mask.
~Delete mask layer from layer box.
9. Merge layers (Image > Merge Visible Layer).
10. Crop image (Image > Autocrop Image).
11. Scale image to desired size (Image > Scale Image).
12. Add copyright info and name.
13. Save as .png
You are finished :) 
 This tutorial is of my own creation and any resemblance to any other tuts is purely coincidental. This tutorial is for personal use only, using it for monetary gain is against our TOU's.
Supplies Needed:
~Gimp (any version will do).
~BCA Collab 2009 PTU scrapkit which you can get from Scraps with Attitude HERE.
~Tube of choice. I used the FTU art of Osa Honey, you can download her tubes directly from her blog HERE.
~Template of choice. I used BCA Template 2 by Tracy @ Freebie Friends Scraps & More HERE.
~Mask of choice. I used WSL mask218 which you can get HERE.
~Font of choice. I used Sign Painter House Script.
Let's get started!!!
1. Open a new layer ( I prefer a large canvas, so I make mine 1050x656). Make your canvas transparent (Layer > Transparency > Color to Alpha).
2. Open template in PSD format, move layers of template around until they are the way you like them.
~Add paper from scrapkit to individual layers of the template (Right click on layer in layer box > Alpha to Selection > CTRL I > Select paper layer in layer box > Delete).
These are the papers I used:
Paper 4
Paper 6
~I added noise to some of the template layers to make them look glittery (Filters > Noise > RGB Noise).
~I colorized some of the template layers to better match the scrapkit (Colors > Colorize > play with the setting until you get the desired color).
~Add drop shadow to template layers (Filters > Light & Shadow > Drop Shadow).
3. Open tube, add drop shadow.
4. Open and place the following elements:
WordTag 2
HeartRope 1
Flower 1
Flower 2
Flower 3
Flower 6
Baby Bear 3
~Some of the elements may need to be sized down. Using your scale tool in your tool box adjust the pixel size until element is the correct size~
~Add drop shadow to all elements~
5. Open Paper 2
6. Open mask
7. Add mask to paper (right click on paper layer in layer box > add layer mask > black full transparency).
~Select mask layer in layer box, right click on mask layer (on canvas) > copy.
~Make mask layer invisible (click on eye next to mask in layer box).
~Select paper in layer box, right click on paper (on canvas, all you will see is the outline of the paper) > Paste.
~Anchor layer (click on anchor next to trash can on layer box).
~Right click on paper layer in layer box > apply layer mask.
~Delete mask from layer box.
8. Merge Layers (Image > Merge Visible Layers).
9. Crop Image (Image > Autocrop Image).
10. Scale image to desired size (Image > Scale Image).
11. Add copyright info and name
12. Save as .png
ALL DONE!!!!!!!!!!
This tutorial is of my own creation and any resemblance to any other tuts is purely coincidental. This tutorial is for personal use only, using it for monetary gain is against our TOU's.
Supplies Needed:
~Gimp (any version will do).
~BCA Collab 2009 PTU scrapkit which you can get from Scraps with Attitude HERE.
~Tube of choice. I used the FTU art of Osa Honey, you can download her tubes directly from her blog HERE.
~Template of choice. I used BCA Template 2 by Tracy @ Freebie Friends Scraps & More HERE.
~Mask of choice. I used WSL mask218 which you can get HERE.
~Font of choice. I used Sign Painter House Script.
Let's get started!!!
1. Open a new layer ( I prefer a large canvas, so I make mine 1050x656). Make your canvas transparent (Layer > Transparency > Color to Alpha).
2. Open template in PSD format, move layers of template around until they are the way you like them.
~Add paper from scrapkit to individual layers of the template (Right click on layer in layer box > Alpha to Selection > CTRL I > Select paper layer in layer box > Delete).
These are the papers I used:
Paper 4
Paper 6
~I added noise to some of the template layers to make them look glittery (Filters > Noise > RGB Noise).
~I colorized some of the template layers to better match the scrapkit (Colors > Colorize > play with the setting until you get the desired color).
~Add drop shadow to template layers (Filters > Light & Shadow > Drop Shadow).
3. Open tube, add drop shadow.
4. Open and place the following elements:
WordTag 2
HeartRope 1
Flower 1
Flower 2
Flower 3
Flower 6
Baby Bear 3
~Some of the elements may need to be sized down. Using your scale tool in your tool box adjust the pixel size until element is the correct size~
~Add drop shadow to all elements~
5. Open Paper 2
6. Open mask
7. Add mask to paper (right click on paper layer in layer box > add layer mask > black full transparency).
~Select mask layer in layer box, right click on mask layer (on canvas) > copy.
~Make mask layer invisible (click on eye next to mask in layer box).
~Select paper in layer box, right click on paper (on canvas, all you will see is the outline of the paper) > Paste.
~Anchor layer (click on anchor next to trash can on layer box).
~Right click on paper layer in layer box > apply layer mask.
~Delete mask from layer box.
8. Merge Layers (Image > Merge Visible Layers).
9. Crop Image (Image > Autocrop Image).
10. Scale image to desired size (Image > Scale Image).
11. Add copyright info and name
12. Save as .png
ALL DONE!!!!!!!!!!

This tutorial is of my own creation and any resemblance to any other tuts is purely coincidental. This tutorial is for personal use only, using it for monetary gain is against our TOU's. Supplies: Gimp- Any version should work FTU Ismael Rac tube. Even though it's FTU, you still need to use a proper license with this tube. You can get the tube HERE PTU Scrap kit 'BCA Collab' from Scraps With Attitude HERE Vix Mask 364 HERE Font- Scriptina Let's begin! -Go to File>New and open a new canvas with a width of 500 and heigth of 500 pixels. Press ok. -Open frame 1. Go to Layer>Scale Layer by 50%. Position in the middle and toward the bottom of the canvas. Right click the frame layer in the layer box and click layer to image size. Using the magic wand, click inside the top square of the frame. Go to Select>Grow by 3. Press ok. Open paper 2 and move layer below frame layer in layer box. Right click paper layer in layer box and choose add alpha channel. Now scale by 40%. Go to Select>Invert and then press delete on your keyboard. Go to Select>None and layer to image size to this paper layer. -Repeat above with paper to the bottom squares. In the left square I used paper 3 and the right square I used paper 4. Make the frame later active and go to Filters>Light and Shadow>Drop Shadow of 2, 2, 2. black, 40. -Open your tube. Move layer to the top in the layer box. Right click in layer box and choose duplicate. Duplicate 2 times for a total of 3 tube layers. Hide 2 of the tube layers by clicking the little eye next to the layer in the layer box. Make your visible tube layer active and scale by 65%. Position in the middle of the frame. Add same drop shadow. Layer to Image size. -Unhide one of the hidden tube layers. Move layer below the frame layer in the layer box. Position tube in the bottom left box of the frame. See my tag as a reference. Make the bottom left paper layer active. Using the magic wand, click outside of the paper. Make your tube layer active and press delete on your keyboard. Select none and layer to image size. Change the opacity to 50. Do the same with the other hidden tube layer, but put it in bottom right square. -Open flower heart chain 1. Move layer below main tube layer. Scale by 25%. Place to the right of the main tube. Add drop shadow and layer to image size. -Open flower 3. Move layer to the bottom. Scale by 15% and place the the left of the main tube. Layer to image size. Duplicate and using your flip tool flip the duplicate layer. -Open heart rope 1. Move layer above frame layer. Scale by 40%. Place at the bottom of the frame. Add drop shadow and layer to image size. -Open word tag 2. Move layer below your main tube layer. Scale by 25%. Using the rotate tool, click on the canvas. Rotate by 25 and place on the bottom left. Layer to image size and add drop shadow, -Open word tag 3. Move above the hope word tag. Scale by 20%. Rotate my 25. Add drop shadow and layer to image size. -Open paper 1 and move to the bottom. Open mask. Make the paper layer active. In the layers box, right click on the paper and click Add layer mask and make sure that black full transparency is selected. Make the mask layer active and go to Edit>Copy. Make the mask layer invisible by clicking the eye next to it in the layer box. Go to Edit>Paste. Click the anchor at the bottom of the layer box. Right click on the paper layer in the layer box and click Apply layer Mask. Change the opacity of the paper layer to 45. Delete mask layer. -Add your name and copyrights. -Go to Image>Merge Visible Layers and press ok. Next, go to Image>Autocrop Image. There you have it! Hope you enjoyed my tut:)

This tutorial is of my own creation and any resemblance to any other tuts is purely coincidental. This tutorial is for personal use only, using it for monetary gain is against our TOU's. Supplies Needed: ~Gimp (any version will do). ~Tube of choice. I used the art of Suzanne Woolcott, you must have a license to use her art which you can get HERE. ~Strangers in the Night PTU scrapkit which you can get from Sweet Cravings Scraps HERE. ~Mask of choice. I used Vix mask 404 which you can get HERE. ~Font of choice. I used Bitchin. Let's get started!!!!! 1. Open a new layer ( I prefer a large canvas, so I make mine 1050x656). Make your canvas transparent (Layer > Transparency > Color to alpha). 2. Open Frame 9, add drop shadow (Filters > Light & Shadow > Drop Shadow). 3. Open your tube, add drop shadow. 4. Open and place the following elements: Lightning 3 Spooky Castle Moon & Cloud Ghost Sign 1 Bat Candy Bag Jack O'Lantern Spider 1 Frog ~Some elements may need to be sized down. Using your Scale Tool in your tool box adjust the pixel size to desired size~ ~Add drop shadow to all elements~ 5. Open Paper 7. 6. Open mask. 7. Add mask to paper (right click on paper layer in layer box > Add Layer Mask > Black Full Transparency). ~Select mask in layer box, right click on mask (on canvas) > copy. ~Make mask layer invisible (click on eye next to mask in layer box). ~Select paper in layer box, right click on paper (on canvas, all you will see is the outline of the paper) > Paste. ~Anchor layer (click on anchor next to trash can on layer box). ~Right click on paper layer (in layer box) > Apply Layer Mask. ~Delete mask layer from layer box. 8. Merge layers (Image > Merge Visible Layer). 9. Crop image (Image > Autocrop Image). 10. Scale image to desired size (Image > Scale Image). 11. Add copyright info and name. 12. Save as .png You are finished :)
 This tutorial is of my own creation and any resemblance to any other tuts is purely coincidental. This tutorial is for personal use only, using it for monetary gain is against our TOU's.
Supplies Needed:
~Gimp (any version will do).
~Pink Ribbon PTU scrapkit which you can get from Creative Intentionz HERE.
~Tube of choice. I used the outstanding art of Ismael Rac, you must have a license to use his art which you can get HERE.
~Mask of choice. I used WSL mask224 which you can get HERE.
~Template of choice. I used Tracy F. BCA template 8 which you can get HERE.
~Font of choice. I used Aquarelle.
Let's get started!!!
1. Open a new layer ( I prefer a large canvas, so I make mine 1050x656). Make your canvas transparent (Layer > Transparency > Color to Alpha).
2. Open Template in PSD format, move layers of template around until they are the way you like them.
~Add paper from scrapkit to individual layers of the template (Right click on layer in layer box > Alpha to Selection > CTRL I > Select paper layer in layer box > Delete).
These are the papers I used:
Paper 2
Paper 6
Paper 8
Paper 10
~I also added noise to some of the layers to make them look glittery (Filters > Noise > RGB Noise).
~Add drop shadow to layers (Filters > Light & Shadow > Drop Shadow).
3. Open tubes, I used both a full body and 2 close ups. I lowered the opacity of the close ups to 50 (at the top of the layer box you will see a bar you can slide to change the opacity of the selected layer). Add drop shadow to the full body tube.
4. Open and place the following elements:
Sparkles
CallaLillies 1
Flower 1
Flower 2
Bird
AwarenessRibbon 2
Doodle 1
~Some of the elements may need to be sized down. Using your Scale Tool on your tool box adjust the pixel size to desired size~
~Add drop shadow to all elements~
5. Open Paper 4
6. Open mask
7. Add mask to paper (right click on paper layer in layer box > add layer mask > black full transparency).
~Select mask layer in layer box, right click on mask layer (on canvas) > copy.
~Make mask layer invisible (click on eye next to mask in layer box).
~Select paper in layer box, right click on paper (on canvas, all you will see is the outline of the paper) > Paste.
~Anchor layer (click on anchor next to trash can on layer box).
~Right click on paper layer in layer box > apply layer mask.
~Delete mask from layer box.
8. Merge Layers (Image > Merge Visible Layers).
9. Crop Image (Image > Autocrop Image).
10. Scale image to desired size (Image > Scale Image).
11. Add copyright info and name
12. Save as .png
YOU ARE DONE!!!!!!!!!!
This tutorial is of my own creation and any resemblance to any other tuts is purely coincidental. This tutorial is for personal use only, using it for monetary gain is against our TOU's.
Supplies Needed:
~Gimp (any version will do).
~Pink Ribbon PTU scrapkit which you can get from Creative Intentionz HERE.
~Tube of choice. I used the outstanding art of Ismael Rac, you must have a license to use his art which you can get HERE.
~Mask of choice. I used WSL mask224 which you can get HERE.
~Template of choice. I used Tracy F. BCA template 8 which you can get HERE.
~Font of choice. I used Aquarelle.
Let's get started!!!
1. Open a new layer ( I prefer a large canvas, so I make mine 1050x656). Make your canvas transparent (Layer > Transparency > Color to Alpha).
2. Open Template in PSD format, move layers of template around until they are the way you like them.
~Add paper from scrapkit to individual layers of the template (Right click on layer in layer box > Alpha to Selection > CTRL I > Select paper layer in layer box > Delete).
These are the papers I used:
Paper 2
Paper 6
Paper 8
Paper 10
~I also added noise to some of the layers to make them look glittery (Filters > Noise > RGB Noise).
~Add drop shadow to layers (Filters > Light & Shadow > Drop Shadow).
3. Open tubes, I used both a full body and 2 close ups. I lowered the opacity of the close ups to 50 (at the top of the layer box you will see a bar you can slide to change the opacity of the selected layer). Add drop shadow to the full body tube.
4. Open and place the following elements:
Sparkles
CallaLillies 1
Flower 1
Flower 2
Bird
AwarenessRibbon 2
Doodle 1
~Some of the elements may need to be sized down. Using your Scale Tool on your tool box adjust the pixel size to desired size~
~Add drop shadow to all elements~
5. Open Paper 4
6. Open mask
7. Add mask to paper (right click on paper layer in layer box > add layer mask > black full transparency).
~Select mask layer in layer box, right click on mask layer (on canvas) > copy.
~Make mask layer invisible (click on eye next to mask in layer box).
~Select paper in layer box, right click on paper (on canvas, all you will see is the outline of the paper) > Paste.
~Anchor layer (click on anchor next to trash can on layer box).
~Right click on paper layer in layer box > apply layer mask.
~Delete mask from layer box.
8. Merge Layers (Image > Merge Visible Layers).
9. Crop Image (Image > Autocrop Image).
10. Scale image to desired size (Image > Scale Image).
11. Add copyright info and name
12. Save as .png
YOU ARE DONE!!!!!!!!!!
Snag Our Blinkies


Don't Be A Pirate!

