Gimptastic Scraps Available Exclusively @

Gimptastic Scraps CT


Blog Trains

CU Licenses


Friday, November 30, 2012


Below is a tag I made with both the tube & kit...


This tutorial is of my own creation and any resemblance to any other tuts is purely coincidental. This tutorial is for personal use only, using it for monetary gain is against our TOU's.
Supplies:
Gimp or program of choice
PTU kit My First Christmas from Desirena Designs. You can purchase this kit at The PSP Project.
Tube of hcoice. I am using the art of Elias Chatzoudis. You must have a licnese to use these tubes. Purchase them at his shop HERE.
Template 78 from Addictive Templates. Its the 2nd one on the linked page.
Mask 3 from Staci Rosa at Creative Misfits Creations
Font- Janda Silly Monkey
-Open template. Delete credits. Image>Scale Image 450x450 px. Image>Canvas Size 600x600 px and click center.
-Let's add papers to the template layers. Make the template layer active (see below). Right click template layer in layer box and choose alpha to selection. Open paper (see below). Right click paper layer in layer box and choose add alpha channel. Select>Invert. Press delete on your keyboard. Select>None. Filters>Light & Shadow>Drop Shadow 2, 2, 2, black, 50. Delete the original template layer. Here are the template layers and which papers I used:
raster 9- paper 1
raster 12- paper 8
raster 11- paper 6
raster 14- paper 7
raster 5- paper 9
raster 1- paper 3
raster 2- paper 10
-Repeat drop shadow on the following layers:
raster 3
raster 6
raster 7
raster 8
raster 15
raster 16
-Make raster 10 active. Colors>Colorize Hue: 95, Saturation: 50, Lightness: 27. Repeat drop shadow.
-Open tube. Move tube below all the word art layers in the layer box. Place tube to the right side of thag. Repeat drop shadow. Layer>Duplicate Layer. Filters>Blur>Gaussian BLur on default. Changethe mode to solft light and lower the opacity to 65.
-Open frame 2. Move this layer above the big yellow circle paper layer. Layer>Scale Layer 70%. Place on the yellow circle. Repeat drop shadow.
Other Elements:
tree
lights 2
present 1, 2, 3
santa
ball 1, 2
candy cane 1
holly
deer
sparkle
snow cocoa
-Open paper 5. Make the bottom layer. Apply mask. Click HERE to learn how to use maks in gimp.
-Add your name and copyright and you're done!
Thursday, November 29, 2012

This tutorial is of my own creation and any resemblance to any other tuts is purely coincidental. This tutorial is for personal use only, using it for monetary gain is against our TOU's
Supplies:
Gimp or program of choice
PTU kit Kindreds Swan from Gimptastic Scraps. Purchase this kit exclusivley at PSP Tubes Stop.
Tube of choice. I am using the art of Keith Garvey. You must have a licnese to use these tubes. Purchase them at Garv Girls
Mask 2 from Melissaz Creationz
Fonts- Quickier Demo & Great Vibes
-File>New 600x600 px.
-Open window. Layer>Scale Layer 75%. Place in center of canvas. Select the magic wand and click inside the window. Select>Grow 5. Open paper 6 and move below the window in the layer box. Layer>Transparency>Add Alpha Channel. Select>Invert. Press delete on your keyboard. Select>None. Make the window active. Filters>Light &Shadow>Drop Shadow 2, 2, 3, black, 35.
-Open wreath. Make the top layer. Place in the center of window. Repeat drop shadow.
-Open tube. Make the top layer. Scale 65%. Place in the middle of tag. Repeat drop shadow. Layer>Duplicate Layer. Filters>Blur>Gaussian Blur on default. Change the mode to grain merge and lower the opacity to 15.
-Open frame 1. Make the bottom layer. Scale 90%. Place in center of tag. Repeat drop shadow.
Other elements:
bench
flower 1, 2
flower 4, 5 - Flip
scatter
heart scatter
candle
ribbon 1
glitter 1
jar
heart - Rotate 10
leaf 2
key - Rotate 10
butterfly
branch 2
-Open paper 9. Make the bottom layer. Apply mask. Click HERE to learn how to use masks in gimp.
-Make the top layer active. Select the text tool. Font: Quickier Demo, Size: 65, foreground color: fcc978. Click canvas and type 'Crazy for you'. Place text at the upper left of tag. Layer>Transparency>Alpha To Selection. Grow 2. Layer>New Alyer. Move new layer below text layer. Change foreground to 884ecb. Select the bucket fill tool and fill selection. Select none. Add a gaussian blur of 10. Lower the opacity to 35. Make the top text active. Add drop shadow of 2, 2, 2, black, 50.
-Add your name with the Great Vibes font. Also, add your copyright and you're done!
Wednesday, November 28, 2012
My CT has been CRAZY busy and man do I have some awesome results to share with you...
These first few are all made using my new PTU kit Ginger Christmas

This hot tag is from Hannah @ Sugar Coated Tags N Tuts, it's called Ginger Christmas

This adorable tag is from Beth Ann @ Dazzled by Beth Ann, it's also called Ginger Christmas

This fab tag is from Belinda @ BKC Designs, it's called Gingerbread Christmas. She also made some extras you can grab HERE.

Belinda also made these freakin adorable cluster frames you can get HERE.

Millie @ Millie's PSP Madness made this great tut called Merry Xmas. She also made some extras you can get HERE.

Sherena @ Sherena's Sweet Treats made this wicked tut, it's called Give me the Cookies.

Last but not least is this sweet tut from Tweety @ Tweety's Tutorials, it's called Season to be Freezin' and she used my PTU kit also called Season to be Freezin'.
Tuesday, November 27, 2012

This adorable kit is filled with loads of sweet elements, perfect for all
of those Christmas tags. Ginger Christmas contains 50 elements, 5
frames and 10 papers.
I made a freebie cluster frame for all of you...

You can grab it HERE.
This is a tag I made with the frame:


This tutorial is of my own creation and any resemblance to any other tuts is purely coincidental. This tutorial is for personal use only, using it for monetary gain is against our TOU's
Supplies:
Gimp or program of choice
Tube of choice. I am using the art of Xketch. You must have a license to use these tubes. Purchase the one I used at The PSP Project.
PTU kit A Midnight Kiss from Tasha's Playground.
Mask 3 from Melissaz Creationz
Font- Signerica Fat
-File>New 600x600 px.
-Open frame 5. Layer>Scale Layer 75%. Select the magic wand and click inside the frame. Select>Grow 5. Open paper 1 and move below the frame layer in the layer box. Layers>Transparency>Add Alpha Channel. Select>Invert. Press delete on your keyboard. Open tube. Place in selection. Delete. Select>None. Change the mode to value. Make the frame active. FIlters>Light & Shadow>Drop Shadow 3, 3, 5, black, 50.
Open frame 2. Make the bottom layer. Scale 85%. Select the rotate tool and click the canvas. In the angle box put 10. Place frame in the middle of canvas. Repeat drop shadow.
-Open frame 6. Make the top layer. Scale 40%. Place at the bottom left of tag. Using the magic wand, click inside the frame. Grow 5. Open paper 12 and move below the frame. Add alpha channel. Invert & delete. Open tube and place in the selection. Delete. Select none. Change the mode to overlay. Make the frame active. Repeat drop shadow.
-Open swag. Move this layer above the last layer. Scale 65%. Place at the bottom left of tag. Layer>Duplicate Layer. Select the flip tool and click the canvas to flip. Flip again, but press CTRL. Place duplicate to the bottom right of the tag. Repeat drop shadow on both.
Other Elements:
scatter 2
candle
flower 1
flower 3
flower 4
sequin flower
bling
bottle 2
bottle
butterflies
feather
bling string
-Open paper 4. Make the bottom layer. Apply mask. Click HERE to learn how lto use masks in gimp.
-Add your name and copyright and you're done!
Monday, November 26, 2012

Today is the final day of this sale!!!!!!
Don't miss out on these awesome deals!!!
Buy 1 Get 2 FREE @ Pics for Design
Saturday, November 24, 2012

This tutorial is of my own creation and any resemblance to any other tuts is purely coincidental. This tutorial is for personal use only, using it for monetary gain is against our TOU's
Supplies:
Gimp or program of choice
PTU kit Woodland Harmony from A Taggers Scrap
Tube of choice. I am using the art of Edward Reed. You must have a license to use these tubes. You can purchase his tubes at Indie-Zine
Mask 84 from weescotslass
Font- Aliquam
-File>New 600x600 px.
-Open frame 4. Layer>Scale Layer 65%. Place in center of canvas. Select the magic wand and click inside of the frame. Select>Grow 2. Open paper 6 and move below the frame layer in the layer box. Layer>Transparency>Add Alpha Channel. Scale 65%. Select>Invert. Press delete on your keyboard. Select>None. Filters>Light & Shadow>Drop Shadow 2, 2, 2, black, 50.
-Open tube. Make the top layer. Scale 85%. Place toward the right side of frame. Repeat drop shadow. Layer>Duplicate Layer. Filters>Blur>Gaussian Blur on default settings. Change the mode to grain merge and lower the opacity to 40.
-Open grass. Move this layer below the tube layer. Scale 75%. Place at the bottom of tag.
-Open frame 3. Make the bottom layer. Scale 75%. Place in the center of tag. Add drop shadow of 2, 2, 5, black, 30.
-Open frame. Make the bottom layer. Scale 65%. Place to the right side of tag. Repeat drop shadow.
-Open frame 11. Move frame below tube layer. Scale 55%. Select the rotate tool and click canvas. In the angle box put -15. Using the magic wand, click in the top part of frame. Grow 1. Open paper 9 and move paper layer below frame layer. Add alpha channel. Invert & delete. Open tube. Place tube in the selection. Delete. Select none. Change the mode to screen. Repeat for the bottom part of frame, only using paper 1 and change the tube mode to overlay. Make the frame active. Add drop shadow of 2, 2, 5, black, 50.
other elements:
fungi
flower 1
berries
flower 4
flower 5
owl
mushrooms 2
butterfly
glass pebbles
bird
sparkles
-Open paper 4. Make the bottom layer. Apply mask. Click HERE to learn how to use masks in gimp.
-Add your name and copyright and you're done!
Friday, November 23, 2012
I've got some awesome results to share from my CT :)

This adorable tut is from Beth Ann @ Dazzled by Beth Ann, it's called Winter Woods and she used my PTU kit also called Winter Woods.

This beauty is from Hannah @ Sugar Coated Tags N Tuts, it's called Forest Keepers and she used my PTU kit also called Forest Keepers.

Finally, Belinda @ BKC Designs made this hot tag using my portion of our FTU Winter Diva collab.

This tutorial is of my own creation and any resemblance to any other tuts is purely coincidental. This tutorial is for personal use only, using it for monetary gain is against our TOU's
Supplies:
Gimp or program of choice
PTU kit Jingle Jangle from Creative Intentionz. You can purchase this kit at The PSP Project.
Mask 310 from weescotslass
Font- The Great Escape
-File>New 600x600 px.
-Open paper 2. Layer>Transparency>Add Alpha Channel. Layer>Scale Layer 65%. Select the ellipse tool and make selection in the center of the canvas.


Select>Invert. Select>Shrink 30. Press delete on your keyboard. Select>None. Filters>Decor>Add Bevel. Uncheck work on copy and leave the rest of the settings. Place near bottom left of canvas. Repeat for paper 4. Place this frame towards the top right of canvas.


-Make the red frame active. Select the magic wand and click inside red frame. Select>Grow 5. Open paper 1 and move paper layer below frame layer in the layer box. Add alpha channel. Invert & delete. Select none. Repeat for green frame usinf paper 3. Make the red frame active again. Add drop shadow of 2, 2, 3, black, 35. Repeat drop shadow on green frame.
-Open paper 5. Make the bottom layer. Add alpha channel. Scale 45%. Select the rotate tool and click canvas. In the angle box put 15. Layer>Transparency>Alpha To Selection. Shrink 30. Delete. Select none. Add bevel. Add paper 7 to this frame (repeat steps above for adding paper to red frame). Repeat drop shadow on blur frame. Repeat with paper 8, Only rotate -15 and add paper 6 to frame.
-Open element 22. Make the top layer. Scale 50%. Place at the bottom of the tag. Repeat drop shadow.
-Open element 13. Move this layer below the word art layer. Place in the middle of tag. Repeat drop shadow.
Other elements:
9
10
18
24
11
14
25 - Rotate 10
-Open paper 7. Make the bottom layer. Apply mask. Click HERE to learn how to use masks in gimp.
-Add name and copyright and you're done!

This tutorial is of my own creation and any resemblance to any other tuts is purely coincidental. This tutorial is for personal use only, using it for monetary gain is against our TOU's.
Supplies Needed:
~Gimp (any version will do).
~Cold as Ice PTU scrapkit by A Taggers Scrap.
~Tube of choice. I used the artwork of Jennifer Janesko, you must have a license to use this art which you can now get from CDO HERE.
~Template of choice. I used template 129 which you can get from Millie's PSP Madness HERE.
~Font of choice. I used Alex Brush.
Let's get started!!!
1. Open a new layer (I prefer a large canvas, so I make mine 1050x656). Make your canvas transparent (Layer > Transparency > Color to Alpha).
2. Open template in PSD format, move layers of template around until they are the way you like them.
~Add paper from scrapkit to individual layers of the template (Right click on template layer in layer box > Alpha to Selection > CTRL I > Select paper layer in layer box > Delete).
These are the papers I used:
Paper 1
Paper 2
Paper 3
Paper 8
Paper 15
~I added noise to some of the template layers to make them look glittery (Filters > Noise > RGB Noise).
~I colorized some of the template layers to better match the scrapkit (Colors > Colorize > play with the setting until you get the desired color).
~Add drop shadow to template layers (Filters > Light & Shadow > Drop Shadow).
3. Open tube, add drop shadow.
4. Open and place the following elements:
Gem Deco
Heart 2
Leaves
Leaf
Snowflake 3
Snowflake 4
Circles 2
Deco 4
Icicle
Candle
Music
Sleigh Bell
Snow Boots
Earmuffs
Butterfly 1
Snow Cloud
Frame 7
~Some of the elements may need to be sized down. Using your scale tool in your tool box adjust the pixel size until element is the correct size~
~Add drop shadow to all elements (except Circles 2, Snow Cloud & Frame 7 )~
5. Merge Layers (Image > Merge Visible Layers).
6. Crop Image (Image > Autocrop Image).
7. Scale image to desired size (Image > Scale Image).
9. Add copyright info and name.
9. Save as .png
ALL DONE!!!!!!!!!!
Thursday, November 22, 2012
WOOT!!!!!!!!!!!!! It's time for savings!!!!!!!!!!!!!!!! I decided to start my sale today :) Now through Monday save BIG!!!!!!!!!!!!!!!!

That's right folks, it's time for big savings!!!!!!!!! These prices are crazy, all of my kits are priced under $1...wow!!!!!! The sale only lasts through Monday...so act fast.
Buy 1 Get 2 FREE @ Pics for Design.
Wednesday, November 21, 2012
Here are a few CT tags and extras : )
The first 2 are from the PTU kit Turkey Day Protest from Gimptastic Scraps


Here are a few snags from this kit


Next, I have some tags using the PTU kit Good Gooble from Tasha's Playground.


Here are a few more snags


Tuesday, November 20, 2012
Woohoo!!!!!!!!!! Here are some amazing results from my awesome CT...
These first tuts are done with my PTU kit Winter Woods:

This beauty is from Millie @ Millie's PSP Madness and it's called Ready for Sledding and Skating


This lovely tut is from Sherena @ Sherena's Sweet Treats, it's called Winter Snowfall. She did an animated and unanimated version.
These tuts were done using my PTU kit Forest Keepers:

This pretty tut is from Belinda @ BKC Designs, it's called Forest Friends. She also made some extras you can grab HERE.

This awesome tut is from Tasha @ Tasha's Playground, it's called Forest Keeper.
WOW!!!!!! Great stuff as always!!!! Thank you ladies ♥
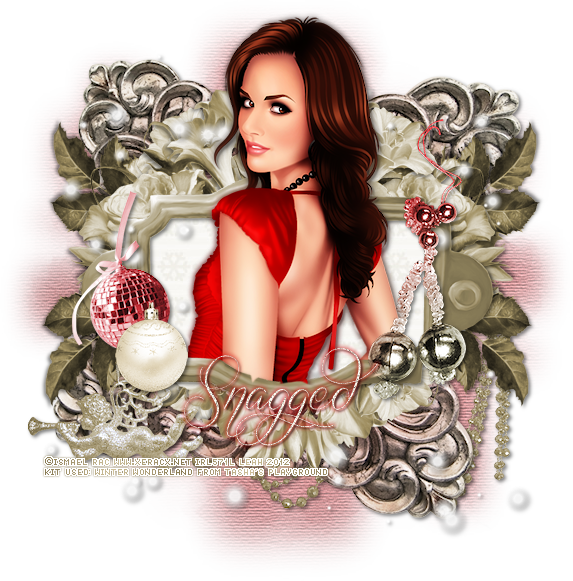
Monday, November 19, 2012
I've got a couple tags tonight using the beautiful new PTU kit Winter Wonderland from Tasha's Playground! Check out her blog to see where you can pick up this kit.


Here are a few snags:


This tutorial is of my own creation and any resemblance to any other tuts is purely coincidental. This tutorial is for personal use only, using it for monetary gain is against our TOU's.
Supplies Needed:
~Gimp (any version will do).
~Tube of choice. I used the artwork of Rebecca Sinz, you must have a license to use this art which you can get from Dreamscape Imaging HERE.
~Violet Winter PTU scrapkit by Tasha's Playground, which you find HERE.
~Font of choice. I used Mr. Canfields.
Let's get started!!!!!
1. Open a new layer ( I prefer a large canvas, so I make mine 1050x656). Make your canvas transparent (Layer > Transparency > Color to alpha).
2. Open Frame 2, add drop shadow (Filters > Light & Shadow > Drop Shadow).
3. Open Paper 4 center it behind Frame 2, remove excess paper using a cutting tool or eraser.
4. Open Window element, place it over Frame 2 & Paper 4 in your layer box. Add drop shadow.
5. Open Paper 9 center it behind Window, remove excess paper using a cutting tool or eraser.
6. Open tube, add drop shadow.
7. Open and place the following elements:
Sparkle 2
Snow
Branch 2
Snowflake 2
Deco 2
Leaves 3
Marble
Lantern
Pinecone
Violin
Berries
Star 2
~Some elements may need to be sized down. Using the Scale Tool in your tool box adjust pixels to desired size~
~Add drop shadow to all elements (except Sparkle 2 & Snow)~
8. Open Flower Circle element and place it under all other elements in your layer box. This will give the effect of using a mask.
9. Merge layers (Image > Merge Visible Layer).
10. Crop image (Image > Autocrop Image).
11. Scale image to desired size (Image > Scale Image).
12. Add copyright info and name.
13. Save as .png
You are finished :)

This tutorial is of my own creation and any resemblance to any other tuts is purely coincidental. This tutorial is for personal use only, using it for monetary gain is against our TOU's
Supplies:
Gimp or program of choice
Gimp or program of choice
PTU Kit Season To Be Freezin from Gimptastic Scraps
Template 178 from Addictive Templates
Fonts- Secret Recipe & Firefly Castle
-Open template. Delete credits, raster 2, 3, 4 & 5. Image>Scale Image 450x450 px. Image>Canvas Size 600x600 px and click center.
-Let's add papers to the template layers. Make the template layer active (see below). Right click template layer in layer box and choose alpha to selection. Open paper (see below). Right click paper layer in layer box and choose add alpha channel. Select>Invert. Press delete on your keyboard. Select>None. Filters>Light & Shadow>Drop Shadow 2, 2, 5, black, 50. Delete the original template layer. Here are the template layers and which papers I used:
copy of raster 7- paper 2 (no drop shadow)
raster 7- paper 4 (no drop shadow)
raster 6- paper 5 (no drop shadow)
raster 9- paper 6
raster 8- paper 8
raster 10- paper 10
-Make raster 11 active. Colors>Colorize on defualt settings. Repeat drop shadow.
-Copy of raster 11 active. Colorize- Hue: 276, Saturation: 50, Lightness: 35. Repeat drop shadow.
-Raster 12 active. Colorize: Hue: 103, Saturation: 63, Lightness: 9. Repeat drop shadow.
-Open frame 4. Make the top layer. Layer>Scale Layer 35%. Place to the bottom right of the tag. Select the magic wand and click inside the frame. Select>Grow 5. Change foreground color to 8cd2dc and background color to b685d6. Select the blend tool. Grandiet: FG TO BG (RGB), Shape: Linear, Repeats: None. Layer>New Layer. Move new layer below frame layer. Add gradient to the selection by clicking the center of the selection and crag down. Layer>Duplicate Layer. Filters>Distort>Ripple. Change only the period to 21 and the amplitute to 53. Filters>Blur>Blur. Open snow angel 1. Place in the selection. Invert & delete. Select none. Change the mode to soft light. Make the frame active and repeat drop shadow.
-Open frame 1. Make the bottom layer. Scale 85%. Select the rotate tool and click canvas. In the angle box put 15. Place in the center of tag. Repeat drop shadow.
-Open snow angel 1. Move below the gradient layers. Scale 85%. Place in the middle of tag. Repeat drop shadow.
-Open penguin 12. Move layer below snow angel. Scale 65%. Rotate 10. Place to the right side of tag. Repeat drop shadow.
-Open scarf. Move layer above snow angel. Place at the bottom of tag. Repeat drop shadow. Erase anything below the scraf layer.
Elements:
holly leaves
heart
snow swirl 1
branch (flip)
tree 1
star scatter
tag
-Make the top layer active. Select the text tool. Font: Secret Recipe, Size: 75, Foreground color: f4b765. Click canvas and type 'Snow Buddies'. Place text to the top laeft of tag. Filters>Noise>RGB Noise. Change all sliders (except alpha) to 0.35. Filters>Decor>Add Bevel. Uncheck work on copy. Alpha to selection. Grow by 2. Add new layer & move new layer below text layer. Change foreground to white. Select the bucket fill tool and fill seleciton. Select none. Repeat drop shadow.
-Opem paper 4. Make the bottom layer. Apply mask. Click HERE to learn how to use masks in gimp.
-Add your name with the Firefly Castle font. Also add copyright and you're done!
Sunday, November 18, 2012

That's right, I am planning on a BIG sale Black Friday weekend, but I can't let the cat out of the bag yet...so I thought I'd just give you a little tease ;)
Keep your eyes peeled for more info coming soon.
Subscribe to:
Posts
(Atom)
Snag Our Blinkies


Don't Be A Pirate!

