Gimptastic Scraps Available Exclusively @

Gimptastic Scraps CT


Blog Trains

CU Licenses


Saturday, October 29, 2011
 Well here is a yummy treat for all of you :) Does it get any hotter than this??? Arthur Crowe outdid himself this time!!!! You can find this hottie in the new releases section at PTE HERE
Friday, October 28, 2011
I've got some templates for you all today. I had fun making these ones! Feel free to send results to Gimptasticblog@yahoo.com. You can download them HERE.

Here are some tags I made using my new templates.


Thursday, October 27, 2011
 Here's a tag I made using a HOT new tube from Scott Blair. You can find this tube in the new releases section at PTE HERE.
Wednesday, October 26, 2011

This tutorial is of my own creation and any resemblance to any other tuts is purely coincidental. This tutorial is for personal use only, using it for monetary gain is against our TOU's.
Supplies Needed:
~Gimp (any version will do).
~Sunny Summer Days PTU scrapkit by KNC Scrapz which you can get from Scrap-u-nique HERE.
~Tube of choice. I used the artwork of BamBam, you must have a license to use this art which you can get HERE.
~Font of choice. I used Allure Script.
Let's get started!!!!!
1. Open a new layer ( I prefer a large canvas, so I make mine 1050x656). Make your canvas transparent (Layer > Transparency > Color to alpha).
2. Open Frame 2, add drop shadow (Filters > Light & Shadow > Drop Shadow).
3. Open Paper 4 center it behind frame, remove excess paper using a cutting tool or eraser in your tool box.
4. Open Wreath (round frame), add drop shadow.
5. Open Paper 10 center it behind frame, remove excess paper using a cutting tool or eraser in your tool box.
6. Open tube, add drop shadow.
7. Open and place the following elements:
element 1
element 2
Birdhouse
Bird
Bird 2
Basket 1
Flower 2
Green ribbon
Vine
Branch
Lemon
Lemon 1
Lemon 2
Leaves
Bottle
Watering can
Butterflies
~Some of the elements may need to be sized down. Using your scale tool in your tool box adjust the pixel size until element is the correct size~
~Add drop shadow to all elements~
8. Merge layers (Image > Merge Visible Layer).
9. Autocrop image (Image > Autocrop Image).
10. Scale image to desired size (Image > Scale Image).
11. Add copyright info and name.
12. Save as .png
You are finished :)
Monday, October 24, 2011
This tutorial is of my own creation and any resemblance to any other tuts is purely coincidental. This tutorial is for personal use only, using it for monetary gain is against our TOU's.
Supplies Needed:
~Gimp (any version will do).
~Oragami Jarmies FTU minikit which you can get from Numb Bumm HERE.
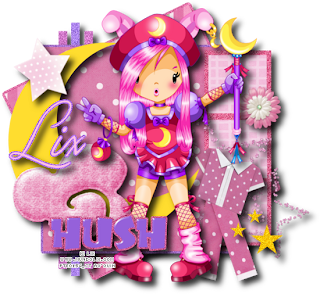
~Tube of choice. I used the artwork of Lix, you must have a license to use this art. You can purchase this art from PTE HERE.
~Template of choice. I used the Hush template which you can get from Creative Scraps by Crys HERE.
~Font of choice. I used ValentinaJF.
Let's get started!!!
1. Open a new layer ( I prefer a large canvas, so I make mine 1050x656). Make your canvas transparent (Layer > Transparency > Color to Alpha).
2. Open template in PSD format, remove and move layers of template around until they are the way you like them.
~Add paper from scrapkit to individual layers of the template (Right click on template layer in layer box > Alpha to Selection > CTRL I > Select paper layer in layer box > Delete).
~This scrap kit is full sized, so these papers will need to be sized down quite a bit.
These are the papers I used:
Paper 1
Paper 2
Paper 4
~I added noise to some of the template layers to make them look glittery (Filters > Noise > RGB Noise).
~I colorized some of the template layers to better match the scrapkit (Colors > Colorize > play with the setting until you get the desired color).
~Add drop shadow to template layers (Filters > Light & Shadow > Drop Shadow).
3. Open tube, add drop shadow.
4. Open and place the following elements:
Cloud
Star
Stars
Jammies 2
Flower
~The elements will need to be sized down because this is full sized. Using your scale tool in your tool box adjust the pixel size until element is the correct size~
~Add drop shadow to all elements~
5. Merge Layers (Image > Merge Visible Layers).
6. Crop Image (Image > Autocrop Image).
7. Scale image to desired size (Image > Scale Image).
8. Add copyright info and name
9. Save as .png
ALL DONE!!!!!!!!!!
We just wanted to take a moment to thank all of our followers :) We finally broke the 100 follower mark and it feels AWESOME!!!!! Thank you all so much for believing in a couple of Gimpy girls...LOL.
Here are some more amazing tags from our friends over at Cafemom using Leah's Punktastic Kit.


Some of our friends over at Cafemom made some amazing tags using Leah's halloween templates! We just wanted to show off their amazing talent!


 Vanessa over at Leather & Lace Tuts did an awesome tut using our collab templates with Tasha.
Click HERE to check out the tut!

This tutorial is of my own creation and any resemblance to any other tuts is purely coincidental. This tutorial is for personal use only, using it for monetary gain is against our TOU's.
Supplies:
Awesome PTU kit from Designs BySilky called Blackhearted
Tube of choice. I am using Keith Garvey. You must have a license to use his tubes. You can purchase them HERE
Font- ValentinaJF
Let's get started!!
-File>New 600x600 pixels.
-Open frame 5. Layer>Scale Layer 50%. Select the rotate tool. Click canvas and put 90 in the angle box. select the magic wand. Click inside the frame. Select>Grow by 5. Open paper 4. Move paper layer below frame layer in the layer box. Layer>Transparency>Add Alpha Channel. Scale paper 60%. Select>Invert. Press delete on keyboard. Select>None. Make the frame active. Filters>Light & Shadow>Drop Shadow 2, 2, 2, black, 50.
-Open frame 6. Rotate by 90. Make the bottom layer. Scale by 50%. Move to the left of the oval frame. Layer>Layer To Image Size. Layer>Duplicate Layer. Select the flip tool. Click canvas to mirror the duplicate frame. Layer>Merge down to merge these 2 frames together. Select the magic wand. Hold shift down on your keyboard and click inside both frames. Add paper 5 like you did to the other frame. Repeat drop shadow on frames.
-Open frame 1. Make the top layer. Sclae 40%. Hold shift and click inside the blank spaces of the heart frame. Add paper 2. Select none. On the heart frame add a drop shadow of 2, 2, 2, black, 100. Open tube. Move below the heart frame. Duplicate and put each tube inside of the hearts. Erase parts of the tubes sticking outside the frame. Change the mode of both tubes to dodge.
-Open tube again. Move below the heart frame paper layer. Scale 75%. Place in the middle of the tag. Repeat drop shadow. Duplicate. Filters>Blur>Gaussian Blur on default. Change the mode of the duplicate tube to soft light.
Elements:
Add drop shadow of 2, 2, 2, black, 50 to all element layers, unless otherwise stated (it will say NDS for 'no drop shadow'). See my tag for placement.
59- Duplicate- Flip duplicate
33 NDS
07
50- Rotate by -90
62 NDS
26
42
60 NDS
-Add your name and copyright.
All done!
Sunday, October 23, 2011
 Here's a tag using a SUPER hot new tube from Elias Chatzoudis.
You can find this tube in the new releases section at PTE HERE.
Here's a tag using a SUPER hot new tube from Elias Chatzoudis.
You can find this tube in the new releases section at PTE HERE.
Saturday, October 22, 2011

Supplies Needed:
~Gimp (any version will do).
~2 Cute 2 Spook PTU scrapkit which you can get from Tasha's Playground HERE.
~Tube of choice. I used the artwork of Ismael Rac, you must have a license to use this art which you can get HERE.
~Template of choice. I used Leah's Template 103 which you can get on our blog HERE.
~Font of choice. I used Weltron.
Let's get started!!!
1. Open a new layer ( I prefer a large canvas, so I make mine 1050x656). Make your canvas transparent (Layer > Transparency > Color to Alpha).
2. Open template in PSD format, move layers of template around until they are the way you like them.
~Add paper from scrapkit to individual layers of the template (Right click on template layer in layer box > Alpha to Selection > CTRL I > Select paper layer in layer box > Delete).
These are the papers I used:
Paper 13
Paper 17
Paper 23
~I added noise to some of the template layers to make them look glittery (Filters > Noise > RGB Noise).
~I colorized some of the template layers to better match the scrapkit (Colors > Colorize > play with the setting until you get the desired color).
~Add drop shadow to template layers (Filters > Light & Shadow > Drop Shadow).
3. Open tube, add drop shadow.
4. Open and place the following elements:
Web 2
Feather
Ribbon 3
Star
Star 2
Star 3
Star 4
Eyeball
Bat 4
Ghost 3
Mr Reaper
Pumpkin
Skull 3
~Some of the elements may need to be sized down. Using your scale tool in your tool box adjust the pixel size until element is the correct size~
~Add drop shadow to all elements~
5. Merge Layers (Image > Merge Visible Layers).
6. Crop Image (Image > Autocrop Image).
7. Scale image to desired size (Image > Scale Image).
8. Add copyright info and name
9. Save as .png
ALL DONE!!!!!!!!!!
Friday, October 21, 2011
 Here is a tag I made using a smokin hot tube by Keith Garvey. This tube is a re-release and can be found in the new releases section at PTE HERE.
Thursday, October 20, 2011
HERE is an amazing tutorial by our girl Vanessa over at Leather and Lace Tuts. She used one of our collab temps for this one and it turned out super HOT!!!
 Here is a tut result from our friend Sherena. This tag was made following Amy's FTU tut Welcome to the Jungle.

Thank you so much ladies for sharing your results with us. We really do LOVE to see them.
If any of you would like to share your results with us please send them to us at gimptasticblog@yahoo.com

This tutorial is of my own creation and any resemblance to any other tuts is purely coincidental. This tutorial is for personal use only, using it for monetary gain is against our TOU's.
Supplies:
Gimp
Awesome PTU kit from Wicked Princess Scraps called 'This Is Me' HERE
Tube of choice. I am using the art of Lady Mishka. You must have a license to use her tubes. You can purchase them HERE
Template 383 by Divine Intentionz HERE
Mask 223 from weescottslass HERE
Font-Petra Script
Let's Begin!
-Open template. Delete credits. Image>Scale Image 500x336 px. Image>canvas Size 600x600 px. Make sure to press center.
-Let's add papers to the template layers. Make the template layer active (see below). Right click template layer in layer box and choose alpha to selection. Open paper (see below). Right click paper layer in layer box and choose add alpha channel. Layer>Scale Layer by 60%.
Select>Invert. Press delete on your keyboard. Select>None. Delete the original template layer.
Here are the template layers and which papers I used:
square center- paper 12 Filters>Light & Shadow>Drop Shadow 0, 0, 10 black, 80
square left & square right- paper 1 Filters>Repeat Drop Shadow
square 1 & square 2- paper 5
large circle left & large circle right- paper 10 Repeat drop shadow
rectangle- paper 8
-Make thin rectangle active. Colors>Colorize. Move the lightness slider to -100. Leave the others on their default settings. Repeat with circle back.
-Make circles active. Alpha to selection. Add new layer. Change the foreground color to ff1461. Change the background color to fcd61b. Select the gradient tool. On your canvas, click the top left of the circles and drag your mouse to the bottom right. Open close up tube. Layer>Duplicate Layer twice so you have a total of 3 tube layers. Put each tube in one of the circles. Invert & delete each tube. I had to erase parts of each tube the spilled over into another circle. Change the mode of all the tubes to screen. Make your gradiend circles layer active. Filter>Noise>RGB Noise on default. Add a drop shadow of 2, 2, 2, black, 50 to this layer. Delete the original circles layer.
-Open full body tube. Move this layer below the word art layer. Scale 65%. Place to right side of tag and repeat drop shadow.
-Make the wordart active. Alpha to selection. Add a new layer below this layer. Select>Grow by 1. Using the bucket fill tool, fill the selection. Select none. Add drop shadow of 0, ,0 10, black, 80.
-Make the circle layer active. Alpha to selection. Add new layer. Fill with same gradient as before. Select none. Delete original circle layer.
Elements:
Add a drop shadow of 2, 2, 2, black, 50 to all element layers, unless otherwise stated (it will say NDS for 'no drop shadow'). See my tag for placement.
photo border NDS
skull- Rotate -15
whatever arrow
beaded rope
credit card
heart bracelet NDS
heart chain link
beaded string NDS
star button
tear drop flower
-Add your name and copyright.
You're finished!!
Wednesday, October 19, 2011

 Here are a few more CT tags by Leah. I used a very pretty PTU kit from Creative Intentionz called Forever Twilight for these tags. Check out her blog HERE to see the stores she sells in.

 I made these tags using an absolutely adorable PTU kit from Tasha's Playground called 2 Cute 2 Spook. This kits was so much fun to work with!!! Check out Tasha's blog HERE to see what stores she sells in.
Tuesday, October 18, 2011
 Our good pal Sarah over at Sarah's Tags n Things made a tut using one of Leah's new halloween templates! Its a beauty...ain't it?
 You can check out this tut HERE.

This award was given to us by Vanessa over at Leather & Lace Tuts and Lesia at Deadly Desire. We are honored and really appreciate that you thought of us:)
Here are 3 blogs that put a smile on our faces:
Monday, October 17, 2011
This tutorial is of my own creation and any resemblance to any other tuts is purely coincidental. This tutorial is for personal use only, using it for monetary gain is against our TOU's.
Using masks in Gimp is a little tricky. Here is a tutorial on how to use them. I am not going to add this to a tag, but if you would like to add a mask to a tag you need to move the layers to the bottom.
Supplies:
Mask 1 from our blog HERE
Here we go!
-Go to File>New and make the canvas size 600x600 pixels. Press okay.
This part won't be needed if you are adding a mask to a tag.
-Add a new layer by clicking the folded paper icon at the bottom of your layer box.
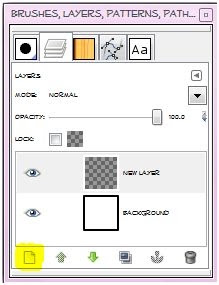
Using your bucket fill tool fill the new
layer with color of choice. I am using black. You can also do this with a paper from a scrap kit if you'd like. To
do that, just open the paper and move the paper layer to the bottom in your layer box and skip adding a new layer and filling it with color.
-Open your mask and make sure it is above the black layer in the layer box. You may get a pop up box like the one below. Just press convert.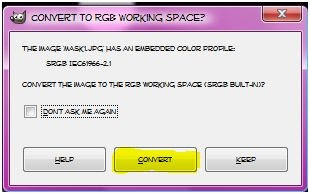
-Make your black layer (or paper layer) active and right click the layer in the layer box. Click add layer mask. Make sure black (full trancparency) is checked. Click add. 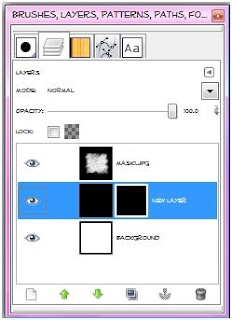
-Make sure there is a white outline on the 2nd box by your black layer in the layer box. If not, just click on it the layer box. 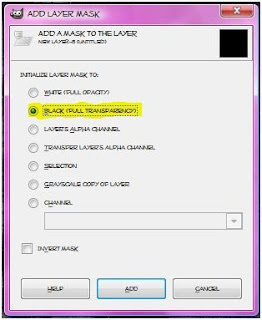
-Make your mask layer active. Go to Edit>Copy. Hide this layer by clicking the little eye next to the layer in the layer box. 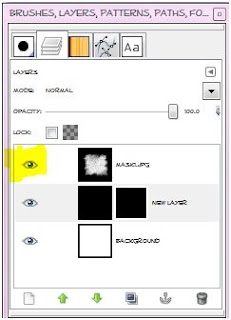
-Make your black layer (or paper layer) active. Go to Edit>Paste. Now you will have a floating section in your layer box. You need to anchor it. To do this click the little anchor icon at the bottom of the layer box. 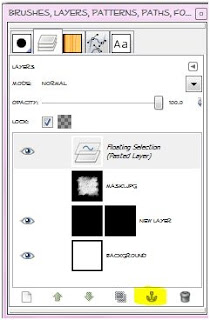
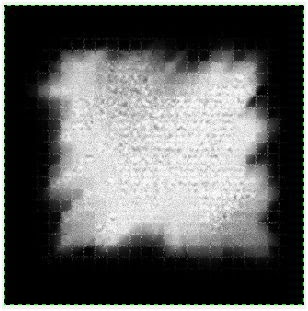
-You can delete the mask layer in the layer box. Now you should just see the mask. 
Saturday, October 15, 2011
 Supplies:
Gimp
Adorable PTU kit from Sweet Cravings Scraps called Nightmare on my Street HERE
Mask 167 from weescotslass HERE
Font- Porky's
Let's Begin!
-File>New 600x600 px.
-Open frame 3. Layers>Scale Layer 40%. Select your rectangle tool. Make a selection around your frame.
 -Open paper 1 and move below frame layer. Layers>Transparency>Add Alpha Channel. Scale 60%. Select>Invert. Press delete on your keyboard. Select>None. Make frame layer active. Filters>Light & Shadow>Drop Shadow 1, 1, 10, black, 50.
-Open frame 1. Make the bottom layer. Scale 40%. Select the rotate tool. In the angle box, put
-45. Select your magic wand. Click inside the frame. Select>Grow by 5. Open paper 4. Move paper under frame layer. Add alpha channel. Scale 60%. Invert & delete. Select none. Repeat drom shadow on frame layer.
-Open cute zombie twin 2. Move below the black frame. Place her face in the black frame. Erase parts of her that are sticking outside of the black frame. Change the mode to grain merge.
-Open cute zombie twin 2 again. Make the top layer. Scale 60%. Move to the left of your tag. Add a drop shadow of 2, 2, 2, black, 50.
-Open spooky house. Move below the yellow paper.Scale by 50%. Place behind the girl.
-Open frame 5. Make the bottom layer. Scale 55%. Place to the left of your tag. Some of the frame was sticking out below the house, so I erased it. Add drop shadow of 0, 0, 10, black, 80.
Other Elements:
Add a drop shadow of 2, 2, 2, black, 50 to all elements, unless otherwise stated (it will say NDS). See my tag for placement.
word art NDS
broom- Rotate -90 NDS
cute shy ghost
doodleios
cute goo spider
smiley 2
-Open paper 6 and make the bottom layer. Apply your mask.
-Add your name and copyright.
You're finished!!
Subscribe to:
Comments
(Atom)
Snag Our Blinkies


Don't Be A Pirate!

