Gimptastic Scraps Available Exclusively @

CDO

Gimptastic Scraps CT

TonyasTemptations
AlwaysCreations
Kiyas
Kiyas
TagsnTutsbyPam
LadyDragus
BKCDesigns

Blog Trains

FantasticallyFreeBlogTrain

CU Licenses

CapriciousCULicense
ScrapNTubesCU
AnoriesWorldCU
CreativeArtDesignCU
LaCarolitasDesignCU
ScrapsDimensionsCUEricaWilmaSensibiityCUGOFCUTheScrappingCopCU
Thursday, October 6, 2011
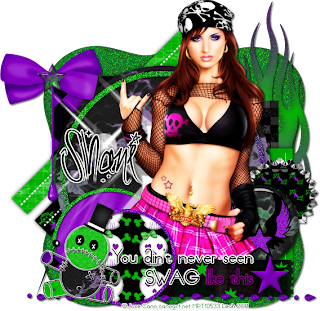
This tutorial is of my own creation and any resemblance to any other tuts is purely coincidental. This tutorial is for personal use only, using it for monetary gain is against our TOU's. Supplies Gimp Awesome PTU kit from Wicked Princess Scraps called Acid Rock HERE Tube of choice. I am using the work of Jose Cano. You must have a license to use his tubes. You can purchase them HERE Template- Collab 2 by Tasha, Amy & Leah HERE or HERE Font- Sick Capital Vice Let's get started! -Open template. Delete the credits. Image>Scale Image 500x496 pixels. Image>Canvas Size 600x600 pixels and make sure to click center. -Let's add papers to the template layers. Make the template layer active (see below). Right click template layer in layer box and choose alpha to selection. Open paper (see below). Right click paper layer in layer box and choose add alpha channel. Layer>Scale Layer by 60%. Select>Invert. Press delete on your keyboard. Select>None. Delete the original template layer. Here are the template layers and which papers I used: circle 3- paper 1 Filters>Light & Shadow>Drop Shadow 0, 0, 10, black, 80 circle 1- paper 11 circle 2- paper 2 square 1- paper 3 Filters>Repeat Drop Shadow copy of square 1- paper 9 repeat drop shadow square 2- paper 20 bar 1- paper 6 repeat drop shadow bar 2- paper 17 repeat drop shadow -Make frame 1 active. Alpha to selection. Add new layer above this layer. Change your foreground color to 7800b4. Select your bucket fill tool. Fill the selection. Select none. Filters>Noise>RGB Noise. Change all sliders (except alpha) to 0.40. Add drop shadoe of 2, 2, 2, black, 50. Repeat for frame 2, except change your foreground color to 00ae00. -Make thin circle active. Alpha to selection. Add new layer above. Foreground- 00ae00. Background-7800b4. Select the gradient tool (leave on default settings). Click your mouse at the top of the curcle and drag it down to the bottom. Select none. Repeat noise and drop shadow. -Make star 1 active. Alpha to selection. Add new layer above. Fill with the same purple as before. Select none. Filters>Decor>Add Bevel. Uncheck work on copy. Repeat drop shadow. Repeat for star 2, except fill with black. -Make wordart 2 active. Colors>Colorize. Change the lightness lsider to 100. Repeat drop shadow. repeat above for wordart 4 & 6. -Open tube. Move below the wordart layers. Repeat drop shadow. Filters>Blur>Gaussian Blur. Change the mode to soft light. Elements: Add drop shadow of 2, 2, 2, black, 50 to all element layers, unless otherwise stated (I'll say NDS). See my tag for placement. tape NDS bow tear drop firestar NDS starburst NDS voodoo doll button bottle cap matting flames- rotate -90 rain bling -Add your name and copyright. That's it! I hope you enjoyed my tut!

0 comments:

Post a Comment

Snag Our Blinkies

GimptasticBlinkie1GimptasticBlinkie2GimptasticBlinkie3GimptasticBlinkie4GimptasticBlinkie5

Chit Chat


Blog Archive

Don't Be A Pirate!

NoPirate1NoPirate2