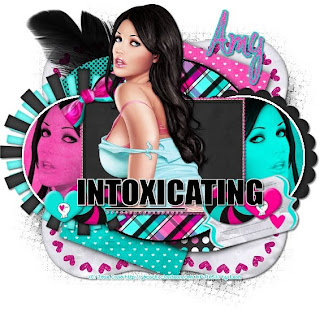
This tutorial is of my own creation and any resemblance to any other tuts is purely coincidental. This tutorial is for personal use only, using it for monetary gain is against our TOU's. Supplies: -Gimp- Any version should work -Tube of Choice. I am using the work of Jose Cano. You must have a license to use his work. You can purchase his tubes HERE FTU kit from Cinnamon Scraps called 'Toxic Candyland' HERE Template- Intoxicating by CrazyCakesScraps HERE Mask- WSL_Mask152 HERE Let's get started!! -Open template. Delete credits. Crop using the crop tool. Image>Scale Image by 500x500 pixels. Image>Canvas Size of 600x600 pixels and make sure to press center. Right click every layer in the layer box and click layer to image size. -Make the merged (black circle) layer active. Using the magic wand, click outside of the frame. Open paper 10. Right click paper layer in the layer box and choose add alpha channel. Layer>Scale Layer by 50%. Press delete on your keyboard. Select>Invert. Add new layerbelow this layer. Select>Grow by 3. Using the bucket fill tool and your foreground set to black, fill the selection. Select>None. Filters>Light and Shadow>Drop Shadow of 2, 2, 15, black, 100. -Make raster 1 (left pink circle) layer active. Click outside with magic wand. Open paper 4 and add alpha channel. Scale by 50%> Press delete. Invert and grow by 3. Add a new layer below this layer. Fill with white. Select none. Filters>Repeat Drop Shadow. -Make rater 2 (right pink circle) layer active. Click outside with magic wand. Open paper 4 and add alpha channel. Scale by 50%> Press delete. Invert and grow by 3. Add a new layer below this layer. Fill with white. Select none and repeat drop shadow.. -Make raster 4 (bottom grey circle) active. Click outside with magic wand. Open paper 11 and add alpha channel. Scale by 50%. Press delete and select none. Repeat drop shadow. -Make raster 5 (top grey circle) active. Click outside with magic wand. Open paper 13 and add alpha channel. Scale by 50%. Press delete and select none. Repeat drop shadow. .-Make raster 6 (bottom white square) layer active. Click outside with magic wand. Open paper 8 and add alpha channel. Scale by 60%. Press delete and select none. Repeat drop shadow. -Make raster 7 (top white square) layer active. Click outside with magic wand. Open paper 5 and add alpha channel. Scale by 60%. Press delete and select none. Repeat drop shadow. -Make merged #1 (words) layer active. Right click layer in layer box and choose alpha to selection. Fill selection with black. Grow by 1. Add new layer below this layer. Fill with white. Select none. Add a drop shadow of 2, 2, 2, black, 50. -Open frame 5. Scale by 50%. Click inside frame with magic wand. Grow by 3. Open paper 3 and add alpha channel. Scale by 50%. Invert and delete. Select none. Repeat drop shadow on frame. -Open tube. Scale by 70%. Repeat drop shadow. -Open tube again. Move layer above pink circle. Position inside pink circle. See mine. Layer to image size. Layer>Duplicate Layer. Using th flip tool, flip your duplicate tube. Move the duplicate tube above the blue circle. Make the pink circle layer avtive. Layer to image size. Click outside cirlce with magic wand. Make the tube inside this circle active. Press delete. Do the same with the other tube. Change the modes of both tube layers to value. Elements Add drop shadow of 2, 2, 2, black, 50 to all element layers. See my tag for placement. -flower 13 no scale -flower 11 scale 85% -bow 5 scale 35% -brackets 1 scale 75% -candy 4 scale 50% duplicate -feather 2 scale 65% -candy 9 scale 35% -candy 10 scale 35% -journal tag scale 50%. Using the rotate tool rotate by -15 -Open paper 9 and add alpha channel. Apply mask. Click HERE if you don't know how to add a mask. -Add your name, copyright and crop. You're finished! I hope you enjoyed this tut!
Labels
Chit Chat
Blog Archive
-
▼
2011
(337)
-
▼
January
(24)
- Mardi Gras Templates
- New PTU tut "My Gorjuss Valentine"
- FTU tut- Martini
- New PTU tut "Sweet Temptation"
- OMG!!!! I just had to share!!!!
- PTU Tut- XOXO
- New PTU tut "Love is Toxic"
- Some more templates!
- Tag Show Off
- New PTU tut "Je T'aime Paris"
- New PTU tut- Wild One
- WOOT, we got an AWARD!!!!!!!!!
- New Templates!
- PTU tut- Cupcake Dreams
- Divalicious
- New PTU tut "She's a Diva"
- New PTU tut "Gothic Love"
- New PTU tut "Gorjuss Gift"
- FTU tut- Intoxicating
- New PTU tut- Purple Fairy
- New FTU tut "Pour me a Double"
- Valentine Temps!
- New PTU tut "Crazy Girl"
- New PTU tut "Winter Heat"
-
▼
January
(24)


0 comments:
Post a Comment