Wednesday, March 21, 2012

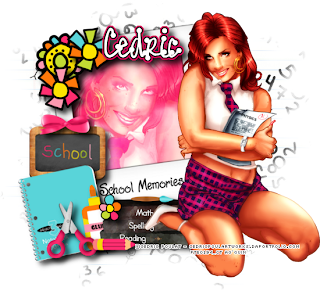
This tutorial is of my own creation and any resemblance to any other tuts is purely coincidental. This tutorial is for personal use only, using it for monetary gain is against our TOU's.
Supplies Needed:
~Gimp (any version will do).
~Tube of choice. I used the artwork of Cedric Poulat, you must have a license to use this art which you can get @ PSP Tubes Emporium HERE.
~Back to School FTU scrapkit by Sweet Cravings Scraps which you can get HERE.
~Mask of choice. I used mask 17 which you can get from HorsePlay's Pasture HERE.
~Font of choice. I used Pea Faith Dots.
Let's get started!!!!!
1. Open a new layer ( I prefer a large canvas, so I make mine 1050x656). Make your canvas transparent (Layer > Transparency > Color to alpha).
2. Open Frame 2, add drop shadow (Filters > Light & Shadow > Drop Shadow). I tilted the frame slightly using the rotate tool in the tool box.
3. Open Paper 12 center it behind frame, remove excess paper using a cutting tool or eraser.
4. Open tubes. I used both a full body and a close-up.
~For the full body tube you will need to duplicate the tube so that you have 2 (at the bottom of your layer box click on the blue box. This will give you 2 tube layers).
~Select the top tube layer in your tool box. Add Gaussian Blur (Filters > Blur > Gaussian Blur, use default settings).
~On that same tube layer change the mode to Overlay (at the top of your Layer Box you will see where it says Mode, click the arrow and select Overlay from the drop down menu).
~Add drop shadow to bottom tube layer of full body tube.
~For the close-up tube layer, place it under the frame (but above the paper) in your layer box. Change the mode to Screen (at the top of your Layer Box you will see where it says Mode, click the arrow and select Screen from the drop down menu). Remove excess tube layer using cutting tool or eraser from your tool box.
5. Open and place the following elements:
Chalkboard
Word art 3
Flower 1
Flower 2
Flower 3
Flower 4
Notebook 3
Glue
School books
Bow 6
Scissors 4
Pencil 4
Paintbrush 3
~Some elements may need to be sized down. Using the Scale Tool in your tool box adjust pixels to desired size~
~Add drop shadow to all elements (except Word art 3)~
6. Open Paper 20.
7. Open mask.
8. Add mask to paper (click HERE for a tut on using masks).
9. Merge layers (Image > Merge Visible Layer).
10. Crop image (Image > Autocrop Image).
11. Scale image to desired size (Image > Scale Image).
12. Add copyright info and name.
13. Save as .png
You are finished :)
Labels:FTU tuts
Subscribe to:
Post Comments
(Atom)
Labels
12x12 Layout
A Taggers Scrap
Animated
Announcements
Art of Freya
Basic tuts
Blog Trains
CDO
Cluster Frame
CT tags
Extras
Forum Set
Freebies
FTU CU
FTU Kits
FTU tuts
Holiday
Jackie's Jewels
Kissing Kate
Masks
PTU Kits
PTU tuts
Quick Pages
Results
Results with Amys kits
Show Offs
Sweet Cravings Scraps
Tasha's Playground
Templates
Timeline Banners
Chit Chat
Blog Archive
-
▼
2012
(550)
-
▼
March
(50)
- PTE CT tag by Amy
- At The Circus Cluster Frame Freebie
- PTU Tut- Love Letters
- PTU Tut- Great Easter
- PTU Tut- Happy Easter 2012
- PTE CT Tag by Leah
- PTE CT tag by Amy
- PTU Tut- Angel Above
- PTU tut - Bright Summer
- FTU Tut- Elegant
- PTE CT Tag by Leah
- FTU tut - School Memories
- PTE CT Tag by Leah
- PSP Tube Stop CT tag by Amy
- FTU Tut- Bella
- FTU tut - Spring is in the Air
- PTE CT tag by Amy
- PTU Tut- Not Bossy
- PTE CT tag by Amy
- PTE CT Tag by Leah
- FTU tut - Eggstra Special
- FTU Tut- Hoppy Easter
- Templates 125-129
- PTU Tut- Bad Attitude
- PTE CT tag by Amy
- PTU Tut- Make Me Bad
- PTE CT Tag by Leah
- FTU tut - Can I Take Your Order?
- Wild Side Cluster Frame Freebie
- Tut Results
- PTU Tut- Afternoon Delight
- PTU tut - Out of Control
- PTE CT tag by Amy
- PTE CT Tag by Leah
- FTU tut - Best Friends
- FTU tut - Irish Wench
- FTU tut - Rough Stuff
- FTU Tut- Superstar
- PTE CT tag by Amy
- PTU tut - Always Me
- PTE CT tag by Amy
- Roller Girl Cluster Frame Freebie
- PTU Tut- Roller Girl
- PTE CT tag by Amy
- FTU tut - Sexy Sailor
- FTU Tut- Take It Off
- PTU Tut- Magically Delicious
- PTE CT tag by Amy
- PTE CT Tag by Leah
- Feels Like Today Cluster Frame Freebie
-
▼
March
(50)


0 comments:
Post a Comment