Sunday, March 4, 2012

 This tutorial is of my own creation and any resemblance to any other tuts is purely coincidental. This tutorial is for personal use only, using it for monetary gain is against our TOU's.
Supplies:
Gimp
Tube of choice. I am using the art of Emerald Eyez. This tube will be available at PSP Tubes Emporium HERE starting 3-5-12
Font- Weltron and Syncopate
Lets Begin!
-File>New 600x625.
-Change your foreground color to 5d6685 and change your background color to 37241f. Select the gradient tool. Gradient: FG TO BG (RGB). Shape: Bi-Linear. Layer>New Layer. Rename this layer gradient. Press CTRL on your keyboard and click the middle of your canvas. Drag to the left.
-Open tube. Duplicate 4 times (you should have 5 tubes total). Place each tube on a different spot of the canvas.
 -Make the top tube active. Layer>Merge Down. Merge the rest of the tube layers together. Rename this layer tube 1. Change the mode of this layer to value. Filters>Blur>Motion Blur. Change to radial and click okay. Duplicate. Rename duplicate layer tube 2. Change the mode to soft light. Lower the opacity to 40. Filters>Distorts>Shift on default settings. Repeat shift 3 times. Filters>Enhance>Unsharp Mask on default settings.
-Open tube again. Make the top layer. Rename layer main tube. Layer>Scale Layer 65%. Place to the left of canvas. Filters>Light & Shadow>Drop Shadow 2, 2, 2, black, 50.
-Add New Layer. Rename brush. Movebelow the tube 1 layer. Change foreground to blue from before. Select the paintbrush and brush 17. Click the right side of the canvas. Change the mode to soft light. Repeat drop shadow.
-New Layer. Move below tube 1. Rename this layer lines. Select the rectangle select tool. Make a thin selection near the middle.

-Change foreground to brown used earlier. Select the bucket fill tool and fill the selection. Select>None. Add new layer. Move new layer above lines layer. Change foreground to blue. Make a thin selection on the brown line using the rectangle select tool.
 -Bucket fill selection. Select none. Merge these line layers together. Duplicate. Select the rotate tool and click canvas. Change the angle to 90. Place to the right side of canvas.
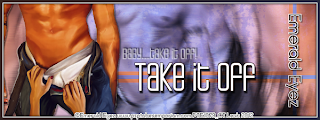
-Make the top layer active. Select the text tool. Change the font to Weltron, Size 65, Foreground white. Type 'Take it off'. Place text on the lines. Layer>Layer To Image Size. Layer>Tranparency>Alpha To Selection. Select>Grow by 1. Add new layer. Move new layer below text layer. Bucket fill with black. Select none. Add drop shadow of 2, 4, 2, black, 80.
-Select text tool again. Change the size to 25. Now type 'Baby.....take it off'. Place this text above the other text. Lower the opacity to 50. Add drop shadow of 2, 2, 2, black, 50.
-Add new layer and move to the top. Select the magic wand and click canvas. Bucket fill with black. Select>Shrink by 7. Press delete on your keyboard. Select none. Filters>blur>Gaussian Blur on default.
-Time to add a border. Add new layer and move it to the top. Click canvas using the magic wand. Bucket fill with brown/blue gadient. Shrink by 5. Delete. Bucket fill white. Shrink by 1 and delete.
-Add name and copyright.
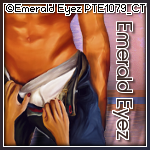
Avatar:
-Close of all the layers above the tube 2 layer (by clickng the eye next to each layer in layer box).
-Edit>Copy Visible.
-File>New 150x150 px. Edit>Paste As>New Layer.
-Open tube. Scale 50%. Repeat drop shadow.
-Add border like we did for the banner.
-Add your name and copyright.
All done!!!
Labels:FTU tuts
Subscribe to:
Post Comments
(Atom)
Labels
12x12 Layout
A Taggers Scrap
Animated
Announcements
Art of Freya
Basic tuts
Blog Trains
CDO
Cluster Frame
CT tags
Extras
Forum Set
Freebies
FTU CU
FTU Kits
FTU tuts
Holiday
Jackie's Jewels
Kissing Kate
Masks
PTU Kits
PTU tuts
Quick Pages
Results
Results with Amys kits
Show Offs
Sweet Cravings Scraps
Tasha's Playground
Templates
Timeline Banners
Chit Chat
Blog Archive
-
▼
2012
(550)
-
▼
March
(50)
- PTE CT tag by Amy
- At The Circus Cluster Frame Freebie
- PTU Tut- Love Letters
- PTU Tut- Great Easter
- PTU Tut- Happy Easter 2012
- PTE CT Tag by Leah
- PTE CT tag by Amy
- PTU Tut- Angel Above
- PTU tut - Bright Summer
- FTU Tut- Elegant
- PTE CT Tag by Leah
- FTU tut - School Memories
- PTE CT Tag by Leah
- PSP Tube Stop CT tag by Amy
- FTU Tut- Bella
- FTU tut - Spring is in the Air
- PTE CT tag by Amy
- PTU Tut- Not Bossy
- PTE CT tag by Amy
- PTE CT Tag by Leah
- FTU tut - Eggstra Special
- FTU Tut- Hoppy Easter
- Templates 125-129
- PTU Tut- Bad Attitude
- PTE CT tag by Amy
- PTU Tut- Make Me Bad
- PTE CT Tag by Leah
- FTU tut - Can I Take Your Order?
- Wild Side Cluster Frame Freebie
- Tut Results
- PTU Tut- Afternoon Delight
- PTU tut - Out of Control
- PTE CT tag by Amy
- PTE CT Tag by Leah
- FTU tut - Best Friends
- FTU tut - Irish Wench
- FTU tut - Rough Stuff
- FTU Tut- Superstar
- PTE CT tag by Amy
- PTU tut - Always Me
- PTE CT tag by Amy
- Roller Girl Cluster Frame Freebie
- PTU Tut- Roller Girl
- PTE CT tag by Amy
- FTU tut - Sexy Sailor
- FTU Tut- Take It Off
- PTU Tut- Magically Delicious
- PTE CT tag by Amy
- PTE CT Tag by Leah
- Feels Like Today Cluster Frame Freebie
-
▼
March
(50)


0 comments:
Post a Comment