Monday, March 19, 2012

 This tutorial is of my own creation and any resemblance to any other tuts is purely coincidental. This tutorial is for personal use only, using it for monetary gain is against our TOU's.
Supplies:
Gimp
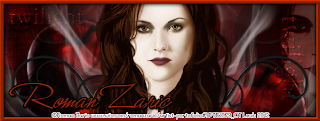
Tube of choice. I am using the art of Roman Zaric. You must have a license to use these tubes. You can purchase the tube I used starting today at PSP Tubes Emporium HERE
FTU kit from Artistic Dreams called Twilight HERE
Font- Monika Italic
Lets get started!
-File>New 600x225 px.
-Open paper 5.
-Open tube. Place to the far right. Layer>Layer To Image Size. Change the mode to grain merge. Lower the opacity to 50. Layer>Duplicate Layer. Select the flip tool and click canvas. Change the mode of the flipped tube to soft light.
-Open tube again. Layer Scale Layer 75%. Place in the middle. Filters>Light & Shadow>Drop Shadow 2, 2, 2, black, 50. Duplicate. Filters>Blur>Gaussian Blur on default. Change the mode to soft light and lower the opacity to 70.
-Open doodle 1. Place to the right side of the main tube. Layer to image size. Repeat drop shadow. Duplicate. Flip.
-Open shadow. Move below the doodle layer. Scale 30%. Place to the right. Lower the opacity to 60. Layer to image size. Duplicate and flip.
-Open apple. Move above the paper layer. Place on the right side. Duplicate. Move duplicate to the left side.
-Open wordart 1. Scale 35%. Place in the upper left corner. Lower the opacity to 50. Repeat drop shadow.
-Open wordart 1 again. Scale 40%. Select the rotate tool. Rotate 90. Place to the right. Lower the opacity to 50 and repeat drop shadow.
-Make the top layer active. Layer>New Layer. Change foreground color to black. Select the bucket fill tool and click canvas. Layer>Transparency>Alpha To Selection. Select>Shrink 8. Press delete on your keyboard. Select>None. Add a gaussian blur of 10.0.
Add new layer. Change foreground to 9f2600. Bucket fill canvas. Alpha to selection. Shrink by 7. Delete. Select none. Filters>Decor>Add Bevel. Uncheck work on copy.
-Add new layer. Alpha to selection. Shrink by 3. Bucket fill selection with black. Shrink 1. Delete. Select none.
-Add name and copyright.
Avatar:
-Make everything above the doodle layer invisible (click the eye next to each layer).
-File>New 150x150 px.
-Edit>Paste As>New Layer.
-Open tube. Scale 35%. Place to the far left. Repeat drop shadow. Duplicate. Add gaussian blur of 5.0. Change mode to soft light and lower the opacity to 70.
-To add the border repeat steps above for banner.
-Add name or initial. Also add copyright.
All done!
Labels:FTU tuts
Subscribe to:
Post Comments
(Atom)
Labels
12x12 Layout
A Taggers Scrap
Animated
Announcements
Art of Freya
Basic tuts
Blog Trains
CDO
Cluster Frame
CT tags
Extras
Forum Set
Freebies
FTU CU
FTU Kits
FTU tuts
Holiday
Jackie's Jewels
Kissing Kate
Masks
PTU Kits
PTU tuts
Quick Pages
Results
Results with Amys kits
Show Offs
Sweet Cravings Scraps
Tasha's Playground
Templates
Timeline Banners
Chit Chat
Blog Archive
-
▼
2012
(550)
-
▼
March
(50)
- PTE CT tag by Amy
- At The Circus Cluster Frame Freebie
- PTU Tut- Love Letters
- PTU Tut- Great Easter
- PTU Tut- Happy Easter 2012
- PTE CT Tag by Leah
- PTE CT tag by Amy
- PTU Tut- Angel Above
- PTU tut - Bright Summer
- FTU Tut- Elegant
- PTE CT Tag by Leah
- FTU tut - School Memories
- PTE CT Tag by Leah
- PSP Tube Stop CT tag by Amy
- FTU Tut- Bella
- FTU tut - Spring is in the Air
- PTE CT tag by Amy
- PTU Tut- Not Bossy
- PTE CT tag by Amy
- PTE CT Tag by Leah
- FTU tut - Eggstra Special
- FTU Tut- Hoppy Easter
- Templates 125-129
- PTU Tut- Bad Attitude
- PTE CT tag by Amy
- PTU Tut- Make Me Bad
- PTE CT Tag by Leah
- FTU tut - Can I Take Your Order?
- Wild Side Cluster Frame Freebie
- Tut Results
- PTU Tut- Afternoon Delight
- PTU tut - Out of Control
- PTE CT tag by Amy
- PTE CT Tag by Leah
- FTU tut - Best Friends
- FTU tut - Irish Wench
- FTU tut - Rough Stuff
- FTU Tut- Superstar
- PTE CT tag by Amy
- PTU tut - Always Me
- PTE CT tag by Amy
- Roller Girl Cluster Frame Freebie
- PTU Tut- Roller Girl
- PTE CT tag by Amy
- FTU tut - Sexy Sailor
- FTU Tut- Take It Off
- PTU Tut- Magically Delicious
- PTE CT tag by Amy
- PTE CT Tag by Leah
- Feels Like Today Cluster Frame Freebie
-
▼
March
(50)


0 comments:
Post a Comment