Wednesday, December 22, 2010
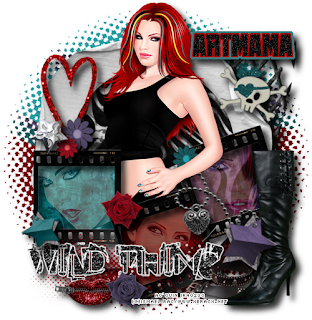
 This tutorial is of my own creation and any resemblance to any other tuts is purely coincidental. This tutorial is for personal use only, using it for monetary gain is against our TOU's.
Supplies Needed:
~Gimp (any version will do).
~Tubes of choice. I used the awesome artwork of Ismael Rac, you must have a license to use his art which you can get HERE.
~Wild Thing PTU scrapkit by Artmama which you get from Exquisite Scraps HERE.
~Mask of choice. I used Artmama mask 12 which you can get HERE.
~Font of choice. I used World at War.
Let's get started!!!!!
1. Open a new layer ( I prefer a large canvas, so I make mine 1050x656). Make your canvas transparent (Layer > Transparency > Color to alpha).
2. Open embellie 35 (round frame), add drop shadow (Filters > Light & Shadow > Drop Shadow).
3. Open Paper 10 center it behind round portion of the frame, remove excess paper using a cutting tool or eraser.
4. Open embellie 25 (filmstrip frame), add drop shadow.
5. Open Papers 1, 2 & 3 place them behind the filmstrip frame. Remove excess paper using a cutting tool or eraser.
6. Open tubes. I used 4 tubes total. I lowered the opacity on the 3 tubes I placed behind the filmstrip frame to 45 (at the top of the layer box you will see a bar you can slide to change the opacity of the selected layer). Add drop shadow to tube in center of the round frame.
7. Open and place the following elements:
embellie 42
embellie 34
embellie 8
embellie 56
embellie 59
embellie 1
embellie 57
embellie 2
embellie 3
embellie 47
embellie 13
embellie 12
embellie 10
embellie 38
embellie 11
embellie 58
~Some elements may need to be sized down. Using the Scale Tool in your tool box adjust pixels to desired size~
~Add drop shadow to all elements~
8. Open Paper 4.
9. Open mask.
10. Add mask to paper.
11. Merge layers (Image > Merge Visible Layer).
12. Crop image (Image > Autocrop Image).
13. Scale image to desired size (Image > Scale Image).
14. Add copyright info and name.
15. Save as .png
You are finished :)
Labels:PTU tuts
Subscribe to:
Post Comments
(Atom)
Labels
12x12 Layout
A Taggers Scrap
Animated
Announcements
Art of Freya
Basic tuts
Blog Trains
CDO
Cluster Frame
CT tags
Extras
Forum Set
Freebies
FTU CU
FTU Kits
FTU tuts
Holiday
Jackie's Jewels
Kissing Kate
Masks
PTU Kits
PTU tuts
Quick Pages
Results
Results with Amys kits
Show Offs
Sweet Cravings Scraps
Tasha's Playground
Templates
Timeline Banners
Chit Chat
Blog Archive
-
▼
2010
(101)
-
▼
December
(14)
- PTU Tut- Ring In 2011
- New PTU tut- Wild thing
- New PTU tut "Chocolate Dream"
- New PTU tut "Celebrate!"
- New PTU tut "Born To Be Wild"
- New PTU tut "Let it Snow"
- New blog layout
- New PTU tut "Christmas Candy"
- New PTU tut "Bright Xmas"
- New PTU tut "Home for the Holidays"
- New PTU tut "Bad Santa"
- New Tut- Glitter Name
- New PTU tut- Black Christmas Without You and anoth...
- New PTU tut "The Night Before Christmas"
-
▼
December
(14)


0 comments:
Post a Comment