Wednesday, April 11, 2012

 This tutorial is of my own creation and any resemblance to any other tuts is purely coincidental. This tutorial is for personal use only, using it for monetary gain is against our TOU's.
Supplies:
Gimp
Tube of choice. I am using the newly released tube from Tim Lowery. You can purchase this tube at PSP Tubes Emporium HERE
Template 126 (both banner and avatar) by me HERE
Fonts- Pixelmix, Battlelines & Devil Breeze.
Let's get started!
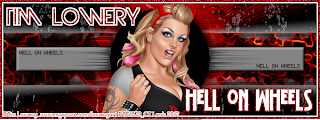
-Open banner template. Delete credits.
-Open tube close up. Move tube layer below below splatter layer in the layer box. Place tube to the far left. Layer>Layer To Image Size. Layer>Duplicate Layer. Select the flip tool and flip. Layer>Merge Down. Change the mode to overlay.
-Make the splatter layer active. Filters>Noise>RGB Noise. Change all sliders (except alpha) to 0.50.
-Make rect 2 active. Filters>Render>Lava on default. Make the rect 2 layer active again. Filters>Blur>Motion Blur. Change to radial and leave the rest of the settings.
-Make the dotted rect active. Filters>Light & Shadow>Drop Shadow of 2, 2, 2, black, 50.
-Make the circle 2 layer active. Filters>Blur>Gaussian Blur of 20.0. Filters>Artistic>Cubism on default. Filters>Enhance>Unsharp Mask. Change the mode to screen.
-Make rect 1 active. Colors>Colorize: Hue & Saturation: 0, Lightness: -30. FIlters>Decor>Add Bevel. Uncheck work on copy and leave the rest of the settings. Add drop shadow of 0, 0, 10, black, 100.
-Make the text tool active. Change font to pixelmix, size 8, foreground color black. Type 'HELL ON WHEELS". Place in the upper left corner of gray rectangle. Duplicate. Place duplicate on the lower right corner. Merge these 2 text layers together. Add drop shadow of 1, 1, 1, black, 25.
-Make circle 1 active. Duplicate. Keep duplicate active and repeat gaussian blur. Filters>Render>Line Nova on default. Move this layer above the bg layer. Lower the opacity to 50.
-Make the original circle layer active. Filters>Decor>Wind. Change the threshold and strength to 50. Leave the rest of the settings and click ok. Filters>Repeat Wind. Change from left to right.
-Make border 1 active. Add noise of 0.30.
-Open tube close up. Moave below the border 3 layer. Layer>Scale Layer 60%. Place in the middle of tag. Add drop shadow of 2, 2, 2, black, 50.
-Make the text tool active again. Change the font to Battlelines, foreground color to white, size 45. Type "Hell on wheels". Place to the bottom right. Layer>Transparency>Alpha To Selection. Select>Grow by 2. Layer>New Layer. Move new layer below text layer. Change foreground to 8a0000. Select the bucket fill tool and fill selection. Select>None. Repeat noise. Repeat drop shadow.
-Add name (with the devil breeze font) and copyright.
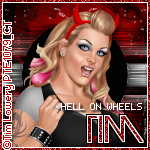
-Open the avatar template.
-Repeat above, just adjuting the settings as needed.
All done!!
Labels:FTU tuts
Subscribe to:
Post Comments
(Atom)
Labels
12x12 Layout
A Taggers Scrap
Animated
Announcements
Art of Freya
Basic tuts
Blog Trains
CDO
Cluster Frame
CT tags
Extras
Forum Set
Freebies
FTU CU
FTU Kits
FTU tuts
Holiday
Jackie's Jewels
Kissing Kate
Masks
PTU Kits
PTU tuts
Quick Pages
Results
Results with Amys kits
Show Offs
Sweet Cravings Scraps
Tasha's Playground
Templates
Timeline Banners
Chit Chat
Blog Archive
-
▼
2012
(550)
-
▼
April
(57)
- FTU Tut- Peach
- Tag Show-off
- FTU Tut- Sea Goddess
- PTE CT Tag & Snags
- PTE CT tag by Amy & some extras
- PTU Tut- I'm Waiting
- FTU Kit - Star
- FTU Tut- Wanna Play?
- PTE CT tag by Amy, plus some extras :)
- PTU Tut- Out Of Control
- PTE CT Tag By Leah
- FTU Tut- To Grandmothers House
- PTE CT tag by Amy
- Tag Show Off!!
- PTU tut - Garden Jewel
- PTU tut - Bring it
- Party Rock Cluster Frame Freebie
- FTU Tut- Audrey
- PTE CT Tag by Leah
- Tut Results
- PTU tut- Troublemaker
- PTU tut - Sexting and the City
- PTE CT tag by Amy
- PTU Tut- Think Good Thoughts
- PTE CT Tag by Leah
- PTU tut - Spring Fling
- PTE CT tag by Amy
- PTE CT Tag by Leah (AC)
- PTU tut - Sail Away
- FREEBIE- Love To Love Facebook Timeline Cover
- FTU tut - Blood Lust
- PTU Tut- California Girl
- PTU Tut- Satisfaction
- Sorrowful You Cluster Frame Freebie
- FTU Tut- Raising Hell
- Freebie- Totally Rad Facebook Timeline Banner
- FTU Tut- Classic Beauty
- PTE CT tag by Amy
- FTU Tut- Hell On Wheels
- FREEBIE - Ladybug Garden Facebook Timeline Banner
- FTU tut - Ask Me if I Care
- PTE CT Tag by Leah
- What a Feeling Cluster Frame Freebie
- FTU tut - End of Days
- FTU Tut- I Love Cupcakes
- FTU tut - Steampunk Angel
- Templates 130-134
- PTU tut - Vintage Reflection
- New PTE Artist- Gina King
- New PTE Artist - Gina King
- PTU tut - Who's that Girl?
- PTU Tut- Spring Breeze
- FTU Tut- Spring Time
- PTU tut - Ladybug Garden
- FTU tut - SWAG
- PTU Tut- Hit Like A Girl
- PTE CT Tag by Leah
-
▼
April
(57)


0 comments:
Post a Comment