Friday, April 20, 2012
 This tutorial is of my own creation and any resemblance to any other tuts is purely coincidental. This tutorial is for personal use only, using it for monetary gain is against our TOU's.
Supplies:
Gimp (or program of choice)
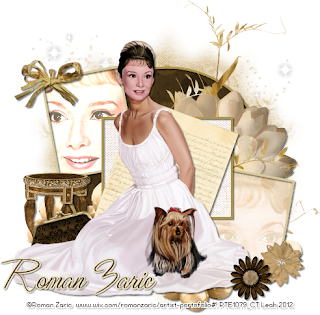
Tube of choice. I am using the art of Roman Zaric. You must have a license to use these tubes. The tube I used is coming soon to PSP Tubes Emporium HERE
FTU kit from A Taggers Scrap called Vintage Girl HERE
Template 3 by Sue HERE
Font- Valentina JF
-Open template. Delete credits. Image>Scale Image 450x450 px. Image>Canvas Size 600x600 px and click center.
-Let's add papers to the template layers. Make the template layer active (see below). Right click template layer in layer box and choose alpha to selection. Open paper (see below). Right click paper layer in layer box and choose add alpha channel. Select>Invert. Press delete on your keyboard. Select>None. Delete the original template layer.Here are the template layers and which papers I used:
-Let's add papers to the template layers. Make the template layer active (see below). Right click template layer in layer box and choose alpha to selection. Open paper (see below). Right click paper layer in layer box and choose add alpha channel. Select>Invert. Press delete on your keyboard. Select>None. Delete the original template layer.Here are the template layers and which papers I used:
circle- paper 34
right- paper 32
left- paper 35
middle- paper 26
-Make botom right paper active. Alpha to selection. Open tube close up. Place in selection. Invert & delete. Select none. Change the mode to screen. Repeat for top left paper, but change the mode of the tube to grain merge.
-Open full body tube. Make the top layer. Scale 75%. Place in the middle of tag. Filters>Light & Shadow>Drop Shadow of 2, 2, 2, black, 50.
-Make frame 3 active. Colors>Colorize: Hue: 44 Saturation: 41 Lightness: -50. Repeat drop shadow. Rpeat for frame layer.
-Make frame 1 active. Colorize: Hue: 46 Saturation: 44 Lightness: -26. Repeat drop shadow. repeat for frame #2 layer.
-Make the mask layer active. Alpha to selection. Open paper 28. Invert & delete. Select none. Delete the mask layer.
Elements:
beads
letter- rotate 20
flower 4
bow 5
flower 10
flower 2
sparkels
leaves 3
table 2
purse Rotate -15
-Add your name and copyright and you're done!
Labels:FTU tuts
Subscribe to:
Post Comments
(Atom)
Labels
12x12 Layout
A Taggers Scrap
Animated
Announcements
Art of Freya
Basic tuts
Blog Trains
CDO
Cluster Frame
CT tags
Extras
Forum Set
Freebies
FTU CU
FTU Kits
FTU tuts
Holiday
Jackie's Jewels
Kissing Kate
Masks
PTU Kits
PTU tuts
Quick Pages
Results
Results with Amys kits
Show Offs
Sweet Cravings Scraps
Tasha's Playground
Templates
Timeline Banners
Chit Chat
Blog Archive
-
▼
2012
(550)
-
▼
April
(57)
- FTU Tut- Peach
- Tag Show-off
- FTU Tut- Sea Goddess
- PTE CT Tag & Snags
- PTE CT tag by Amy & some extras
- PTU Tut- I'm Waiting
- FTU Kit - Star
- FTU Tut- Wanna Play?
- PTE CT tag by Amy, plus some extras :)
- PTU Tut- Out Of Control
- PTE CT Tag By Leah
- FTU Tut- To Grandmothers House
- PTE CT tag by Amy
- Tag Show Off!!
- PTU tut - Garden Jewel
- PTU tut - Bring it
- Party Rock Cluster Frame Freebie
- FTU Tut- Audrey
- PTE CT Tag by Leah
- Tut Results
- PTU tut- Troublemaker
- PTU tut - Sexting and the City
- PTE CT tag by Amy
- PTU Tut- Think Good Thoughts
- PTE CT Tag by Leah
- PTU tut - Spring Fling
- PTE CT tag by Amy
- PTE CT Tag by Leah (AC)
- PTU tut - Sail Away
- FREEBIE- Love To Love Facebook Timeline Cover
- FTU tut - Blood Lust
- PTU Tut- California Girl
- PTU Tut- Satisfaction
- Sorrowful You Cluster Frame Freebie
- FTU Tut- Raising Hell
- Freebie- Totally Rad Facebook Timeline Banner
- FTU Tut- Classic Beauty
- PTE CT tag by Amy
- FTU Tut- Hell On Wheels
- FREEBIE - Ladybug Garden Facebook Timeline Banner
- FTU tut - Ask Me if I Care
- PTE CT Tag by Leah
- What a Feeling Cluster Frame Freebie
- FTU tut - End of Days
- FTU Tut- I Love Cupcakes
- FTU tut - Steampunk Angel
- Templates 130-134
- PTU tut - Vintage Reflection
- New PTE Artist- Gina King
- New PTE Artist - Gina King
- PTU tut - Who's that Girl?
- PTU Tut- Spring Breeze
- FTU Tut- Spring Time
- PTU tut - Ladybug Garden
- FTU tut - SWAG
- PTU Tut- Hit Like A Girl
- PTE CT Tag by Leah
-
▼
April
(57)


0 comments:
Post a Comment