Monday, July 18, 2011
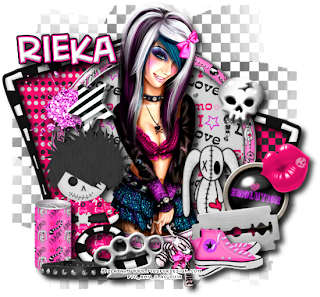
 This tutorial is of my own creation and any resemblance to any other tuts is purely coincidental. This tutorial is for personal use only, using it for monetary gain is against our TOU's.
Supplies Needed:
~Gimp (any version will do).
~Tube of choice. I used the artwork of Zlata M . You must have a license to use this art which you can get HERE.
~I Heart Emo PTU scrapkit by Rieka Rafita. This kit is an exclusive for SATC, you can find out more info on Rieka's blog HERE.
~Font of choice. I used Creative Block .
Let's get started!!!!!
1. Open a new layer ( I prefer a large canvas, so I make mine 1050x656). Make your canvas transparent (Layer > Transparency > Color to alpha).
2. Open Frame 1, tilt the frame slightly using the Rotate Tool in your tool box. Duplicate the frame so that you have 2 of them, flip one of them so that they are a mirror image of each other, you can use the Flip Tool in your tool box for this. Move the frames in to desired position, add drop shadow (Filters > Light & Shadow > Drop Shadow).
3. Open Paper 10 & Paper 13 center one behind each frame, remove excess paper using the rectangular cutting tool or eraser from your tool box.
4. Open Frame 2, add drop shadow.
5. Open Paper 5 center it behind Frame 2, remove excess paper using the rectangular cutting tool in your tool box.
6. Open tube, add drop shadow.
7. Open and place the following elements:
Bunny Emo
Emo Doll
Splat 2
Star
Skull 1
Doodle
Can
Cuff 2
Metal
Emo Brad
Razor Blade
Sneakers
Lips
~Some of the elements may need to be sized down. Using your scale tool in your tool box adjust the pixel size until element is the correct size~
~Add drop shadow to all elements~
8. Open Mask element and place under all other layers.
9. Merge layers (Image > Merge Visible Layer).
10. Autocrop image (Image > Autocrop Image).
11. Scale image to desired size (Image > Scale Image).
12. Add copyright info and name.
13. Save as .png
You are finished :)
Labels:PTU tuts
Subscribe to:
Post Comments
(Atom)
Labels
12x12 Layout
A Taggers Scrap
Animated
Announcements
Art of Freya
Basic tuts
Blog Trains
CDO
Cluster Frame
CT tags
Extras
Forum Set
Freebies
FTU CU
FTU Kits
FTU tuts
Holiday
Jackie's Jewels
Kissing Kate
Masks
PTU Kits
PTU tuts
Quick Pages
Results
Results with Amys kits
Show Offs
Sweet Cravings Scraps
Tasha's Playground
Templates
Timeline Banners
Chit Chat
Blog Archive
-
▼
2011
(337)
-
▼
July
(24)
- FTU tut "Garden of Love"
- PTU tut "Feelin' Dotty"
- PTU tut "WHATEVER"
- PTU tut "We're not in Kansas anymore..."
- FTU tut "Independent Woman"
- PTU tut "Girly Girl"
- PTU tut- Tea for 2
- FTU tut "Bumpalicious"
- *Another Tut Result*
- FTU tut - Text on a Path
- PTU tut- Deep Sea Adventure
- PTU tut "♥ Emolution ♥"
- *Tut Results*
- PTU tut- Piece of Me
- PTU tut "High School Drama"
- PTU tut "Captivating"
- Summer Templates!
- PTU tut- Summer Beauty
- PTU tut "Fairy Fun"
- Baby Templates!
- PTU tut "A Mother's Love"
- PTU tut "Go on With Your Bad Self"
- PTU tut- Bleeding Hearts
- PTU Tut- Skull Rock
-
▼
July
(24)


0 comments:
Post a Comment