Gimptastic Scraps Available Exclusively @

Gimptastic Scraps CT


Blog Trains

CU Licenses


Thursday, March 31, 2011
 This tutorial is of my own creation and any resemblance to any other tuts is purely coincidental. This tutorial is for personal use only, using it for monetary gain is against our TOU's.
Supplies Needed:
~Gimp (any version will do).
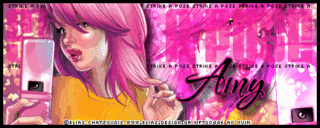
~Tube of choice. I used the art of Elias Chatzoudis, you must have a license to use this art which you can now get HERE.
~Banner style template. I used the Signature Tag Template by Rieka Rafita which you can get HERE.
~Font of choice. I used Velvenda Heavy, Pixelette & TheNautiGal.
Let's get started!!!
1. Open a new layer ( I prefer a large canvas, so I make mine 1050x656). Make your canvas transparent (Layer > Transparency > Color to Alpha).
2. Open template in PSD format.
3. Open 2 tubes, merge the tubes together (Right click on top tube layer in layer box > Merge Down) Once the tubes are merged together smudge the tubes together using your Smudge Tool in your tool box. Be sure to erase any excess that may smudge outside of the size of your template. See image below for an example of smudged tubes...
4. To get the glow effect you see in the bottom right corner go to Filters > Light & Shadow > Super Nova. Change the color to match your tubes.
This tutorial is of my own creation and any resemblance to any other tuts is purely coincidental. This tutorial is for personal use only, using it for monetary gain is against our TOU's.
Supplies Needed:
~Gimp (any version will do).
~Tube of choice. I used the art of Elias Chatzoudis, you must have a license to use this art which you can now get HERE.
~Banner style template. I used the Signature Tag Template by Rieka Rafita which you can get HERE.
~Font of choice. I used Velvenda Heavy, Pixelette & TheNautiGal.
Let's get started!!!
1. Open a new layer ( I prefer a large canvas, so I make mine 1050x656). Make your canvas transparent (Layer > Transparency > Color to Alpha).
2. Open template in PSD format.
3. Open 2 tubes, merge the tubes together (Right click on top tube layer in layer box > Merge Down) Once the tubes are merged together smudge the tubes together using your Smudge Tool in your tool box. Be sure to erase any excess that may smudge outside of the size of your template. See image below for an example of smudged tubes...
4. To get the glow effect you see in the bottom right corner go to Filters > Light & Shadow > Super Nova. Change the color to match your tubes.
5. Add a new transparent layer (at the bottom of your layer box you will see what looks like a white piece of paper, click on that to add a new layer. See image below) right above your smudged tubes.

~Using your brush tool from your tool box select the vine brush. Randomly stamp the brush all over your image until you like the way it looks~
~Change the mode of your vine brush layer to Dodge (at the top of your layer box you will see where it says Mode, select Dodge from the drop down menu. See image below)~

~Below is what your tag should now look like~

6. Open another tube, change the mode on this tube to Hardlight.

~Below is what your tag should now look like~

7. Add text to your tag.
8. Open another tube, add drop shadow (Filters > Light & Shadow > Drop Shadow)

~Now at this point your tag could be finished if you do not want to animate. If this is the case then do as follows...
8. Merge Layers (Image > Merge Visible Layers > Merge).
7. Crop Image (Image > Autocrop Image).
7. Scale image to desired size (Image > Scale Image).
8. Add copyright info and name
~Save as .png (only save this way if you do NOT want to animate)~
~If you do want to animate your tag then continue here~
9. Duplicate your merged and competed tag, so you have 2 identical tags in your layer box.

10. On your top tag layer add a light effect in front of the camera so it looks like a flash (Go to Filters > Light & Shadow > Super Nova. See image below for the settings I used)


Subscribe to:
Post Comments
(Atom)
Snag Our Blinkies


Don't Be A Pirate!


Great tutorial! Thank you!
ReplyDelete