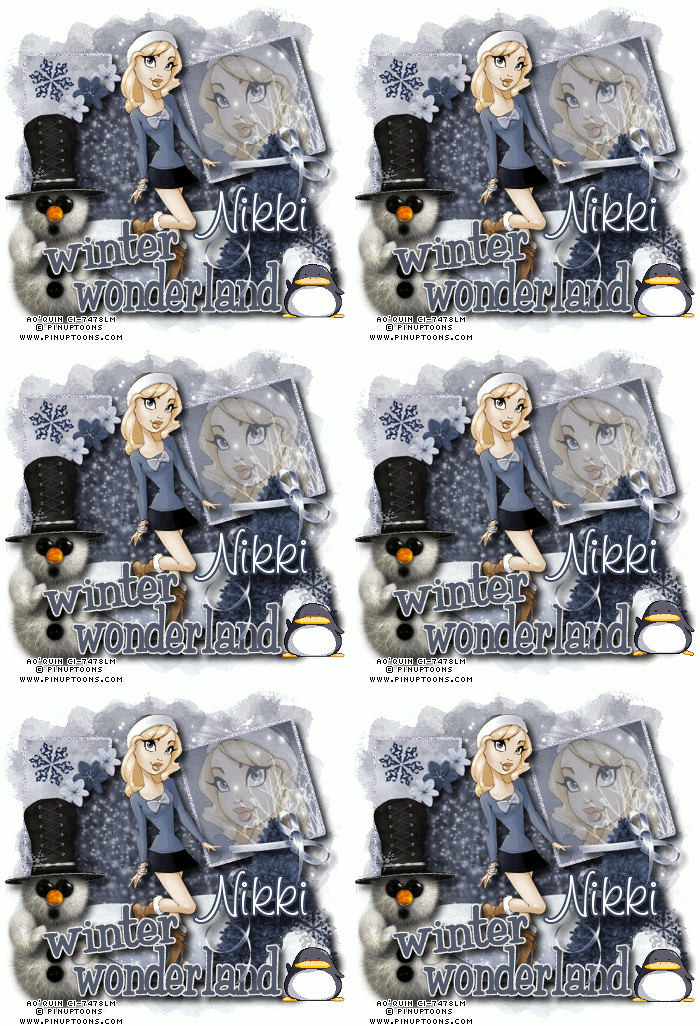
Friday, November 19, 2010
 This tutorial is of my own creation and any resemblance to any other tuts is purely coincidental. This tutorial is for personal use only, using it for monetary gain is against our TOU's.
~Gimp (any version will do).
~Blue Christmas PTU scrapkit which you can get from Creative Intentionz HERE.
~Tube of choice. I used the adorable PinUpToons, you must have a license to use this art which you can get HERE.
~Template of choice. I used xmas temp 8 from Addictive Templates which you can get HERE.
~Mask of choice. I used WSL mask 254 which you can get HERE.
~Animated penguin. I found this cutie at Peachie's Collection HERE.
~Font of choice. I used Kayleigh.
Let's get started!!!
1. Open a new layer ( I prefer a large canvas, so I make mine 1050x656). Make your canvas transparent (Layer > Transparency > Color to Alpha).
2. Open template in PSD format, move layers of template around until they are the way you like them.
~Add paper from scrapkit to individual layers of the template (Right click on layer in layer box > Alpha to Selection > CTRL I > Select paper layer in layer box > Delete).
These are the papers I used:
Paper 2
Paper 8
Paper 10
Paper 12
~I added noise to some of the template layers to make them look glittery (Filters > Noise > RGB Noise).
~I colorized some of the template layers to better match the scrapkit (Colors > Colorize > play with the setting until you get the desired color).
~Add drop shadow to template layers (Filters > Light & Shadow > Drop Shadow).
3. Open tubes, I used both a full body and a close up. I lowered the opacity of the close ups to 50 (at the top of the layer box you will see a bar you can slide to change the opacity of the selected layer). Add drop shadow to the full body tube.
4. Open and place the following elements:
Ribbon Bow 2
SnowFlake 1
SnowFlake 2
SnowBalls
Tree
Snowman
Snow Pile
Lily 1
Lily 2 x2
Sparkles
~Some of the elements may need to be sized down. Using your scale tool in your tool box adjust the pixel size until element is the correct size~
~Add drop shadow to all elements~
4. Open Paper 6
5. Open mask
6. Add mask to paper (click HERE for a tut on using masks)
7. Merge Layers (Image > Merge Visible Layers).
8. Crop Image (Image > Autocrop Image).
9. Scale image to desired size (Image > Scale Image).
10. Add copyright info and name
~At this point I would usually tell you to save as png and you are done, which you can do if you do not want the tag to be animated. If you want the animation continue with the tut~
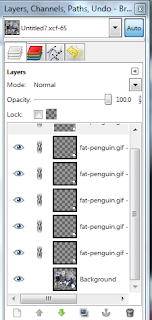
11. Open the animated penguin. The penguin animation will open in 6 layers in your layer box. Lock all layers of the penguin together using the chain (the little box next to the eye in your layer box). Once the layers are locked together you can move all of the layers of the penguin all at the same time and position the image where you like it on the tag. It is very important that all the layers stay lined up in order for the animation to work properly. Your layer box should look something like this...
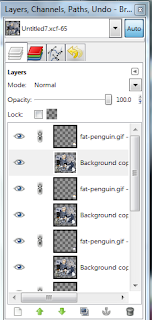
12. Next you need to duplicate your tag layer 5 times, so that you now have 6 tag layers and 6 penguin layers in your layer box. Postion a tag layer under each penguin layer. Your layer box should be penguin layer-tag layer-penguin layer-tag layer 6 times. You should have 12 layers in your layer box. Your layer box should look something like this...

13. Now you need to merge each penguin layer down to the tag layer (Right click on the penguin layer > Merge Down). Do this to all 6 penguin layers. When you are done you should have 6 layers in your layer box.
14. Now you must give all of the layers in your layer box a white background. Animation and transparency do not mix well together, it will distort your tag if you skip this step. (Right click on a layer in your layer box > Remove Alpha Channel) You must do this to all 6 layers. Your Layer box should look something like this...
Subscribe to:
Post Comments
(Atom)
Labels
12x12 Layout
A Taggers Scrap
Animated
Announcements
Art of Freya
Basic tuts
Blog Trains
CDO
Cluster Frame
CT tags
Extras
Forum Set
Freebies
FTU CU
FTU Kits
FTU tuts
Holiday
Jackie's Jewels
Kissing Kate
Masks
PTU Kits
PTU tuts
Quick Pages
Results
Results with Amys kits
Show Offs
Sweet Cravings Scraps
Tasha's Playground
Templates
Timeline Banners
Chit Chat
Blog Archive
-
▼
2010
(101)
-
▼
November
(22)
- New PTU tut- Pink Christmas and Template!
- New templates by Leah
- New FTU tut "Funky Punky Christmas"
- New PTU tut "Punk Rock Barbie"
- New PTU tut "Little Bo Peep"
- New PTU tut- Secret Garden
- Artmama is having a 'Buy My Store' sale! Click th...
- New PTU tut- Goth Gal
- New PTU tut "Girlz Rock"
- New animated PTU tut "Winter Wonderland"
- Christmas Templates!!
- New PTU Tut- Rockstar
- New PTU tut "Hey Now"
- New PTU Tut- Gorjuss Cutie
- New PTU tut "On the Hunt"
- Freebie!!! Temps 11-15
- New PTU tut "Beautiful"
- New tut- Enjoy This Moment (ptu)
- New PTU tut "Taking the Scenic Route"
- New PTU tut "Fall Friends"
- New FTU tut "Wintertime"
- New PTU tut- Heavenly
-
▼
November
(22)


0 comments:
Post a Comment