Thursday, February 23, 2012

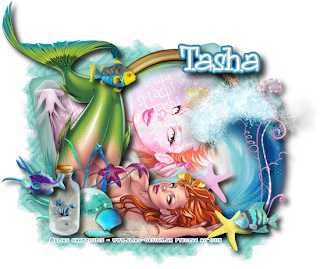
This tutorial is of my own creation and any resemblance to any other tuts is purely coincidental. This tutorial is for personal use only, using it for monetary gain is against our TOU's.
Supplies Needed:
~Gimp (any version will do).
~Tube of choice. I used the artwork of Elias Chatzoudis, you must have a license to use this art which you can get from PSP Tubes Emporium HERE.
~Splash PTU scrapkit by Tasha's Playground which you can find HERE.
~Mask of choise. I used WSL mask 363 which you can get HERE.
~Font of choice. I used 0 Whoa DNA.
Let's get started!!!!!
1. Open a new layer ( I prefer a large canvas, so I make mine 1050x656). Make your canvas transparent (Layer > Transparency > Color to alpha).
2. Open Frame 1, add drop shadow (Filters > Light & Shadow > Drop Shadow).
3. Open Paper 5 center it behind frame, remove excess paper using a cutting tool or eraser.
4. Open tubes. I used both a full body tube and a close-up.
~Take the close up layer and move it (in your layer box) under Frame 1, but above the paper. Change the Mode on the tube to Hardlight (at the top of your Layer Box you will see where it says Mode, click the arrow and select Hardlight from the drop down menu). Remove excess tube layer using a cutting tool or eraser.
~Add drop shadow to the full body tube.
5. Open Porthole element and place it (in your layer box) above the close up tube but under the full body layer. Do not added drop shadow.
6. Open and place the following elements:
Wave
Starfish
Starfish 2
Fish 1
Fish 3
Fish 4
Jellyfish
Seaweed
Seaweed 2
Marble
Sand
Bottle
Clamshell
~Some elements may need to be sized down. Using the Scale Tool in your tool box adjust pixels to desired size~
~Add drop shadow to all elements (except Sand)~
7. Open Paper 13.
8. Open mask.
9. Add mask to paper (click HERE for a tut on using masks).
10. Merge layers (Image > Merge Visible Layer).
11. Crop image (Image > Autocrop Image).
12. Scale image to desired size (Image > Scale Image).
13. Add copyright info and name.
14. Save as .png
You are finished :)
Labels:PTU tuts,Tasha's Playground
Subscribe to:
Post Comments
(Atom)
Labels
12x12 Layout
A Taggers Scrap
Animated
Announcements
Art of Freya
Basic tuts
Blog Trains
CDO
Cluster Frame
CT tags
Extras
Forum Set
Freebies
FTU CU
FTU Kits
FTU tuts
Holiday
Jackie's Jewels
Kissing Kate
Masks
PTU Kits
PTU tuts
Quick Pages
Results
Results with Amys kits
Show Offs
Sweet Cravings Scraps
Tasha's Playground
Templates
Timeline Banners
Chit Chat
Blog Archive
-
▼
2012
(550)
-
▼
February
(48)
- PTE CT Tag by Leah
- Tag Showoff
- FTU tut - Spring Fling
- Route 66 Cluster Frame Freebie
- PTU Tut- Miss Fabulous
- PTU Tut- Splash
- Splash Cluster Frame Freebie
- G Gurl Swag Freebie Cluster Frame
- PTU tut - Pretty as a Picture
- PTU tut - Lucky Lady
- FTU Tut- Purple Fairy
- PTU tut - Under the Sea
- FTU tut - Day of the Dead
- FTU Tut- Kitty Cat
- PTE CT tag by Amy
- PTU tut - Luck o' the Irish
- FTU Tut- Under The Sea
- PTU Tut- Big Deal
- PTE CT Tag by Leah
- FTU tut - Evil Alice
- PTU tut - Pirate Booty
- St. Pats Templates 130-132
- FTU Tut- Deborah Grieves
- FTU Tut- St. Patricks Day
- PTE CT Tag by Amy
- *Check Out Wicked Princess Scraps*
- PTU tut - St. Pattys Day
- FTU tut - Just Dotty
- PTU Tut- Love
- PTE CT Tag by Leah
- FTU tut - Hedgie Love
- PTU tut - Mystical
- FTU Tut- Love Spell
- Forum Templates 125-129
- FTU Tut- Victoria Fox- Animated
- FTU tut - Groovy Girl
- PTU Tut- Love Birds
- PTU tut - Love is Magic
- PTU Tut- Dark Angel
- PTE CT Tag by Leah
- FTU Tut- Valentine Cutie
- PTE CT tag by Amy
- FTU tut - Dark Serenade
- PTE CT Tag by Leah
- FTU tut - Camo Girl
- FTU Tut- Valentine Hottie
- PTU Tut- Girly Grunge
- PTE CT tag by Amy
-
▼
February
(48)


0 comments:
Post a Comment