Friday, February 3, 2012

 This tutorial is of my own creation and any resemblance to any other tuts is purely coincidental. This tutorial is for personal use only, using it for monetary gain is against our TOU's.
Supplies:
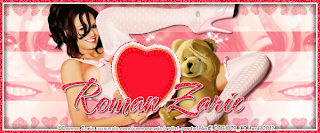
Tube of choice. I am using the art of Roman Zaric. You must have a license to use these tubes. This tube will be available for purchase 2-3-12 at PSP Tubes Emporium HERE
Texture from Bokeh HERE. I used texture 3
Heart brushes HERE
Font- TheNautiGal
Lets get started!
-File>New 600x250 px.
-Layer>New Layer. Change your foreground color to f9203d. Change background color to f2dfda. Select your gradient tool. Change from Linear to Radial. Press ctrl on your keyboard and click the middle of your tag with your mouse. Drag your mouse to the left to add gradient.
-Open texture. Make the top layer. Layer>Transparency>Add Alpha Channel. Layer>Scale Layer 50%. Change the mode to overlay. Layer>Dulpicate Layer.
-Add new layer. Select your gradient tool. Change from Radial to Bi Linear. While pressing ctrl, click the middle of your canvas and drag your mouse up. Change the mode to value.
-Open tube close up. Make the top layer. Move to the far right of your canvas. Change the mode to screen. Layer>Layer To Image Size. Duplicate. Select the flip tool and click canvas.
-Open full body tube. Make the top layer. Scale 80%. Place in the middle of tag. Filters>Light & Shdaow>Drop Shadow 2, 2, 2, black, 50. Duplicate tube. Filters>Blur>Gaussian Blur on default. Change the mode to soft light and lower the opacity to 60.
-Open your sparkles. Move below the tube layer.
-Let's add a border. Add a new layer at the top. Foreground should be still set at f9203d. Select the magic wand. Click canvas. With the bucket select tool, click canvas. Filters>Noise>RGB Noise. Change all sliders (except alpha) to 0.50. Filters>Shrink by 5. Press delete on your keyboard. Add new layer. Make the 2nd layer. Fill with white. Shrink by 2. Press delete. Add dnew layer. Make the 3rd layer. Fill with black. Shrink by 3. Press delete. Select>None. Add gaussian blur of 10.0.
-Add new layer. Move above the sparkles layer. Select your paintbrush and the heart bar 2 brush. Add harts to the bottom of your tag. Duplicate layer. Using the flip tool, press crtl pn your keyboard and click canvas. Repeat noise. Lower opacity to 50.
-Add new layer. Make the top layer. Filters>Artistic>Weave. Change all the boxes to 1.0. You should now have a 'pasted layer; at the top of your layer box. Move the pasted layer above your texture layer.
-New layer. Move above the top gradient layer. Select the rectangle select tool. Add 2 think rectangle selections to you tag (you will need to press shift).

-Set your foreground color to f47183. Fill the selection with the bucket fill tool.
-Add your name and copyright.
For the avitar:
-Make these layers invisible (click the eye next to each layer). Tube, name, copyright & border layers.
-Edit>Copy Visible.
-File>New 150x150 px.
Edit>Paste As>New Layer.
-Layer>Layer To Image Size.
-Open tube. Make the top layer. Scale 35%.
-Add your border, like we did above for the banner.
-Add your name or initial. Also add your copyrights.
All done! 
Labels:FTU tuts
Subscribe to:
Post Comments
(Atom)
Labels
12x12 Layout
A Taggers Scrap
Animated
Announcements
Art of Freya
Basic tuts
Blog Trains
CDO
Cluster Frame
CT tags
Extras
Forum Set
Freebies
FTU CU
FTU Kits
FTU tuts
Holiday
Jackie's Jewels
Kissing Kate
Masks
PTU Kits
PTU tuts
Quick Pages
Results
Results with Amys kits
Show Offs
Sweet Cravings Scraps
Tasha's Playground
Templates
Timeline Banners
Chit Chat
Blog Archive
-
▼
2012
(550)
-
▼
February
(48)
- PTE CT Tag by Leah
- Tag Showoff
- FTU tut - Spring Fling
- Route 66 Cluster Frame Freebie
- PTU Tut- Miss Fabulous
- PTU Tut- Splash
- Splash Cluster Frame Freebie
- G Gurl Swag Freebie Cluster Frame
- PTU tut - Pretty as a Picture
- PTU tut - Lucky Lady
- FTU Tut- Purple Fairy
- PTU tut - Under the Sea
- FTU tut - Day of the Dead
- FTU Tut- Kitty Cat
- PTE CT tag by Amy
- PTU tut - Luck o' the Irish
- FTU Tut- Under The Sea
- PTU Tut- Big Deal
- PTE CT Tag by Leah
- FTU tut - Evil Alice
- PTU tut - Pirate Booty
- St. Pats Templates 130-132
- FTU Tut- Deborah Grieves
- FTU Tut- St. Patricks Day
- PTE CT Tag by Amy
- *Check Out Wicked Princess Scraps*
- PTU tut - St. Pattys Day
- FTU tut - Just Dotty
- PTU Tut- Love
- PTE CT Tag by Leah
- FTU tut - Hedgie Love
- PTU tut - Mystical
- FTU Tut- Love Spell
- Forum Templates 125-129
- FTU Tut- Victoria Fox- Animated
- FTU tut - Groovy Girl
- PTU Tut- Love Birds
- PTU tut - Love is Magic
- PTU Tut- Dark Angel
- PTE CT Tag by Leah
- FTU Tut- Valentine Cutie
- PTE CT tag by Amy
- FTU tut - Dark Serenade
- PTE CT Tag by Leah
- FTU tut - Camo Girl
- FTU Tut- Valentine Hottie
- PTU Tut- Girly Grunge
- PTE CT tag by Amy
-
▼
February
(48)


0 comments:
Post a Comment