Monday, August 1, 2011
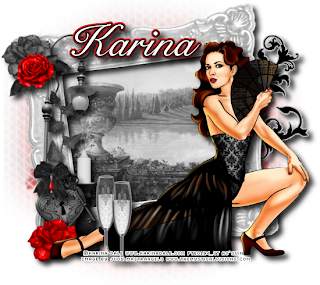
 This tutorial is of my own creation and any resemblance to any other tuts is purely coincidental. This tutorial is for personal use only, using it for monetary gain is against our TOU's.
Supplies Needed:
~Gimp (any version will do).
~Tube of choice. I used the artwork of Karina Dale, you must have a license to use this art which you can get from PTE HERE.
~Background image of choice. I used an image from Judy Mastrangelo's Image pack 1. Her art is available for purcahse at PTE HERE.
~Dark Angel PTU scrapkit by Crazy Carita Scraps which you can purchase from PTE HERE.
~Mask of choice. I used SD mask 9 which you can get from Scrap Dimensions HERE.
~Font of choice. I used Signet Roundhand Italic.
Let's get started!!!!!
1. Open a new layer ( I prefer a large canvas, so I make mine 1050x656). Make your canvas transparent (Layer > Transparency > Color to alpha).
2. Open element 11 (frame), add drop shadow (Filters > Light & Shadow > Drop Shadow).
3. Open Judy Mastrangelo image center it behind frame, remove excess using a cutting tool or eraser from your tool box.
~I made this image black & white to better match the tag (Colors > Desaturate > Lightness).
4. Open tube, add drop shadow.
5. Open and place the following elements:
element 16
element 17
element 18
element 21
element 22
element 29
element 30
element 36
element 38
element 40
~Some elements may need to be sized down. Using the Scale Tool in your tool box adjust pixels to desired size~
~Add drop shadow to all elements~
6. Open Paper 2.
7. Open mask.
8. Add mask to paper (click HERE for a tut on using masks)
9. Merge layers (Image > Merge Visible Layer).
10. Crop image (Image > Autocrop Image).
11. Scale image to desired size (Image > Scale Image).
12. Add copyright info and name.
13. Save as .png
You are finished :)
Labels:PTU tuts
Subscribe to:
Post Comments
(Atom)
Labels
12x12 Layout
A Taggers Scrap
Animated
Announcements
Art of Freya
Basic tuts
Blog Trains
CDO
Cluster Frame
CT tags
Extras
Forum Set
Freebies
FTU CU
FTU Kits
FTU tuts
Holiday
Jackie's Jewels
Kissing Kate
Masks
PTU Kits
PTU tuts
Quick Pages
Results
Results with Amys kits
Show Offs
Sweet Cravings Scraps
Tasha's Playground
Templates
Timeline Banners
Chit Chat
Blog Archive
-
▼
2011
(337)
-
▼
August
(41)
- PTU tut- Gone Country
- FTU tut "Hidden Paradise"
- PTU tut "Awesome!"
- PTU tut- Rac N' Roll Animated
- FTU tut "She's Bad"
- PTU tut- My Secret Place
- PTU tut- Autumn Once Again
- Blog Award!!!!
- Tut results...
- PTE CT tag by Amy
- PTU tut "Music School Dropout"
- FTU tut "Devil's Candy"
- FTU tut "Cowgirls Rule"
- PTU tut "Fall Escape"
- Forum Set Templates
- Tut Results...
- PTE CT Tag by Amy
- FTU tut "Welcome to the Jungle"
- Tut Results...
- Tut by Tasha's Playground
- FTU tut "No Other Like Me"
- PTU tut- Born to be Wild
- PTU tut "Dream a Little Dream"
- FTU tut "Gothic Calling"
- New PTU tut "Simply Delicious"
- FTU Tut- Punk Princess
- New PTU tut "Bright Emo"
- FTU tut "Sweet Like Candy"
- PTE CT Tag by Amy
- PTU Tut- Sunshine
- PTU tut- Sweet
- FTU tut "Summer Fun"
- PTE CT Tag by Amy
- Tut results
- FTU tut "Tropical Heat"
- Tut Results
- PTU tut "For the Love of Goth"
- New Templates!
- New PTU Tut- Courage
- FTU tut "Feeling Playful" Banner & Avi
- PTU tut "Moonlight Dance"
-
▼
August
(41)


Thanks this looks great!! :D
ReplyDelete