Gimptastic Scraps Available Exclusively @

Gimptastic Scraps CT


Blog Trains

CU Licenses


Friday, February 10, 2012

This tutorial is of my own creation and any resemblance to any other tuts is purely coincidental. This tutorial is for personal use only, using it for monetary gain is against our TOU's.
Supplies Needed:
~Gimp (any version will do).
~A Bit Groovy FTU scrapkit by Scraps Dimensions which you can find HERE.
~Tube of choice. I used the artwork of Lix, this tube is not yet available...but she will be SOON!!! You must have a license to use this art. You can purchase this art from PTE HERE.
~Template of choice. I used plain template 2 which you can get from Brutal Designs HERE.
~Font of choice. I used Keep on Truckin'.
Let's get started!!!
1. Open a new layer ( I prefer a large canvas, so I make mine 1050x656). Make your canvas transparent (Layer > Transparency > Color to Alpha).
2. Open template in PSD format, remove and move layers of template around until they are the way you like them.
~Add paper from scrapkit to individual layers of the template (Right click on template layer in layer box > Alpha to Selection > CTRL I > Select paper layer in layer box > Delete).
These are the papers I used:
Paper 5
Paper 6
Paper 8
Paper 9
Paper 10
~I added noise to some of the template layers to make them look glittery (Filters > Noise > RGB Noise).
~I colorized some of the template layers to better match the scrapkit (Colors > Colorize > play with the setting until you get the desired color).
~Add drop shadow to template layers (Filters > Light & Shadow > Drop Shadow).
3. Open tube, add drop shadow.
4. Open and place the following elements:
Beaded swirl 1
Beaded swirl 2
Flower 1
Flower 2
Flower 3
Flower 4
Butterfly 3
Butterfly 4
Daisy 1
Daisy 2
Daisy 3
Happy face
Peace
Peace WA
~Some of the elements may need to be sized down. Using your scale tool in your tool box adjust the pixel size until element is the correct size~
~Add drop shadow to all elements~
5. Merge Layers (Image > Merge Visible Layers).
6. Crop Image (Image > Autocrop Image).
7. Scale image to desired size (Image > Scale Image).
8. Add copyright info and name.
9. Save as .png
ALL DONE!!!!!!!!!!
Thursday, February 9, 2012
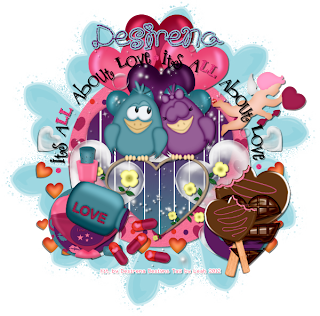
This tutorial is of my own creation and any resemblance to any other tuts is purely coincidental. This tutorial is for personal use only, using it for monetary gain is against our TOU's.
Supplies:
Gimp
PTU kit from Desirena Designs called Rainbow Valentine. You can purchase this kit at The PSP Project HERE
Template by Selina HERE
Make 311 by weescotslass HERE
Font- Schnookums
Lets begin!
-Open temp. Delete credits. Image>Scale Image 450x423 px. Change the x & y resolutions to 72. Image>Canvas Size 600x600 px. Click center.
-Let's add papers to the template layers. Make the template layer active (see below). Right click template layer in layer box and choose alpha to selection. Open paper (see below). Right click paper layer in layer box and choose add alpha channel. Layer>Scale Layer by 60%.Select>Invert. Press delete on your keyboard. Select>None. Delete the original template layer.Here are the template layers and which papers I used:
big circle- paper 2 Filters>Light & Shadow>Drop Shadow 2, 2, 2, black, 50
small circle 1 & small circle 2- paper 9 Filters>Repeat Drop Shadow
medium circle 1 & medium circle 2- paper 5 repeat drop shadow
-Make the heart layer active. Alpha to selection. Layer>New Layer. Chage your foreground color to 44838f. Change your background color to 5D1a5f. Select your gradient tool. Change to FG TO BG (RGB). Click at the bottom of the heart selection with your mouse and drag up to the top of the heart. Fitlers>Distorts>Blinds. Vertical, Dispalcement 30, Number of Segments 10. Select none. Add drop shadow of 0, 0, 10, black, 50.
-Open birds. Make the top layer. Scale 75%. Place birds on the heart. Add drop shadow of 2, 2, 0, black, 50.
Elements:
balloons
hearts
capsules 2
cupid
love potion
sparkle
chocolate heart- rotate 15-duplicate & flip
chocolate 1
-Add new layer at the bottom. Change foreground to 93D3De. Select the bucket fill tool and fill canvas. Apply mask to this layer. Click HERE to learn how to use masks.
-Add your name and copyright.
All done!
Wednesday, February 8, 2012

This tutorial is of my own creation and any resemblance to any other tuts is purely coincidental. This tutorial is for personal use only, using it for monetary gain is against our TOU's.
Supplies Needed:
~Gimp (any version will do).
~Secret Valentine PTU scrapkit by Sweet Cravings Scraps which you can find HERE.
~Tube of choice. I used the artwork of Ava Schwark, you must have a license to use this art. You can purchase this art from PSP Tube Stop HERE.
~Template of choice. I used BP template 141 which you can get from BeckyP's Creations HERE.
~Font of choice. I used CAC Pinafore.
Let's get started!!!
1. Open a new layer ( I prefer a large canvas, so I make mine 1050x656). Make your canvas transparent (Layer > Transparency > Color to Alpha).
2. Open template in PSD format, remove and move layers of template around until they are the way you like them.
~Add paper from scrapkit to individual layers of the template (Right click on template layer in layer box > Alpha to Selection > CTRL I > Select paper layer in layer box > Delete).
These are the papers I used:
Paper 1
Paper 3
Paper 13
~I added noise to some of the template layers to make them look glittery (Filters > Noise > RGB Noise).
~I colorized some of the template layers to better match the scrapkit (Colors > Colorize > play with the setting until you get the desired color).
~Add drop shadow to template layers (Filters > Light & Shadow > Drop Shadow).
3. Open tube, add drop shadow.
4. Open and place the following elements:
Heart sprigs
Flower 5
Flower 6
Flower 7
Butterfly 1
Butterfly 3
Shiny heart 2
Locket 3
Key 3
Bow 4
Bunny 1
Love bug 1
Love bug 2
~Some of the elements may need to be sized down. Using your scale tool in your tool box adjust the pixel size until element is the correct size~
~Add drop shadow to all elements~
5. Merge Layers (Image > Merge Visible Layers).
6. Crop Image (Image > Autocrop Image).
7. Scale image to desired size (Image > Scale Image).
8. Add copyright info and name.
9. Save as .png
ALL DONE!!!!!!!!!!

This tutorial is of my own creation and any resemblance to any other tuts is purely coincidental. This tutorial is for personal use only, using it for monetary gain is against our TOU's.
Supplies:
Gimp
PTU kit from Tagedy's Creations called Garrett's Godess HERE. All profits from this kit will go directly to Garrett Blair.
Tube of choice. I am usingthe art of Elias Chatzoudis. You must have a license to use these tubes. You can purchase them at PTE HERE
Template 68 by me HERE
Mask 5 by Dazzlin' Designs HERE
Font- Anglican Text
Lets get started!
-Open template. Delete credits, thin rect 1 & 2 and frame. Image>Scale Image 450x509. Image>Canvas Size 600x600 px. Click center.
-Let's add papers to the template layers. Make the template layer active (see below). Right click template layer in layer box and choose alpha to selection. Open paper (see below). Right click paper layer in layer box and choose add alpha channel. Layer>Scale Layer by 60%.Select>Invert. Press delete on your keyboard. Select>None. Delete the original template layer.Here are the template layers and which papers I used:
circle 1- paper 17
rect 1- paper 21 Filters>Light & Shadow>Drop Shadow 2, 2, 2, black, 50
rect 2- paper 7 Filters>Repeat drop Shadow
square 1- glitter 1 repeat drop shadow
square 2- paper 16
square 3- paper 2 repeat drop shadow
circle 2- glitter 4 repeat drop shadow
-Open frame 2. Make the top layer. Scale 92%. Place on top of the yellow circle. Add drop shadow of 3, 3, 10, black, 80.
-Open tube. Make the top layer. Add drop shadow of 2, 2, 2, black, 50. Layer>Duplicate Layer. Filters>Blur>Gaussian Blur on default. Change the mode to soft light and lower the opacity to 50.
Elements:
jewelery box 2
candles 1, 3, 5 & 5
pile o skulls
scatter 3
apothacary bottles
bird
moon
ink splatter 1
dead tree 2
-Open paper 19. Make the bottom layer. Apply mask. Click HERE to learn how to use masks.
-Add your name and copyright.
All finished!

Check out this awesome tube by Alica Mujica!! She will be available at PSP Tubes Emporium
2-9-12 HERE.
Tuesday, February 7, 2012

This tutorial is of my own creation and any resemblance to any other tuts is purely coincidental. This tutorial is for personal use only, using it for monetary gain is against our TOU's.
Supplies:
Gimp
Tube of choice. I am using the art of Jack Anita. You must have a license to use these tubes. You can purchase this tube starting today at PSP Tubes Emporium HERE
FTU scrap kit from LadyHawwk HERE
Template 75 by Elegant Inspirations HERE
Font-
Lets get started!
-Open template. Delete credits. Image>Scale Image 450x450. Image>Canvas Size 600x600 px and make sure to click center.
-Let's add papers to the template layers. Make the template layer active (see below). Right click template layer in layer box and choose alpha to selection. Open paper (see below). Right click paper layer in layer box and choose add alpha channel. Layer>Scale Layer by 60%.Select>Invert. Press delete on your keyboard. Select>None. Delete the original template layer.Here are the template layers and which papers I used:
main black circle- paper 3
black circle 1 & black circle 2- paper 5 Fitlers>Light & Shadow>Drop Shadow 2, 2, 2, black, 50
red circle 1- paper 10
red circle 2- paper 7 Filters>Repeat Drop Shadow
maroon square 1 & maroon square 2- paper 14 repeat drop shadow
grey square 1 & grey square 2- paper 1 repeat drop shadow
white square 1 & white square 2- paper 11 repeat drop shadow
red rectangle- paper 16 repeat drop shadow
-Make strip 1 active. Colors>Colorize Hue: 0 Saturation: 66 Lightness: -66. Fitlers>Noise>RGB Noise. Change all the sliders (except alpha) to 0.30. Repeat drop shadow. Repeat above for strip 2.
-Make square 1 active. Merge saquare 1 with square 2 & square 3. to do this, go to Layer>Merge Down. Select your magic wand. While pressing shift on your keyboard, click each square. Layer>New Layer. Set your foreground color to 9d0104. Set your background color to b9b394. Select your gradient tool. I'm using the FG to BG (RGB) setting. With your mouse, click the top letf corner of the squares and drag down to the bottom right corner of the squares. Add new layer. Set your foreground color to white and fill selection with your bucket fill tool. Select>Shrink by 3. Press delete on your keyboard. Open tube. Move tube layer above the gradient layer we just added. Place tube in your selection. Select>Grow by 1. Invert & Delete. Select none. Change the mode of the tube to screen.
-Open tube again. Make the top layer. Scale 75%. Place to the right side of tag. Repeat drop shadow.
Elements:
3
12
5
9
ribbon 2
29
24
11
13
31
32
-Add your name and copyright.
You're finished!
Monday, February 6, 2012
 Here's a tag I made featuring a cutie from Andrea Young. She will be available tomorrow @ PSP Tubes Emporium.
Subscribe to:
Posts
(Atom)
Snag Our Blinkies


Don't Be A Pirate!

