Sunday, November 20, 2011

This tutorial is of my own creation and any resemblance to any other tuts is purely coincidental. This tutorial is for personal use only, using it for monetary gain is against our TOU's.
Supplies Needed:
~Gimp (any version will do).
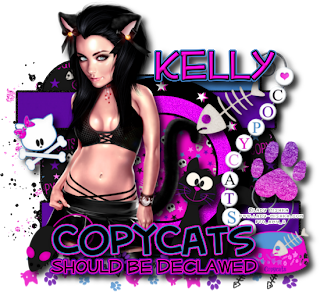
~Copycats PTU scrapkit by Angel's Desingz, which you can purcahse at Scraps-U-nique HERE.
~Tube of choice. I used the artwork of Lady Mishka, you must have a license to use this art. You can purchase this art from PFD HERE.
~Template of choice. I used Collab 1 template which you can get on our blog HERE.
~Font of choice. I used Mufferaw.
Let's get started!!!
1. Open a new layer ( I prefer a large canvas, so I make mine 1050x656). Make your canvas transparent (Layer > Transparency > Color to Alpha).
2. Open template in PSD format, remove and move layers of template around until they are the way you like them.
~Add paper from scrapkit to individual layers of the template (Right click on template layer in layer box > Alpha to Selection > CTRL I > Select paper layer in layer box > Delete).
These are the papers I used:
Paper 1
Paper 9
Paper 12
Paper 13
~I added noise to some of the template layers to make them look glittery (Filters > Noise > RGB Noise).
~I colorized some of the template layers to better match the scrapkit (Colors > Colorize > play with the setting until you get the desired color).
~Add drop shadow to template layers (Filters > Light & Shadow > Drop Shadow).
3. Open tube, add drop shadow.
4. Open and place the following elements:
Splat
Whisp
Kitty
Wordart 2
Pawprint
Fishbones
Dish
Kitty crossbones
Mouse
~Some of the elements may need to be sized down. Using your scale tool in your tool box adjust the pixel size until element is the correct size~
~Add drop shadow to all elements (except Splat & Whisp)~
5. Merge Layers (Image > Merge Visible Layers).
6. Crop Image (Image > Autocrop Image).
7. Scale image to desired size (Image > Scale Image).
8. Add copyright info and name.
9. Save as .png
ALL DONE!!!!!!!!!!
Labels:PTU tuts
Subscribe to:
Post Comments
(Atom)
Labels
12x12 Layout
A Taggers Scrap
Animated
Announcements
Art of Freya
Basic tuts
Blog Trains
CDO
Cluster Frame
CT tags
Extras
Forum Set
Freebies
FTU CU
FTU Kits
FTU tuts
Holiday
Jackie's Jewels
Kissing Kate
Masks
PTU Kits
PTU tuts
Quick Pages
Results
Results with Amys kits
Show Offs
Sweet Cravings Scraps
Tasha's Playground
Templates
Timeline Banners
Chit Chat
Blog Archive
-
▼
2011
(337)
-
▼
November
(42)
- Tut Result
- FTU tut - Christmas Kisses
- PTU tut - Holiday Hottie
- FTU tut - White Christmas
- PTE CT tag by Amy
- PTU Tut- Santa's Helper
- Christmas Templates!
- PTU tut - Santa's Workshop
- *Announcement*
- ~*~Happy Thanksgiving~*~
- FTU tut - Popstar
- PTE CT tag by Amy
- PTE CT tag by Amy
- FTU tut - Daydreamer
- PTU tut - Copycats should be Declawed
- PTE CT tag by Amy
- FTU tut - Goodies for Santa
- PTU Tut- Memories
- PTE CT tag by Amy
- PTU tut - Snow Bunny
- Collab Templates
- PTE CT tag by Amy
- Tut results
- PTU Tut- Fancy
- PTE CT tag by Amy
- PTU tut - Thanksgiving Feast
- PTE CT tag by Amy
- PTU tut - Darkness Falls
- FTU tut - Waiting for Santa
- PTE CT tag by Amy
- CT tag by Amy
- FTU Tut- Private Garden
- FTU tut - Turkey Time
- PTU Tut- Lullaby
- PTE CT tag by Amy (AC)
- FTU tut - Winter Vacation
- PTE CT tag by Amy
- FTU Tut- Not Perfect
- Thanksgiving Templates!
- Are you Ready for a Sale??
- PTU Tut- Just a Girl
- PTE CT tag by Amy
-
▼
November
(42)


0 comments:
Post a Comment