Gimptastic Scraps Available Exclusively @

Gimptastic Scraps CT


Blog Trains

CU Licenses


Tuesday, November 30, 2010
I have a new tut for you today called Pink Christmas along with a new template! I used a super cute PTU kit from Krissy's Scraps called Pink Frosting. You can purchase the kit HERE.
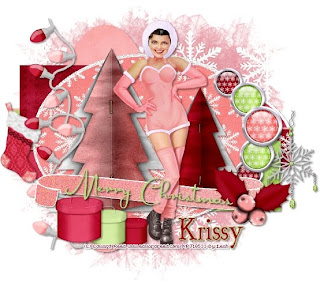
I have a new template to go along with the tut. If you download please leave some love:)
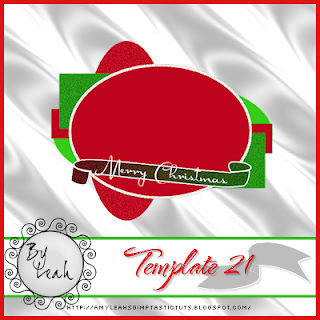
You can get the template HERE
This tutorial is of my own creation and any resemblance to any other tuts is purely coincidental. This tutorial is for personal use only, using it for monetary gain is against our TOU's.
Supplies:
Gimp- Any version should work
Cute PTU Scrap Kit from Krissy's Scraps called Pink Frosting HERE
Tube of Choice. I am using the art of Edward Reed. You must have a license to use his tubes. You can purchase them HERE
Template 21 form me HERE
Mask 212 from Gems taggin scraps HERE
Font St. Nicholas
Let's get started!
-Open template. Delete the credits. Crop using the crop tool. Go to Image>Scale Image by 500 px. Image>Canvas Size 600x600 px and make sure you click centered. Right click all the layers in the layer box and choose layer to image size.
-Make oval 1 active. Click outside of the oval using your magic wand tool. Open paper 2. Right click paper in layer box and choose Add Alpha Channel. Layer>Scale layer by 50%. Press delete on your keyboard to delete anything outside of the oval. Select>None. Delete the original oval 1 layer.
-Make oval 1 back active. Go to Filters>Light and Shadow>Drop Shadow of 2, 2, 3, black, 40.
-Make square 1 active. Click outside with magic wand. Open paper 11 and add alpha channel. Scale by 40%. Press delete and select none. Filters>Repeat drop Shaodw. Delete original square 1 layer.
-Make square 2 active. Click outside with magic wand. Open paper 12 and add alpha channel. Scale by 40%. Press delete and select none. Repeat drop shadow. Delete original sqaure 2 layer.
-Make oval 2 active. Click outside with magic wand. Open paper 5 and add alpha channel. Scale by 65%. Press delete and select none. Reapeat drop shadow. Delete original oval 2 layer.
-Make oval 3 active. Click outside with magic wand. Open paper 6 and add alpha channel. Scale by 65%. Press delete and select none. Repeat drop shadow. Delete original oval 3 layer.
-Make rect 1 avtive. Click outside with magic wand. Open paper 4 and add alpha channel. Scale by 50%. Press delete. Select>Invert. Select>Grow by 3. Add anew layer below this layer. Using your bucket fill tool, fill with fab3b4. Select none. Repeat drop shadow. Delete original rect 1 layer.
-Make rect 2 active. Click outside with magic wand. Open paper 3 and add alpha channel. Scale by 50%. Press delete. Invert and grow by 3. Add new layer below this layer. Fill with fab3b4. Select none and repeat drop shadow. Delete original rect 2 layer.
-Make the ribbon layer active. Click outside with magic wand. Add new layer above this layer. Invert. Fill with linear gradient using fab3b4 and F78C89. Filters>Noise>RGB Noise using default settings. Select none. Add drop shadow to ribbon back layer. Delete original ribbon layer.
-Make the merry christmas layer active. Right click layer in layer box and choose alpha to selection. Add new layer above this layer. Fill with B9D87B. Select none. Repeat drop shadow. Delete original merry christmas layer.
-Open tube. Scale by 75%. Add drop shdow.
Elements
Add a drop shadow to all element layers. See my tag as a reference as to where to place element layers.
-holly 2 Scale 40%
-paper christmas tree 1 scale 50%
-paper christmas tree 2 scale 40%
-gift box 1 scale 25%
-gift box 3 scale 20%
-gift box 4 scale 15%
-snowflake ornament 3 scale 50%
-lights 1 scale 50% Using rotate tool rotate by 90
-brad 2 scale 35%
-brad 3 scale 30% Layers>Duplicate
-brad 4 scale by 35% Duplicate
-stocking 1 scale 40%
-Open paper 1 and move to the bottom in layer box. Add alpha channel and apply mask. Click HERE for our mask tutorial.
-Add your name and copyrights and crop.
I hope you enjoyed this tut!
Happy Holidays!!
Subscribe to:
Post Comments
(Atom)
Snag Our Blinkies


Don't Be A Pirate!


Lovely template! I'm going to play! Thanks, Leah.
ReplyDelete