Gimptastic Scraps Available Exclusively @

Gimptastic Scraps CT


Blog Trains

CU Licenses


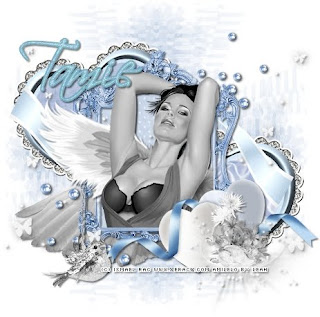
Supplies: Gimp- Any version should work Beautiful PTU Angel Cloud kit fromAddictive Pleasures HERE I am using the work of Ismael Rac. You must have a licence to use his art. You can purchase his tubes HERE WSL Mask 159 HERE Font- Scriptina Let's Begin! -Go to File>New. Open a new canvas of 500x500 pixels. -Open frame. Go to Layer>Scale layer by 50%. Using the magic wand tool, click inside of the frame. Go to Select>Grow by 3. Open paper 11. Move this paper layer under the frame layer in the layer box. Right click the paper layer in the layer box and click add alpha channel. Scale by 50%. Go to Select>Invert. Press delete on your keyboard. Go to Select >None. Next, go to Filters>Light & Shadow>Drop Shadow of 2, 2, 2, black, 50. -Open tube. Scale by 40%. Right click the layer in the layer box and click layer to image size. Go to Colors>Colorize. Move the hue and saturation sliders all the way to the left so it turns the tube black and white. Add drop shadow. Go to Layer>Duplicate layer. Move the duplicate tube layer to the top. Make the paper layer active. Click outside the paper using the magic wand. Make the bottom tube layer active and press delete on your keyboard. Make the duplicate tube active. Using the eraser tool, erase the wing on the right and a little off the bottom of the tube so she isn't sticking outside of the frame. Select none. -Open Hearts 2. Scale by 65%. Move to the bottom right of the tag. Add drop shadow. -Open shiny sparkle. Move this layer to the bottom in the layer box. Scale by 75% Add drop shadow. -Frame 2. Move this layer above the shiny sparkle in the layer box. Scale by 85%. Click inside top heart with magic wand. Grow by 5. Open paper 7 and move layer below the heart frame. Add alpha channel and scale by 50%. Invert and press delete. Make the heart frame layer active. Press inside the bottom heart with the magic wand. Grow by 5. Open paper 3 and add alpha channel. Scale by 50%. Invert and press delete. -Open decor 2. Move this layer to the top. Scale by 40%. Move to the bottom right and add drop shadow. -Open bird. Move this layer below the top tube layer. Scale by 50%. Move to the bottom left. Add drop shadow. -Open wing. Move this layer to the bottom. Scale by 75%. Move to the bottom left. Add drop shadow. -Open butterflies. Move this layer below the top tube. Scale by 65%. Add drop shadow. -Open paper 10. Apply mask. -Add your name and copyright. You're finished!
Snag Our Blinkies


Don't Be A Pirate!


0 comments:
Post a Comment