Gimptastic Scraps Available Exclusively @

Gimptastic Scraps CT


Blog Trains

CU Licenses


Wednesday, November 30, 2011

This tag was made by our friend Shawna, it is based on Amy's FTU tut Cool Ride. It turned out AWESOME, that is one hunky man there...LOL. Thank you so much Shawna for sharing your results with us.
We LOVE to see your results, please feel free to send them to us on Facebook or via email at gimptasticblog@yahoo.com
Tuesday, November 29, 2011

This tutorial is of my own creation and any resemblance to any other tuts is purely coincidental. This tutorial is for personal use only, using it for monetary gain is against our TOU's.
Supplies Needed:
~Gimp (any version will do).
~Tube of choice. I used the artwork of Roman Zaric you must have a license to use this art which you can get @ PTE HERE.
~Winter Eleganzia FTU scrapkit by Angelblue which you can get HERE.
~Font of choice. I used rolina.
Let's get started!!!!!
1. Open a new layer ( I prefer a large canvas, so I make mine 1050x656). Make your canvas transparent (Layer > Transparency > Color to alpha).
2. Open element 47 (frame), add drop shadow (Filters > Light & Shadow > Drop Shadow).
3. Open Paper 14 center it behind frame, remove excess paper using a cutting tool or eraser.
4. Open tube, add drop shadow.
5. Open and place the following elements:
element 1
element 18
element 21
element 37
element 48
element 51
element 52
element 53
element 54
element 56
element 60
element 61
element 65
~Some elements may need to be sized down. Using the Scale Tool in your tool box adjust pixels to desired size~
~Add drop shadow to all elements~
6. Merge layers (Image > Merge Visible Layer).
7. Crop image (Image > Autocrop Image).
8. Scale image to desired size (Image > Scale Image).
9. Add copyright info and name.
10. Save as .png
You are finished :)
Monday, November 28, 2011

This tutorial is of my own creation and any resemblance to any other tuts is purely coincidental. This tutorial is for personal use only, using it for monetary gain is against our TOU's.
Supplies Needed:
~Gimp (any version will do).
~Tube of choice. I used the artwork of Keith Garvey, you must have a license to use this art which you can get at PTE HERE.
~Christmas Chaos PTU scrapkit by Tasha's Playground which you can get HERE.
~Font of choice. I used ValentinaJF.
Let's get started!!!!!
1. Open a new layer ( I prefer a large canvas, so I make mine 1050x656). Make your canvas transparent (Layer > Transparency > Color to alpha).
2. Open Wreath, add drop shadow (Filters > Light & Shadow > Drop Shadow).
3. Open Paper 12 center it behind wreath, remove excess paper using a cutting tool or eraser.
4. Open Frame 3, add drop shadow.
5. Open Paper 3 center it behind frame, remove excess paper using a cutting tool or eraser.
6. Open tubes. I used both a full body tube and a close-up.
~Take the close up layer and move it (in your layer box) under Frame 3, but above the paper. Change the Mode on the tube to Burn (at the top of your Layer Box you will see where it says Mode, click the arrow and select Burn from the drop down menu). Remove excess tube layer using a cutting tool or eraser.
~Add drop shadow to the full body tube.
7. Open and place the following elements:
Light
Star 2
Tree 4
Elf dude 2
Snowman
Santa
Reindeer
Heart
Bag
Candle
Cupcake
Flower
~Some elements may need to be sized down. Using the Scale Tool in your tool box adjust pixels to desired size~
~Add drop shadow to all elements (except Light)~
8. Merge layers (Image > Merge Visible Layer).
9. Crop image (Image > Autocrop Image).
10. Scale image to desired size (Image > Scale Image).
11. Add copyright info and name.
12. Save as .png
You are finished :)
 This tutorial is of my own creation and any resemblance to any other tuts is purely coincidental. This tutorial is for personal use only, using it for monetary gain is against our TOU's.
Supplies Needed:
This tutorial is of my own creation and any resemblance to any other tuts is purely coincidental. This tutorial is for personal use only, using it for monetary gain is against our TOU's.
Supplies Needed:~Gimp (any version will do).
~Santa's Goodie Bag FTU scrapkit by Angel's Designz HERE.
~Tube of choice. I used the artwork of Tim Lowery, you must have a license to use this art. You can purchase this art from PTE HERE.
~Template of choice. I used Leah's template 119 which you can get on our blog HERE.
~Font of choice. I used Scriptina.
Let's get started!!!
1. Open a new layer ( I prefer a large canvas, so I make mine 1050x656). Make your canvas transparent (Layer > Transparency > Color to Alpha).
2. Open template in PSD format, remove and move layers of template around until they are the way you like them.
~Add paper from scrapkit to individual layers of the template (Right click on template layer in layer box > Alpha to Selection > CTRL I > Select paper layer in layer box > Delete).
These are the papers I used:
Paper 1
Paper 2
Paper 6
Paper 8
Paper 12
~I added noise to some of the template layers to make them look glittery (Filters > Noise > RGB Noise).
~I colorized some of the template layers to better match the scrapkit (Colors > Colorize > play with the setting until you get the desired color).
~Add drop shadow to template layers (Filters > Light & Shadow > Drop Shadow).
3. Open tubes, I used both a full body and a close up.
~Open full body tube, you will need to duplicate this tube so that you have 2 (at the bottom of your layer box click on the blue box. This will give you 2 tube layers).
~Select the top tube layer in your tool box. Add Gaussion Blur (Filters > Blur > Gaussion Blur, use default settings).
~On that same tube layer change the mode to Screen (at the top of your Layer Box you will see where it says Mode, click the arrow and select Screen from the drop down menu).
~Add drop shadow to bottom tube layer.
~I changed the mode on the close-up to Overlay (at the top of your Layer Box you will see where it says Mode, click the arrow and select Overlay from the drop down menu). This tube has been added to the template in the same way you add paper (Right click on template layer in layer box > Alpha to Selection > CTRL I > Select tube layer in layer box > Delete).
4. Open and place the following elements:
Ribbon bow
Tree
Bells
Star
Snowflake
Snowflake scatter
Flower
Glitter
Snowman
Bauble 1
Bauble 2
Candycanes
~Some of the elements may need to be sized down. Using your scale tool in your tool box adjust the pixel size until element is the correct size~
~Add drop shadow to all elements~
5. Merge Layers (Image > Merge Visible Layers).
6. Crop Image (Image > Autocrop Image).
7. Scale image to desired size (Image > Scale Image).
8. Add copyright info and name.
9. Save as .png
ALL DONE!!!!!!!!!!
Sunday, November 27, 2011
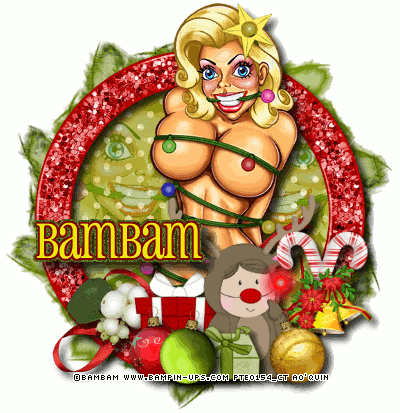
Here's a tag I made with this fun tube from BamBam, you can find her in the New Christmas Tubes section at PTE HERE.
 This tutorial is of my own creation and any resemblance to any other tuts is purely coincidental. This tutorial is for personal use only, using it for monetary gain is against our TOU's
Supplies:
Gimp
Beautiful PTU kit from Sweet Cravings Scraps called I Believe In You HERE
Tube of choice. I am using the work of Elias Chatzoudis. You must have a license to use his tubes. You can purchase them HERE
Template 120 from me HERE
Christmas mask 9 from K'Lani Designs HERE
Font- creampuff
Let's Begin!!
-Open template. Delete credits. Image>Scale Image 500x368 px. Image>Canvas Size 600x600 px. Press center.
-Let's add papers to the template layers. Make the template layer active (see below). Right click template layer in layer box and choose alpha to selection. Open paper (see below). Right click paper layer in layer box and choose add alpha channel. Layer>Scale Layer by 60%.Select>Invert. Press delete on your keyboard. Select>None. Delete the original template layer.Here are the template layers and which papers I used:
circle 1- paper 12 Filters>Light & Shadow>Drop Shadow 2, 2, 2, black, 50
square- paper 3 Filters>Repeat Drop Shadow
rect 1- paper 1 repeat drop shadow
circle 2 & 3- paper 7
circle 4- paper 8
circle 5- paper 13 repeat drop shadow
rect 2- paper 10 repeat drop shadow
rect 3- paper 2 repeat drop shadow
-Open frame 2. Move below words back 2 layer. Scale 45%. Place on top of circle directly underneath. Open tube close up. It should open up right above the frame layer. Position in the middle of the frame. Repeat drop shadow. Layer>Duplicate Layer. Move the duplicate tube below the frame layer in the layer box. Make the frame active. Select your magic wand. Click inside the frame. Select>Grow by 5. Make the duplicate tube active (the one below the frame). Invert & delete. Select none. Make the original tube active (the one right above the frame). Select the eraser tool. Erase the bottom portion of the tube so it looks like she is sticking outside the frame. Make the frame active and repeat drop shadow.
-Make words 1 active. Filters>Noise>RGB Noise. I used the default settings. Filters>Decor>Add Bevel. Uncheck work on copy. Make words 1 back active. Repeat drop shadow. Make words 2 active. Colors>Colorize: HUE: 107 SATURATION: 61 LIGHTNESS: -11. Repeat noise and bevel. Make words 2 back active and repeat drop shadow.
Elements:
Add drop shadow of 2, 2, 2, black, 50 to all element layers, unless otherwise stated (I will say NDS for no drop shadow). See my tag for placement.
christmas ball cluster
tree topper
glitter splat 2- NDS
beads
candy cane
tree
gift
cookie
christmas ball 2
stars 2- NDS
-Open paper 5. Move to the bottom layer. Apply mask. Click HERE to learn how to use masks.
-Add your name and copyright and you are finished!
Saturday, November 26, 2011
I love Christmas and anything to do with it. I thought I would spread the joy and make some templates!
 You can download them HERE

This tutorial is of my own creation and any resemblance to any other tuts is purely coincidental. This tutorial is for personal use only, using it for monetary gain is against our TOU's.
Supplies Needed:
~Gimp (any version will do).
~Tube of choice. I used the artwork of Myriadelle, you must have a license to use this art which you can get from PTE HERE.
~I Believe in You PTU scrapkit by Sweet Cravings Scraps which you can get HERE
~Font of choice. I used Frosty.
Let's get started!!!!!
1. Open a new layer ( I prefer a large canvas, so I make mine 1050x656). Make your canvas transparent (Layer > Transparency > Color to alpha).
2. Open Frame 1 (snowflake frame), this frame will be used like a mask layer in the background of the tag.
3. Open Frame 7 (star frame), add drop shadow (Filters > Light & Shadow > Drop Shadow).
4. Open Paper 9 center it behind star frame, remove excess paper using a cutting tool or eraser.
5. Open tube, add drop shadow.
6. Open and place the following elements:
Christmas tree
Curly ribbon
Reindeer 1
Reindeer 2
Flower 1
Leaf
Wrapped note
Gift
Stocking
Gingerbread house
Candycane
Candy
Candy basket
Cookie
~Some elements may need to be sized down. Using the Scale Tool in your tool box adjust pixels to desired size~
~Add drop shadow to all elements ~
7. Merge layers (Image > Merge Visible Layer).
8. Crop image (Image > Autocrop Image).
9. Scale image to desired size (Image > Scale Image).
10. Add copyright info and name.
11. Save as .png
You are finished :)
We just wanted to take a moment to let all of you know that we have decided to step down from 2 of our CT's. We will leaving Rieka Rafita and Creative Intentionz creative teams. We have enjoyed working with both Rieka and Nikki, and we have loved being on their teams. They both have amazing talent and we appreciate the opportunity to have worked with their kits.
We wish them both the best in their future projects.
Wednesday, November 23, 2011

Just wanted to take a moment and wish all of you a Happy Thanksgiving ♥
Tuesday, November 22, 2011

This tutorial is of my own creation and any resemblance to any other tuts is purely coincidental. This tutorial is for personal use only, using it for monetary gain is against our TOU's.
Supplies Needed:
~Gimp (any version will do).
~Tube of choice. I used the artwork of Carlos Cartagena , you must have a license to use this art which you can get from PTE HERE.
~Popstar FTU scrapkit by Grunge & Glitter which you can get HERE.
~Font of choice. I used Pea Faith.
Let's get started!!!!!
1. Open a new layer ( I prefer a large canvas, so I make mine 1050x656). Make your canvas transparent (Layer > Transparency > Color to alpha).
2. Open Frame 3, add drop shadow (Filters > Light & Shadow > Drop Shadow).
3. Open Paper 12 center it behind middle star, remove excess paper using a cutting tool or eraser.
~Open Papers 8 & 11 and center one under each outer star, remove excess paper.
4. Open tubes. I used both a full body tube and a close-up.
~Take the close up layer and move it (in your layer box) under the center star of frame 3, but above the paper. Change the Mode on the tube to Burn (at the top of your Layer Box you will see where it says Mode, click the arrow and select Burn from the drop down menu). Remove excess tube layer using a cutting tool or eraser.
~Add drop shadow to the full body tube.
5. Open and place the following elements:
Star cluster 1
Ribbon 2
Tanktop
Hotpants
Limo
Star 1
Star 2
Musicnote 3
~Some elements may need to be sized down. Using the Scale Tool in your tool box adjust pixels to desired size~
~Add drop shadow to all elements (except Star cluster 1)~
6. Merge layers (Image > Merge Visible Layer).
7. Crop image (Image > Autocrop Image).
8. Scale image to desired size (Image > Scale Image).
9. Add copyright info and name.
10. Save as .png
You are finished :)

Here's a tag I made using another cutie from Jaz Higgins, this is Miss Muffet and you can find her in the New Releases section at PTE HERE.
Monday, November 21, 2011

Here's a tag I made using a lovely tube from Marco Guaglione, you can find this in the New Releases section at PTE HERE
Sunday, November 20, 2011
 This tutorial is of my own creation and any resemblance to any other tuts is purely coincidental. This tutorial is for personal use only, using it for monetary gain is against our TOU's.
Supplies Needed:
This tutorial is of my own creation and any resemblance to any other tuts is purely coincidental. This tutorial is for personal use only, using it for monetary gain is against our TOU's.
Supplies Needed:~Gimp (any version will do).
~The Goodies FTU blogtrain by Tasha's Playground which you can get HERE.
~Tubes of choice. I used the artwork of Jaz Higgins, you must have a license to use this art. You can purchase this art from PTE HERE.
~Template of choice. I used Rose's template 40 which you can get at Rose's Place HERE.
~Font of choice. I used Valentina JF.
Let's get started!!!
1. Open a new layer ( I prefer a large canvas, so I make mine 1050x656). Make your canvas transparent (Layer > Transparency > Color to Alpha).
2. Open template in PSD format.
~Add paper from scrapkit to individual layers of the template (Right click on template layer in layer box > Alpha to Selection > CTRL I > Select paper layer in layer box > Delete).
This is the paper I used:
Paper 8
~I added noise to some of the template layers to make them look glittery (Filters > Noise > RGB Noise).
~I colorized some of the template layers to better match the scrapkit (Colors > Colorize > play with the setting until you get the desired color).
~Add drop shadow to template layers (Filters > Light & Shadow > Drop Shadow).
3. Open tubes, I used both a full body and a close up.
~I changed the mode on the close-up to Hardlight (at the top of your Layer Box you will see where it says Mode, click the arrow and select Hardlight from the drop down menu). This tube has been added to the template in the same way you add paper (Right click on template layer in layer box > Alpha to Selection > CTRL I > Select tube layer in layer box > Delete).
4. Open frame 3, I tilted the frame slightly using the Rotate tool in my tool box. Add drop shadow.
~Open paper 4 and place it directly under the frame. Remove excess paper using an eraser or cutting tool from your tool box.
~Place full body tube under the frame and over the paper. Remove excess using an eraser or cutting tool from your tool box.
5. Open and place the following elements:
Circles
Flower 3
Flower 4
Flowers
Petals
Rose
Grass
Dragonflies
Frog
Heart 2
Bottles
~Some of the elements may need to be sized down. Using your scale tool in your tool box adjust the pixel size until element is the correct size~
~Add drop shadow to all elements (except Circles)~
6. Merge Layers (Image > Merge Visible Layers).
7. Crop Image (Image > Autocrop Image).
8. Scale image to desired size (Image > Scale Image).
9. Add copyright info and name.
10. Save as .png
ALL DONE!!!!!!!!!!

This tutorial is of my own creation and any resemblance to any other tuts is purely coincidental. This tutorial is for personal use only, using it for monetary gain is against our TOU's.
Supplies Needed:
~Gimp (any version will do).
~Copycats PTU scrapkit by Angel's Desingz, which you can purcahse at Scraps-U-nique HERE.
~Tube of choice. I used the artwork of Lady Mishka, you must have a license to use this art. You can purchase this art from PFD HERE.
~Template of choice. I used Collab 1 template which you can get on our blog HERE.
~Font of choice. I used Mufferaw.
Let's get started!!!
1. Open a new layer ( I prefer a large canvas, so I make mine 1050x656). Make your canvas transparent (Layer > Transparency > Color to Alpha).
2. Open template in PSD format, remove and move layers of template around until they are the way you like them.
~Add paper from scrapkit to individual layers of the template (Right click on template layer in layer box > Alpha to Selection > CTRL I > Select paper layer in layer box > Delete).
These are the papers I used:
Paper 1
Paper 9
Paper 12
Paper 13
~I added noise to some of the template layers to make them look glittery (Filters > Noise > RGB Noise).
~I colorized some of the template layers to better match the scrapkit (Colors > Colorize > play with the setting until you get the desired color).
~Add drop shadow to template layers (Filters > Light & Shadow > Drop Shadow).
3. Open tube, add drop shadow.
4. Open and place the following elements:
Splat
Whisp
Kitty
Wordart 2
Pawprint
Fishbones
Dish
Kitty crossbones
Mouse
~Some of the elements may need to be sized down. Using your scale tool in your tool box adjust the pixel size until element is the correct size~
~Add drop shadow to all elements (except Splat & Whisp)~
5. Merge Layers (Image > Merge Visible Layers).
6. Crop Image (Image > Autocrop Image).
7. Scale image to desired size (Image > Scale Image).
8. Add copyright info and name.
9. Save as .png
ALL DONE!!!!!!!!!!
Friday, November 18, 2011

Here is a tag I made using a HOT new tube from The Hunter, this tube is part of his zodiac collection. You can find it in the New Releases section at PTE now
Thursday, November 17, 2011
 This tutorial is of my own creation and any resemblance to any other tuts is purely coincidental. This tutorial is for personal use only, using it for monetary gain is against our TOU's.
Supplies Needed:
This tutorial is of my own creation and any resemblance to any other tuts is purely coincidental. This tutorial is for personal use only, using it for monetary gain is against our TOU's.
Supplies Needed:~Gimp (any version will do).
~Tube of choice. I used the artwork of Jose Cano , you must have a license to use this art which you can get from PTE HERE.
~Christmas in July FTU scrapkit by Sweet Cravings Scraps which you can get HERE.
~Mask of choice. I used WSL mask 235 which you can get HERE.
~Font of choice. I used 1 Snappy DNA.
Let's get started!!!!!
1. Open a new layer ( I prefer a large canvas, so I make mine 1050x656). Make your canvas transparent (Layer > Transparency > Color to alpha).
2. Open Frame 1, add drop shadow (Filters > Light & Shadow > Drop Shadow).
3. Open Paper 2 center it behind frame, remove excess paper using a cutting tool or eraser.
4. Open tubes. I used both a full body tube and a close-up.
~Take the close up layer and move it (in your layer box) under Frame 1, but above the paper. Change the Mode on the tube to Screen (at the top of your Layer Box you will see where it says Mode, click the arrow and select Screen from the drop down menu). Remove excess tube layer using a cutting tool or eraser.
~Add drop shadow to the full body tube.
5. Open and place the following elements:
Christmas tree
Drum
Christmas tin
Gift 2
Christmas ball 4
Christmas ball 5
Snowflake 1
Snowflake 2
Santa note
Glass of milk
Gift bow 2
~Some elements may need to be sized down. Using the Scale Tool in your tool box adjust pixels to desired size~
~Add drop shadow to all elements~
6. Open Paper 7
7. Open mask (click HERE for a tut on using masks).
8. Add mask to paper.
9. Merge layers (Image > Merge Visible Layer).
10. Crop image (Image > Autocrop Image).
11. Scale image to desired size (Image > Scale Image).
12. Add copyright info and name.
13. Save as .png
You are finished :)
 This tutorial is of my own creation and any resemblance to any other tuts is purely coincidental. This tutorial is for personal use only, using it for monetary gain is against our TOU's
Supplies:
Gimp
PTU kit November Rain from Sweet Cravings Scraps HERE
Tube of Choice. I am using the art of FourXsDesigns. You must have al icense to use these tubes. You can purchase them HERE
Template 16 from Candylicious Designs HERE
Mask 404 from Vix HERE
Font- Pacifico
Let's get started!
-Open template. Delete credits. Image>Scale Image by 550x489 px.
-Let's add papers to the template layers. Make the template layer active (see below). Right click template layer in layer box and choose alpha to selection. Open paper (see below). Right click paper layer in layer box and choose add alpha channel. Layer>Scale Layer by 60%.Select>Invert. Press delete on your keyboard. Select>None. Delete the original template layer.Here are the template layers and which papers I used:
pink oval- paper 4
grey circle right- paper 3
grey circle left- paper 2
purple circle- paper 5 Fitlers>Light & Shadow>Drop Shadow 3, 3, 10, black, 80
-Make the oval outline layer active. Filters>Repeat Drop Shadow.
-Open frame 3. Move below the black outline right layer in the layer box. Scale 40%. Place on top of the black outline. Layer>Duplicate Layer. Place duplicate on the other black outline layer. Add drop shadow of 2, 2, 2, black, 50 to both frames.
-Open frame 6. Make the top layer. Scale 35%. Select the rotate tool and click the canvas. In the angle put 45. Place in the middle of tag. Select your magic wand. Click inside the frame. Select>Grow by 5. Open paper 9 and move below frame. Add alpha channel to paper. Invert & delete. Select none. Repeat drop shadow on frame.
-Open tube. Make the top layer. Scale 65%. Place on top of the rotated frame. The bottom portion of the tube will cover the frame. Repeat drop shadow. Duplicate tube. Move duplicate tube below the rotated frame layer. Make the rotated frame active. Click inside frame with magic wand. Grow by 5. Make the duplicate tube active again. Invert & delete. Select none. Make the original tube active. Select your eraser tool. Erase the bottom portion of the tube so that it looks like she is sticking out of the frame. Don't erase her arms.
Elements
Add drop shadow of 2, 2, 2, black, 50 to all element layers unless otherwise stated (it will say NDS for no drop shadow). See my tag for placement.
flower 9-NDS
angel
flower 4
bow 5
butterfly- rotate 30
shattered heart- NDS
statue- flip- NDS
tree- NDS
-Open paper 7. Make the bottom layer. Apply mask to paper. Click HERE to learn how to use masks.
-Add your name and copyright.
You're finished!!!
Wednesday, November 16, 2011

Here's a fun tag I made with a new tube from Sebastien Serrano, you can get this tube in the New Christmas Tubes section at PTE HERE.
Tuesday, November 15, 2011
 This tutorial is of my own creation and any resemblance to any other tuts is purely coincidental. This tutorial is for personal use only, using it for monetary gain is against our TOU's.
Supplies Needed:
This tutorial is of my own creation and any resemblance to any other tuts is purely coincidental. This tutorial is for personal use only, using it for monetary gain is against our TOU's.
Supplies Needed:
~Gimp (any version will do).
~Cheers & Hugs PTU scrapkit by Wicked Princess Scraps. This kit is an exclusive for The Art of Giving and can be purchased HERE.
~Tube of choice. I used the artwork of Keith Garvey, you must have a license to use this art which you can get from PTE HERE.
~Template of choice. I used Crazy Cakes Scraps Snow Bunny template which you can get HERE.
~Font of choice. I used Signerica Fat.
Let's get started!!!
1. Open a new layer ( I prefer a large canvas, so I make mine 1050x656). Make your canvas transparent (Layer > Transparency > Color to Alpha).
2. Open template in PSD format, remove and move layers of template around until they are the way you like them.
~Add paper from scrapkit to individual layers of the template (Right click on template layer in layer box > Alpha to Selection > CTRL I > Select paper layer in layer box > Delete).
These are the papers I used:
Paper 7
Paper 8
Paper 11
~I added noise to some of the template layers to make them look glittery (Filters > Noise > RGB Noise).
~I colorized some of the template layers to better match the scrapkit (Colors > Colorize > play with the setting until you get the desired color).
~Add drop shadow to template layers (Filters > Light & Shadow > Drop Shadow).
3. Open tubes, I used both a full body and a close up.
~Add drop shadow to full body tube.
~I changed the mode on the close-up to Hardlight (at the top of your Layer Box you will see where it says Mode, click the arrow and select Hardlight from the drop down menu). This tube has been added to the template in the same way you add paper (Right click on template layer in layer box > Alpha to Selection > CTRL I > Select tube layer in layer box > Delete).
4. Open and place the following elements:
Beaded Snowflake
Snowflake 2
Birds on ski's
Kitten box
Skating snowman
Rose
Rosebud
Mums
Ornament 2
Gloves
Ice skate
Candycane
~Some of the elements may need to be sized down. Using your scale tool in your tool box adjust the pixel size until element is the correct size~
~Add drop shadow to all elements~
5. Merge Layers (Image > Merge Visible Layers).
6. Crop Image (Image > Autocrop Image).
7. Scale image to desired size (Image > Scale Image).
8. Add copyright info and name.
9. Save as .png
ALL DONE!!!!!!!!!!

Monday, November 14, 2011

Here is a tag I made using a cutie from Edward Reed, you can find her in the New Releases section now at PTE
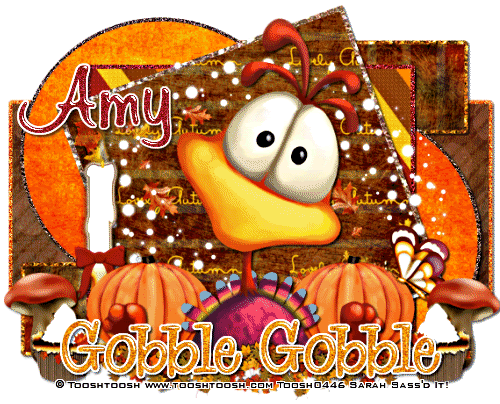
Here are some amazing results all based on Amy's FTU tut Turkey Time
This one was done by Sarah. I LOVE the turkey :)
 These two were done by Sherena. I love how she made both of these look so different using the same tut :)


This one was done by Shawna. I love the glassy effect she gave some of the template layers.

All of these are so great. Thank you ladies for sharing these results with us.
If any of you would like to share your results with us please email us at gimptasticblog@yahoo.com
 This tutorial is of my own creation and any resemblance to any other tuts is purely coincidental. This tutorial is for personal use only, using it for monetary gain is against our TOU's
Supplies:
Gimp
Great PTU kit from Tasha's Playground called Black Ice HERE
Tube of choice. I am using Pinuptoons. You must have a license to use them. You can purchase them HERE
Mask 236 from weescotslass HERE
Font- Prelude FLF Bold
Let's get started!
-File>New 600x600 pixels.
-Open window. Layer>Scale Layer 70%. Select the magic wand. While pressing shift on your keyboard, click inside the 2 squares of the window. Select>Grow by 5. Open paper 1. Move below the window layer in the layer box. Right click paper layer in the layer box and click add alpha channel. Scale 70%. Select>Invert. Press delete on your keyboard. Select>None. Make the window active. Filters>Light & Shadow>Drop Shadow 2, 2, 2, black, 50.
-Open frame 5. Make the top layer. Scale 80%.
-Open tube. Make the top layer. Place to the right of the window. Repeat drop shadow.
-Open tree. Move below the window. Scale 50%. Palce to the left side of window.
Other Elements:
Add drop shadow of 2, 2, 2, black, 50 to all element layers, unless otherwise stated (it will say NDS). See my tag for placement.
flower
snowy roses
trees NDS
candle 2
bow 2
leaf 2- flip
rose 2 NDS
sparkle 3
-Open paper 3. Make the bottom layer. Apply mask. Click HERE to learn how to use masks.
-Add your name and copyright and you are finished!!!!!
This tutorial is of my own creation and any resemblance to any other tuts is purely coincidental. This tutorial is for personal use only, using it for monetary gain is against our TOU's
Supplies:
Gimp
Great PTU kit from Tasha's Playground called Black Ice HERE
Tube of choice. I am using Pinuptoons. You must have a license to use them. You can purchase them HERE
Mask 236 from weescotslass HERE
Font- Prelude FLF Bold
Let's get started!
-File>New 600x600 pixels.
-Open window. Layer>Scale Layer 70%. Select the magic wand. While pressing shift on your keyboard, click inside the 2 squares of the window. Select>Grow by 5. Open paper 1. Move below the window layer in the layer box. Right click paper layer in the layer box and click add alpha channel. Scale 70%. Select>Invert. Press delete on your keyboard. Select>None. Make the window active. Filters>Light & Shadow>Drop Shadow 2, 2, 2, black, 50.
-Open frame 5. Make the top layer. Scale 80%.
-Open tube. Make the top layer. Place to the right of the window. Repeat drop shadow.
-Open tree. Move below the window. Scale 50%. Palce to the left side of window.
Other Elements:
Add drop shadow of 2, 2, 2, black, 50 to all element layers, unless otherwise stated (it will say NDS). See my tag for placement.
flower
snowy roses
trees NDS
candle 2
bow 2
leaf 2- flip
rose 2 NDS
sparkle 3
-Open paper 3. Make the bottom layer. Apply mask. Click HERE to learn how to use masks.
-Add your name and copyright and you are finished!!!!!
Sunday, November 13, 2011
 Here's a tag I made using an awesome tube by Scott Blair. You can find this tube in the New Christmas Tubes section at PTE HERE.
This tutorial is of my own creation and any resemblance to any other tuts is purely coincidental. This tutorial is for personal use only, using it for monetary gain is against our TOU's.
Supplies Needed:
~Gimp (any version will do).
~Tube of choice. I used the artwork of Elias Chatzoudis, you must have a license to use this art which you can get at PTE HERE.
~Give Thanks PTU scrapkit by Rebel Dezigns which you can also get at PTE HERE.
~Mask of choice. I used WSL mask 302 which you can get HERE.
~Font of choice. I used ValentinaJF.
Let's get started!!!!!
1. Open a new layer ( I prefer a large canvas, so I make mine 1050x656). Make your canvas transparent (Layer > Transparency > Color to alpha).
2. Open element 32 (stick frame), add drop shadow (Filters > Light & Shadow > Drop Shadow).
3. Open Paper 5 center it behind frame, remove excess paper using a cutting tool or eraser.
4. Open tubes. I used both a full body tube and a close-up.
~Take the close up layer and move it (in your layer box) under the frame, but above the paper. Change the Mode on the tube to Hardlight (at the top of your Layer Box you will see where it says Mode, click the arrow and select Hardlight from the drop down menu). Remove excess tube layer using a cutting tool or eraser.
~Add drop shadow to the full body tube.
5. Open and place the following elements:
element 6
element 11
element 18
element 21
element 23
element 28
element 30
element 31
element 33
element 42
element 45
element 46
~Some elements may need to be sized down. Using the Scale Tool in your tool box adjust pixels to desired size~
~Add drop shadow to all elements~
6. Open Paper 6
7. Open mask.
8. Add mask to paper (click HERE for a tut on using masks)
9. Merge layers (Image > Merge Visible Layer).
10. Crop image (Image > Autocrop Image).
11. Scale image to desired size (Image > Scale Image).
12. Add copyright info and name.
13. Save as .png
You are finished :)

Here's a tag I made using a beautiful image by Jon Rattenbury. You can find this 3 pack of images in the New Christmas Tubes section at PTE now.
Friday, November 11, 2011
 This tutorial is of my own creation and any resemblance to any other tuts is purely coincidental. This tutorial is for personal use only, using it for monetary gain is against our TOU's.
Supplies Needed:
This tutorial is of my own creation and any resemblance to any other tuts is purely coincidental. This tutorial is for personal use only, using it for monetary gain is against our TOU's.
Supplies Needed:
~Gimp (any version will do).
~Tube of choice. I used the artwork of Zindy Nielsen, this is a free to use tube but it is required that you use the FTU license you can find HERE.
~Black Ice PTU scrapkit by Tasha's Playground which you get HERE.
~Font of choice. I used Monika Italic.
Let's get started!!!!!
1. Open a new layer ( I prefer a large canvas, so I make mine 1050x656). Make your canvas transparent (Layer > Transparency > Color to alpha).
2. Open frame 4, add drop shadow (Filters > Light & Shadow > Drop Shadow).
3. Open Paper 1 center it behind frame, remove excess paper using a cutting tool or eraser.
4. Open tube, add drop shadow.
5. Open and place the following elements:
Snowy branch 2
Feather
Snowy roses
Candle
Skull
Rose 2
Crow
Leaf 2
Spider
~Some elements may need to be sized down. Using the Scale Tool in your tool box adjust pixels to desired size~
~Add drop shadow to all elements~
6. Merge layers (Image > Merge Visible Layer).
7. Crop image (Image > Autocrop Image).
8. Scale image to desired size (Image > Scale Image).
9. Add copyright info and name.
10. Save as .png
You are finished :)
 This tutorial is of my own creation and any resemblance to any other tuts is purely coincidental. This tutorial is for personal use only, using it for monetary gain is against our TOU's.
Supplies Needed:
This tutorial is of my own creation and any resemblance to any other tuts is purely coincidental. This tutorial is for personal use only, using it for monetary gain is against our TOU's.
Supplies Needed:
~Gimp (any version will do).
~Waiting for Santa FTU scrapkit, which you can get from LaCarolita's Designz HERE.
~Tube of choice. I used the artwork of Tony Tzanoukakis, you must have a license to use this art. You can purchase this art from PTE HERE.
~Template of choice. I used Leah's template 113 which you can get on our blog HERE.
~Font of choice. I used HaloHandletter Medium.
Let's get started!!!
1. Open a new layer ( I prefer a large canvas, so I make mine 1050x656). Make your canvas transparent (Layer > Transparency > Color to Alpha).
2. Open template in PSD format, remove and move layers of template around until they are the way you like them.
~Add paper from scrapkit to individual layers of the template (Right click on template layer in layer box > Alpha to Selection > CTRL I > Select paper layer in layer box > Delete).
These are the papers I used:
Paper 1
Paper 6
Paper 7
~I added noise to some of the template layers to make them look glittery (Filters > Noise > RGB Noise).
~I colorized some of the template layers to better match the scrapkit (Colors > Colorize > play with the setting until you get the desired color).
~Add drop shadow to template layers (Filters > Light & Shadow > Drop Shadow).
3. Open tubes, I used both a full body and a close up.
~Open full body tube, add drop shadow.
~I changed the mode on the close-up to Hardlight (at the top of your Layer Box you will see where it says Mode, click the arrow and select Hardlight from the drop down menu). This tube has been added to the template in the same way you add paper (Right click on template layer in layer box > Alpha to Selection > CTRL I > Select tube layer in layer box > Delete).
4. Open and place the following elements:
Christmas tree
Present 2
Present 3
Poinsettia 2
Ruffle 1
Bow 3
Candycane
Lantern
Ornament 1
Ornament 5
Ornament 8
~Some of the elements may need to be sized down. Using your scale tool in your tool box adjust the pixel size until element is the correct size~
~Add drop shadow to all elements~
5. Merge Layers (Image > Merge Visible Layers).
6. Crop Image (Image > Autocrop Image).
7. Scale image to desired size (Image > Scale Image).
8. Add copyright info and name
9. Save as .png
ALL DONE!!!!!!!!!!
Wednesday, November 9, 2011

Here is a tag I made using a lovely tube by Deborah Grieves, this tube is coming soon to PTE

Here is a tag I made using an adorable tube from Alicia Mujica and a FTU kit called All It's Glory by Wicked Princess Scraps. All you have to do to get this kit is go to the WPS fan page on Facebook and click the "like" button HERE.
 This tutorial is of my own creation and any resemblance to any other tuts is purely coincidental. This tutorial is for personal use only, using it for monetary gain is against our TOU's
Supplies:
Gimp
Beautiful FTU kit from Tasha's Playground called The Goodies Garden HERE
Tube of choice. I am using the art of Elias Chatzoudis. You must have a license to use his tubes.
You can purchase them HERE
Mask 347 from weescotslass HERE
Font- Simply Glamorous
Let's Begin!!!
-File>New 600x600 pixels.
-Open frame. Layer>Scale Layer 70%. Select the magic wand. While pressing shift on your keyboard, click inside the top left & bottom right boxes of the frame. Select>Grow by 5. Open paper 3. Move paper below frame layer in the layer box. Layer>Transparency>Add Alpha Channel. Scale 50%. Select>Invert. Press delete on your keyboard. Select>None. Using the magic wand click in the 2 remaining boxes of the frame. Add paper 5 to the frame, repeating what you did above. Make the frame layer active. Filters>Light & Shadow>Drop Shadow 2, 2, 2, black, 50.
-Open frame 3. Make the top layer. Scale 65%. Select the rotate tool. In the angle box type -15.00. Rotate. With the magic wand, click inside the frame. Grow by 5. Open paper 4 and move below the frame layer. Add paper to frame (the same as above). Make the frame layer active. Filters>Repeat Drop Shadow.
-Open tube close up. Move below frame 3. Place inside this frame. Using the eraser, erase parts of the tube sticking outside the frame. Change the mode of this tube to screen.
-Open full body tube. Make the top layer. Select the flip tool and click canvas to flip your tube. Move to the left of the tag. Repeat drop shadow.
Elements:
Add drop shadow of 2, 2, 2, black, 50 to all element layers, unless otherwise stated (it will say NDS for 'no drop shadow').
grass- NDS
flower 3
branch 2
rainbow- flip- NDS
tree
dragonflies
flowers
heart 1 NDS
heart 2
bow
flower NDS
-Open paper 2. Move to the bottom layer. Apply mask. Click HERE to learn how to use masks.
-Add your name and copyright.
All Done!!
Tuesday, November 8, 2011
 This tutorial is of my own creation and any resemblance to any other tuts is purely coincidental. This tutorial is for personal use only, using it for monetary gain is against our TOU's.
Supplies Needed:
This tutorial is of my own creation and any resemblance to any other tuts is purely coincidental. This tutorial is for personal use only, using it for monetary gain is against our TOU's.
Supplies Needed:~Gimp (any version will do).
~Bibi's Collection portion of the FTU Lovely Autumn blog train, which you can get HERE.
~Tube of choice. I used the artwork of Elias Chatzoudis, you must have a license to use this art. You can purchase this art from PTE HERE.
~I also used the Holiday Pies pack by 4Xs Designs. You can use this pack with any PTE artist. You must have a license to use this art. You can purchase these at PTE as well.
~Template of choice. I used Leah's Template 114 which you can get on our blog HERE.
~Font of choice. I used 0 Whoa DNA.
Let's get started!!!
1. Open a new layer ( I prefer a large canvas, so I make mine 1050x656). Make your canvas transparent (Layer > Transparency > Color to Alpha).
2. Open template in PSD format, remove and move layers of template around until they are the way you like them.
~Add paper from scrapkit to individual layers of the template (Right click on template layer in layer box > Alpha to Selection > CTRL I > Select paper layer in layer box > Delete).
These are the papers I used:
Paper 1
Paper 9
Paper 10
Paper 11
Paper 13
~I added noise to some of the template layers to make them look glittery (Filters > Noise > RGB Noise).
~I colorized some of the template layers to better match the scrapkit (Colors > Colorize > play with the setting until you get the desired color).
~Add drop shadow to template layers (Filters > Light & Shadow > Drop Shadow).
3. Open tube, add drop shadow.
~Open pie tubes from 4Xs Designs Holiday Pies pack, add drop shadow
4. Open and place the following elements:
Deco 13
Pumpkin 1
Pumpkin 2
Candle
Flores 1
Flores 4
Bibifly 1
Noor
Bottle 1
Acorn
Cupcake plain
Cupcake yellow
Champiniones 2
~Some of the elements may need to be sized down. Using your scale tool in your tool box adjust the pixel size until element is the correct size~
~Add drop shadow to all elements~
5. Merge Layers (Image > Merge Visible Layers).
6. Crop Image (Image > Autocrop Image).
7. Scale image to desired size (Image > Scale Image).
8. Add copyright info and name
9. Save as .png
ALL DONE!!!!!!!!!!

This tutorial is of my own creation and any resemblance to any other tuts is purely coincidental. This tutorial is for personal use only, using it for monetary gain is against our TOU's
Supplies:
Adorable PTU kit from KnC Scrapz called Bus To Bedtime HERE
Tube of choice, I am using the art of Elias Chatzoudis. You must have a license to use his tubes. You can purchase them HERE
Fonts- Regency Script & Valentina JF
Let's begin!
-File>New 600x600 pixels.
-Open element 10. Layers>Scale Layer 40%.
Open tube. Make the top layer. Scale 70%. Place at the bottom middle of the frame. Filters>Light & Shadow>Drop Shadow 2, 2, 2, black, 50. Kayer>Duplicate Layer. Filters>Blur>Gaussian Blur on default. Change the mode of the duplicate tube to soft light and lower the opacity to 60.
Elements:
Add a drop shadow of 2, 2, 2, black, 50 to all element layers, unless otherwise stated (it will say NDS for 'no drop shadow').
pillows- NDS
element1- NDS
balloon 2
balloon 3
moon- NDS
lamb- flip with flip tool- NDS
spoons
element 6- NDS
star 1
star 2
stars- NDS
heart
-Select the text tool. Secect the Regency Script font. Set your foreground color to 9354c6. Set your size to 65. Type out 'Lullaby'. Place at the bottom of your tube. Right click the text layer in your layer box and click Alpha To Selection. Select>Grow by 2. Layer>New Layer and move it below your text layer. Select your bucket fill tool and set your foreground color to white. Cliick inside the selection to fill. Select>None. Repeat drop shadow. Now set your foreground color to 7ed5f8. Change the size to 50. Type 'and goodnight...'. Set your foreground to fcee9c. Grow by 1. Add new layer below this text layer. Fill selection. Select none.
-Add your name with the Valentina JF font. Also add your copyright.
All Done!!
Monday, November 7, 2011
 Here is a tag I made using a hot and naughty new tube from Karina Dale. You can find her in the new releases section at PTE HERE.
Sunday, November 6, 2011
This tutorial is of my own creation and any resemblance to any other tuts is purely coincidental. This tutorial is for personal use only, using it for monetary gain is against our TOU's.
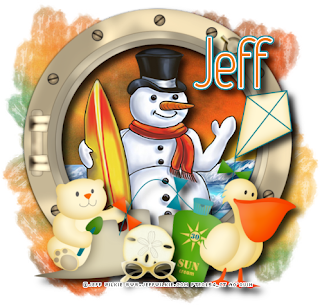
Supplies Needed:
~Gimp (any version will do).
~Tube of choice. I used the artwork of Jeff Wilkie you must have a license to use this art which you can get @ PTE HERE.
~Catch a Wave FTU blogtrain by Nette's NightOwl which you get HERE.
~Mask of choice. I used WSL mask 255 which you can get HERE.
~Font of choice. I used Redhead Goddess.
Let's get started!!!!!
1. Open a new layer ( I prefer a large canvas, so I make mine 1050x656). Make your canvas transparent (Layer > Transparency > Color to alpha).
2. Open Porthole frame, add drop shadow (Filters > Light & Shadow > Drop Shadow).
3. Open Paper 8 center it behind frame.
4. Open tube, add drop shadow.
5. Open and place the following elements:
Bear castle
Kite
Sun cream
Sanddollar
Pelican
Sunglasses
~Some elements may need to be sized down. Using the Scale Tool in your tool box adjust pixels to desired size~
~Add drop shadow to all elements~
6. Open mask.
7. Add mask to paper 8 (click HERE for a tut on using masks)
8. Merge layers (Image > Merge Visible Layer).
9. Crop image (Image > Autocrop Image).
10. Scale image to desired size (Image > Scale Image).
11. Add copyright info and name.
12. Save as .png
You are finished :)
Saturday, November 5, 2011
 It's beginning to look a lot like Christmas...at least it is over at PTE :) You can find this cutie, by brand new artist Myriadelle, in the New Christmas Tubes section HERE.
Don't be a Grinch, get your Christmas tubes now ;)
It's beginning to look a lot like Christmas...at least it is over at PTE :) You can find this cutie, by brand new artist Myriadelle, in the New Christmas Tubes section HERE.
Don't be a Grinch, get your Christmas tubes now ;)
Friday, November 4, 2011
 This tutorial is of my own creation and any resemblance to any other tuts is purely coincidental. This tutorial is for personal use only, using it for monetary gain is against our TOU's.
Supplies:
Gimp
FTU kit Torn Affection from Candys Treats HERE
Tube of choice. I am using Keith Garvey. You must have a license to use his tubes. Purchase them HERE
Template 108 by me HERE
Mask 4 by Melissaz Creationz HERE
Font- Signericia Fat
Lets get started!!
-Open template. Delete credits. Image>Scale Image 500x337 pixles. Image>Canvas Size 600x600 pixels. Click center.
-Let's add papers to the template layers. Make the template layer active (see below). Right click template layer in layer box and choose alpha to selection. Open paper (see below). Right click paper layer in layer box and choose add alpha channel. Layer>Scale Layer by 60%. Select>Invert. Press delete on your keyboard. Select>None. Delete the original template layer.Here are the template layers and which papers I used:
Circle- paper block 3 Filters>Light & Shadow>Drop Shadow 2, 2, 2, black, 50
rect 1- paper affection 4
rect 2- paper dotty 1
square- paper affection 1
rect 3- paper crumpled 2
-Make frame layer active. Alpha to selection. Add new layer above. Set your foreground color to ffdae3. Select the bucket fill tool. Fill selection. Select none. Delete original frame layer. Filter>Repeat Drop Shadow.
-Make words one active. Colors>Colorize. Just change the lightness to 100. Leave the rest. Alpha to Selection. Add new layer below this layer. Fill with black. Repeat drop shadow. On words 2 repeat colorize. On words 2 back repeat drop shadow.
-Open tube. Move below the word layers. Scale 75%. Repeat drop shadow. Layer>Duplicate Layer. Filters>Blur>Gaussian Blur on default. Change mode of tube to soft light.
Elements:
Add drop shadow of 2, 2, 2, black, 50 to all element layers, unless otherwise stated (it will say NDS for 'no drop shadow').
tag 4 (from freebie folder)
note paper crumpled- Rotate -10 NDS
crumpled heart torn
flower NDS
flower 2 NDS
flower stem
fold NDS
staples
ribbon bow 4 NDS
heart 2- rotate 15
-Open crumpled paper 3. Move to the bottom layer. Add mask to paper. Click HERE to learn how to use masks.
-Add your name and copyright.
You're finished!!!
Here are some Thanksgiving themed templates for all of you. If you want us to show off your creations with these or any of the templates on our blog, e-mail us at Gimptasticblog@yahoo.com.
 Download them HERE
Subscribe to:
Posts
(Atom)
Snag Our Blinkies


Don't Be A Pirate!

