Gimptastic Scraps Available Exclusively @

Gimptastic Scraps CT


Blog Trains

CU Licenses


Tuesday, January 31, 2012

This tutorial is of my own creation and any resemblance to any other tuts is purely coincidental. This tutorial is for personal use only, using it for monetary gain is against our TOU's.
Supplies Needed:
~Gimp (any version will do).
~Tube of choice. I used the artwork of Elias Chatzoudis, this tube is a limited edition. You must have a license to use this art which you can get from PSP Tubes Emporium HERE.
~Party Rock PTU scrapkit by Tasha's Playground. Which is available for purchase @ PTE HERE.
~Mask of choice. I used WSL mask 363 which you can get HERE.
~Font of choice. I used ValentinaJF.
Let's get started!!!!!
1. Open a new layer ( I prefer a large canvas, so I make mine 1050x656). Make your canvas transparent (Layer > Transparency > Color to alpha).
2. Open frame 6, add drop shadow (Filters > Light & Shadow > Drop Shadow).
3. Open tube, add drop shadow.
4. Open and place the following elements:
Stars
Feather
Party hat
Gift bag
Marble
Cake
Cake 2
Flower 3
Present
Present 2
Drink
Cupcake
Wordart
 ~Some elements may need to be sized down. Using the Scale Tool in your tool box adjust pixels to desired size~
~Add drop shadow to all elements~
5. Open Paper 10. Center it behind frame 6.
6. Open mask.
7. Add mask to paper (click HERE for a tut on using masks).
8. Merge layers (Image > Merge Visible Layer).
9. Crop image (Image > Autocrop Image).
10. Scale image to desired size (Image > Scale Image).
11. Add copyright info and name.
12. Save as .png
You are finished :)
~Some elements may need to be sized down. Using the Scale Tool in your tool box adjust pixels to desired size~
~Add drop shadow to all elements~
5. Open Paper 10. Center it behind frame 6.
6. Open mask.
7. Add mask to paper (click HERE for a tut on using masks).
8. Merge layers (Image > Merge Visible Layer).
9. Crop image (Image > Autocrop Image).
10. Scale image to desired size (Image > Scale Image).
11. Add copyright info and name.
12. Save as .png
You are finished :)

This tutorial is of my own creation and any resemblance to any other tuts is purely coincidental. This tutorial is for personal use only, using it for monetary gain is against our TOU's.
Supplies:
Gimp
Collab PTU kit from PSP Tube Stop called Weekend In Paris HERE
Font- Scriptina
Lets get started!
-File>New 600x600 px.
Open Impasto Black & White frame. Layer>Scale Layer 75%. Select the magic wand. Click inside the frame. Select>Grow by 5. Open feathers red background. Move below the frame layer. Layer>Transparency>Add Alpha Channel. Select>Invert. Press delete on your keyboard. Select>None. Make the frame layer active. Filters>Light & Shadow>Drop Shadow 2, 2, 2, black, 50.
Open impasto red frame. Make the bottom layer. Scale 80%. Repeat drop shadow.
-Open impasto yellow frame. Make bottom layer. Scale 85%. Repeat drop shadow.
-Open lady in black. Make the top layer. Scale 30%. Place to the left of tag. Repeat drop shadow.
Other Elements:
eiffel tower black
eiffel tower white
dinner table for two small
yellow ribbon
red ribbon
wine bottle & glass
long stemmed rose yellow
long stemmed rose white
long stemmed rose red
rose petal 1
-Add your name and copyright and you're finished!

Who's ready to party??? PSP Tubes Emporium is gearing up for a HUGE celebration that starts 2-1-12. This hot tube from Keith Garvey and this great kit from Abstract Creations called Birthday Time are just 2 of the awesome things that will be available for purchase tomorrow. So save your pennies and get ready to shop and have some FUN!!!!!!
PSP Tubes Emporium is getting ready to celebrate their 1st year anniversary! Here are a few tags I made in honor of the big celebration! The first one is using some adorable cupcakes by Myriadelle. The second is using an exclusive by the talented Tony Tzanoukakis. Take note that this tube is only available for a limited time with purchase. I also used a sweet PTU kit by JRB Scraps in both tags. Both tubes and the kit will be available at PSP Tubes Emporium starting 2-1-12 HERE!
Don't forget to stop by PTE starting tomorrow...you're not going to want to miss what they've got in store!


Monday, January 30, 2012

This tutorial is of my own creation and any resemblance to any other tuts is purely coincidental. This tutorial is for personal use only, using it for monetary gain is against our TOU's.
Supplies Needed:
~Gimp (any version will do).
~Tube of choice. I used the artwork of Misticheskaya, you must have a license to use this art which you can get from PFD HERE.
~Heavenly Peace PTU scrapkit by Tasha's Playground which you can find @ PTE HERE.
~Font of choice. I used Redhead Goddess.
Let's get started!!!!!
1. Open a new layer ( I prefer a large canvas, so I make mine 1050x656). Make your canvas transparent (Layer > Transparency > Color to alpha).
2. Open Frame 2, add drop shadow (Filters > Light & Shadow > Drop Shadow).
3. Open Paper 12 center it behind frame, remove excess paper using a cutting tool or eraser.
4. Open Frame 2 (light purple flowers), place it under frame 2 in your layer box.
5. Open tube, add drop shadow.
6. Open and place the following elements:
Lightspots
Columns
Feather
Feather 2
Deco
Jewel
Gem
Flower 1
Flower 2
Heart
Pearls
Box
~Some elements may need to be sized down. Using the Scale Tool in your tool box adjust pixels to desired size~
~Add drop shadow to all elements (lightspots)~
7. Merge layers (Image > Merge Visible Layer).
8. Crop image (Image > Autocrop Image).
9. Scale image to desired size (Image > Scale Image).
10. Add copyright info and name.
11. Save as .png
You are finished :)
Sunday, January 29, 2012

This tutorial is of my own creation and any resemblance to any other tuts is purely coincidental. This tutorial is for personal use only, using it for monetary gain is against our TOU's.
Supplies Needed:
~Gimp (any version will do).
~Rockabilly PTU scrapkit by Scrappin Krazy Designs, which you can purcahse at Scrap-U-nique HERE.
~Tube of choice. I used the artwork of Robert Alvarado, you must have a license to use this art. You can purchase this art from PTE HERE.
~Template of choice. I used the Rock N Roll template which you can get from Crazy Cakes Scraps HERE.
~Font of choice. I used Battlelines.
Let's get started!!!
1. Open a new layer ( I prefer a large canvas, so I make mine 1050x656). Make your canvas transparent (Layer > Transparency > Color to Alpha).
2. Open template in PSD format, remove and move layers of template around until they are the way you like them.
~Add paper from scrapkit to individual layers of the template (Right click on template layer in layer box > Alpha to Selection > CTRL I > Select paper layer in layer box > Delete).
These are the papers I used:
Paper 5
Paper 9
Paper 13
Paper 14
Paper 15
Paper 16
~I added noise to some of the template layers to make them look glittery (Filters > Noise > RGB Noise).
~I colorized some of the template layers to better match the scrapkit (Colors > Colorize > play with the setting until you get the desired color).
~Add drop shadow to template layers (Filters > Light & Shadow > Drop Shadow).
3. Open tube, add drop shadow.
4. Open and place the following elements:
7
8
20
23
24
29
35
39
53
45
48
50
57
59
71
72
~Some of the elements may need to be sized down. Using your scale tool in your tool box adjust the pixel size until element is the correct size~
~Add drop shadow to all elements (except 71 & 72)~
5. Merge Layers (Image > Merge Visible Layers).
6. Crop Image (Image > Autocrop Image).
7. Scale image to desired size (Image > Scale Image).
8. Add copyright info and name.
9. Save as .png
ALL DONE!!!!!!!!!!
Friday, January 27, 2012

This tutorial is of my own creation and any resemblance to any other tuts is purely coincidental. This tutorial is for personal use only, using it for monetary gain is against our TOU's.
Supplies:
Gimp
PTU kit from P4DSDesignz called Be My Valentines. You can purxhase this kit from Lollipops N Gumdrops HERE
Tube of choice. I am using the art of Elias Chatzoudis. You must have a license to use his tubes. You can purchase them at PTE HERE
Font- Petra Script
Lets get started!
-File>New 600x600 pixels.
-Open frame. Layer>Scale Layer 25%. Select the magic wand. Click inside the frame. Select>Grow 5. Open paper 14. Move below the frame layer. Layer>Transparency>Add Alpha Channel. Scale 50%. Select>Invert. Press delete on your keyboard. Select>None. Make the frame active. Filters>Light & Shadow>Drop Shadow 2, 2, 2, black, 50.
-Open cardboard edge. Make the top layer. Scale 13%. Place at the bottom of the frame.
-Open frame 1 more time. Move layer below the cardboard edge layer. Scale 20%. Select the rotate tool. Click canvas. In the angle box, put -10. See mine for placement. Repeat drop shadow.
-Open tube. Move below the cardboard layer. Place in the middle of tag. Repeat drop shadow.
Other Elements:
bow 1
button 2
valentine heart box- flip
journal tag- rotate -15
paper flower 2
bear
candy 1
candy 2
-Add your name and copyright.
All finished!
Thursday, January 26, 2012

This tutorial is of my own creation and any resemblance to any other tuts is purely coincidental. This tutorial is for personal use only, using it for monetary gain is against our TOU's.
Supplies Needed:
~Gimp (any version will do).
~Tubes of choice. I used the art of PinupToons. You must have a license to use this art which you can get from CDO HERE.
~Font of choice. I used Redhead Goddess.
Let's get started...
This tut is all about the blend animation, you can use this type of animation in many applications once you learn the technique. This tut is NOT for beginners.
1. Open a new layer ( I prefer a large canvas, so I make mine 1050x656). Make your canvas transparent (Layer > Transparency > Color to alpha).
2. Using the Rectangle Select Tool in your tool box create a rectangular shape. Add a new layer to your layer box by clicking the little white paper at the bottom. Flood fill rectangle with color of choice using the Bucket Fill Tool in your tool box.
3. I added a gradient to the base layer. Right click on the base layer in your layer box > Alpha To Selection. You will see little dancing "ants" around your box. Select your Gradient Tool in your tool box. Click on one side of your base layer and drag to the other side. This will spread the color over your entire base layer. I used the Caribbean Blue gradient.
 3. Open tubes. You will need at least 3 tubes, I used 4.
~You will need to duplicate each tube layer, so that you have 2 of each. Click on the little blue square at the bottom of the layer box to duplicate each layer.
~Merge these duplicated tubes together. Right click on the tube layer on your layer box > Merge Down. Do this to all duplicated tube layers. You should now have 4 single tube layers, 1 merged tube layer, your base layer and your background layer.
3. Open tubes. You will need at least 3 tubes, I used 4.
~You will need to duplicate each tube layer, so that you have 2 of each. Click on the little blue square at the bottom of the layer box to duplicate each layer.
~Merge these duplicated tubes together. Right click on the tube layer on your layer box > Merge Down. Do this to all duplicated tube layers. You should now have 4 single tube layers, 1 merged tube layer, your base layer and your background layer.
 ~I changed the mode on the merged tubes to Dodge (at the top of your Layer Box you will see where it says Mode, click the arrow and select Dodge from the drop down menu).
~Remove excess tube that may be hanging over beyond the base layer. Right click the base layer > Alpha to Selection > CTRL I > select tube layer in layer box > Delete. Do this for all tube layers.
4. Merge the merged tubes to the base layer. Right click on the merged tubes layer on your layer box > Merge Down.
~You will need to duplicate this newly merged layer so that you have one for each single tube layer. Place one under each tube layer in your layer box.
~I changed the mode on the merged tubes to Dodge (at the top of your Layer Box you will see where it says Mode, click the arrow and select Dodge from the drop down menu).
~Remove excess tube that may be hanging over beyond the base layer. Right click the base layer > Alpha to Selection > CTRL I > select tube layer in layer box > Delete. Do this for all tube layers.
4. Merge the merged tubes to the base layer. Right click on the merged tubes layer on your layer box > Merge Down.
~You will need to duplicate this newly merged layer so that you have one for each single tube layer. Place one under each tube layer in your layer box.
 ~Merge single tubes to base layer. You will now have 1 base layer and 4 layers that have been merged with single tubes.
 4. Delete background layer from your tool box.
5. Add text and copyright info. You will need to duplicate your text for every layer of your tag.
4. Delete background layer from your tool box.
5. Add text and copyright info. You will need to duplicate your text for every layer of your tag.
 ~Merge text layers to tag layers.
~Crop tag to remove excess background layer. Image > Autocrop Image.
~Merge text layers to tag layers.
~Crop tag to remove excess background layer. Image > Autocrop Image.
 6. Now it's time to animate. Click on Filters > Animation > Blend.
Use these settings:
6. Now it's time to animate. Click on Filters > Animation > Blend.
Use these settings:
 ~Once the blending process is complete a new box will open up that contains your completed tag. If you like to see the animation before you save you can click Filters > Animation > Playback. Another box will open that will allow you to play the animation.
7. Save tag as GIF. File > Save As > GIF. Make sure you select Save as Animation when saving.
~Once the blending process is complete a new box will open up that contains your completed tag. If you like to see the animation before you save you can click Filters > Animation > Playback. Another box will open that will allow you to play the animation.
7. Save tag as GIF. File > Save As > GIF. Make sure you select Save as Animation when saving.
 ~Use default settings for Animated GIF Options
 You are done!!!!!!
Tuesday, January 24, 2012

This tutorial is of my own creation and any resemblance to any other tuts is purely coincidental. This tutorial is for personal use only, using it for monetary gain is against our TOU's.
Supplies Needed:
~Gimp (any version will do).
~Tube of choice. I used the artwork of Joanna Bromley you must have a license to use this art which you can get @ PSP Tube Stop HERE.
~Sweetness FTU scrapkit by Mod Girls Inc which you can get HERE.
~Mask of choice. I used WSL mask 336 which you can get HERE.
~Font of choice. I used Petra Script EF.
Let's get started!!!!!
1. Open a new layer ( I prefer a large canvas, so I make mine 1050x656). Make your canvas transparent (Layer > Transparency > Color to alpha).
2. Open element 8 (frame), add drop shadow (Filters > Light & Shadow > Drop Shadow).
3. Open Paper 3 center it behind frame, remove excess paper using a cutting tool or eraser.
4. Open tube, add drop shadow.
5. Open and place the following elements:
element 2
element 4
element 6
element 7 (x2)
element 11
element 12
element 25
element 26
element 29
element 30
~Some elements may need to be sized down. Using the Scale Tool in your tool box adjust pixels to desired size~
~Add drop shadow to all elements~
6. Open Paper 9.
7. Open mask.
8. Add mask to paper (click HERE for a tut on using masks).
9. Merge layers (Image > Merge Visible Layer).
10. Crop image (Image > Autocrop Image).
11. Scale image to desired size (Image > Scale Image).
12. Add copyright info and name.
13. Save as .png
You are finished :)

Here's a tag I made featuring a fab new tube from Andrea Young. She will be available for purchase 1-25-12 @ PSP Tubes Emporium.

This tutorial is of my own creation and any resemblance to any other tuts is purely coincidental. This tutorial is for personal use only, using it for monetary gain is against our TOU's.
Supplies Needed:
~Gimp (any version will do).
~Love Fire PTU scrapkit by JRB Scraps which you can get from PSP Tubes Emporium HERE.
~Tube of choice. I used the artwork of The Hunter, this tube will be available for purchase 1-25-12. You must have a license to use this art. You can also purchase this art from PTE HERE.
~Template of choice. I used the Cupcake template which will be available in the new Commercial Use section at PTE 1-25-12.
~Mask of choice. I used WSL mask 84-11 which you can get HERE.
~Font of choice. I used riddle.
Let's get started!!!
1. Open a new layer ( I prefer a large canvas, so I make mine 1050x656). Make your canvas transparent (Layer > Transparency > Color to Alpha).
2. Open template in PSD format.
~Add paper from scrapkit to individual layers of the template (Right click on template layer in layer box > Alpha to Selection > CTRL I > Select paper layer in layer box > Delete).
This is the paper I used:
Paper 1
Paper 3
Paper 8
Paper 9
~I colorized some of the template layers to better match the scrapkit (Colors > Colorize > play with the setting until you get the desired color).
~Add drop shadow to template layers (Filters > Light & Shadow > Drop Shadow).
3. Open tube, add drop shadow.
4. Open element 14 (frame), I tilted the frame slightly using the Rotate tool in my tool box. Add drop shadow.
~Open paper 6 and place it directly under the frame. Remove excess paper using an eraser or cutting tool from your tool box.
5. Open and place the following elements:
element 1
element 2
element 3
element 7
element 8
element 13
element 17
element 19
element 20
element 25
~Some of the elements may need to be sized down. Using your scale tool in your tool box adjust the pixel size until element is the correct size~
~Add drop shadow to all elements~
6. Open Paper 1.
7. Open mask.
8. Add mask to paper (click HERE for a tutorial on using masks).
9. Merge Layers (Image > Merge Visible Layers).
10. Crop Image (Image > Autocrop Image).
11. Scale image to desired size (Image > Scale Image).
12. Add copyright info and name.
13. Save as .png
ALL DONE!!!!!!!!!!

Sneak Peek! This tag was made with an all new tube by Scott Blair, available 1-25-12 at PSP Tubes Emporium HERE.

This tutorial is of my own creation and any resemblance to any other tuts is purely coincidental. This tutorial is for personal use only, using it for monetary gain is against our TOU's.
Supplies:
Gimp
Tube of choice. I am using the art of Lix. You must have a license to use these tubes. You can purchase this tube starting today at PSP Tubes Emporium HERE!
Texture 7 by Bokeh HERE
Star brushes HERE
Fonts- Appleberry & Sketchy
File>New 600x250 pixels.
Change your foreground color to 319ccc. Change background color to c03769. Select the gradient tool. Below are the settings I have my gradient on:
 Layer>New Layer. While pressing ctrl on your keyboard, click the top middle of your tag, and drag your mouse to the bottom middle.
Add new layer. We are adding another gradient to this layer. Change your settings to what I have below:
Layer>New Layer. While pressing ctrl on your keyboard, click the top middle of your tag, and drag your mouse to the bottom middle.
Add new layer. We are adding another gradient to this layer. Change your settings to what I have below:
 Click in the middle of your canvas and drag out to the left (while pressing ctrl on your keyboard). Change the mode of this layer to hard light.
Open texture. Move between the 2 graidient layers ( 2nd layer). Layer>Transpareny>Add Alpha Channel. Layer>Scale Layer 80%. Change the mode to dodge.
Open tube. Move below the texture layer. Layer>Duplicate Layer 2 times (for a total of 3 tube layers). Arrange on your canvas as shown below:
Click in the middle of your canvas and drag out to the left (while pressing ctrl on your keyboard). Change the mode of this layer to hard light.
Open texture. Move between the 2 graidient layers ( 2nd layer). Layer>Transpareny>Add Alpha Channel. Layer>Scale Layer 80%. Change the mode to dodge.
Open tube. Move below the texture layer. Layer>Duplicate Layer 2 times (for a total of 3 tube layers). Arrange on your canvas as shown below:
 I changed the mode of the left tube to screen, middle tube to overlay, right tube to grain merge. You can chage the modes to whatever you think looks best.
Open tube again. Make the top layer. Scale 75%. Place to the far left of tag. Filters>Light & Shadow>Drop Shadow 2, 2, 2, black, 50. Duplicate. Filters>Blur>Gaussian Blur on default. Change the mode to dodge and lower the opacity to 30.
Make the bottom gradient layer active. Select the rectangle select tool. Make a selection at the bottom of your tag. I highlighted below where I made my selection:
 Filters>Distort>Blinds. Horizontal, Displacement 30, Number Of Segments 25. Select>None.
 Make the layer under the main tube active. Make a thin rectangle selection at the bottom. Change foreground to e8d95a. Add new layer. Select the bucket fill tool and fill selection. Add new layer. Change foreground back to the blue used earlier. Fill selection. Select>Shrink by 2. Press delete on your keyboard. Select none. Filters>Noise>RGB Noise. Change all the sliders (except alpha) to 0.50. Repeat drop shadow. Your tag should now look like mine below:
 Selete the appleberry font. Change foreground to pink from before. Set the size to 23. Type 'roller girl' 2 times. Place text on yellow rectangle. Add noise of 0.30 (on all sliders except alpha). Add drop shadow of 1, 1, 0, black, 35.
 Selete the appleberry font. Change foreground to pink from before. Set the size to 23. Type 'roller girl' 2 times. Place text on yellow rectangle. Add noise of 0.30 (on all sliders except alpha). Add drop shadow of 1, 1, 0, black, 35.
Add new layer. Move below the 2nd gradient layer. Select the paint brush tool. Select the brush you want to use and click the canvas. I used brush 11 & 12.
Make the top layer active. Add new layer. I added a gradient using the pink and blue colors we used earlier. Click the left top corner and drag mouse to the bottom right corner to add gradient. Layer>Transpareny>Apha To Selection. Shrink by 4. Delete. Add new layer below this layer. Using the bucket fill tool, fill selection. Shrink by 1 and delete. Add new layer below yellow layer. Fill with black. Shrink by 3. Delete. Select none. Add a gaussian blur on default. Change opacity of this layer to 60. Repeat noise. I also added noise to the gradient layer.
Add name using the sketchy font. Add you copy right and you're finished!
Monday, January 23, 2012

This tutorial is of my own creation and any resemblance to any other tuts is purely coincidental. This tutorial is for personal use only, using it for monetary gain is against our TOU's.
Supplies:
Gimp
Tube of choice. I am usingthe ary of Saad. You must have a license to use thses tubes. You can purchase this tube at The PSP Project HERE
FTU scraps kit from A Taggers Scrap called A Whispering Touch HERE
Mask 328 from weesctoslass HERE
Font- Quinfo
Lets begin!
-File>New 600x600 px.
-Open frame 2. Select the rotate tool. Click canvas. In the angle box put 90. Layer>Scale Layer 75%. Select the magic wand. Click inside the frame. Select>Grow by 5. Open paper 3. Move below the frame layer. Layer>Transparency>Add Alpha Channel. Select>Invert. Press delete on your keyboard. Select>None. Make the frame active. Filters>Light & Shdaow>Drop Shadow 2, 2, 2, black, 50.
-Open tube. Make the top layer. Scale 85%. Place at the bottom of frame. Filters>Repeat Drop Shadow.
-Open curtain. Move below the tube layer. Scale 65%. Select the flip tool and click canvas. Place at the bottom of the frame. Repeat drop shadow.
-Open deco 1. Rotate 90. Move below the tube layer. Place at the bottom of frame.
Other Elements:
clock
deco 2
jewelry
hanging flower
candle
fairy dust
flowers
-Open paper 1. Move to the bottom layer. Apply mask. Click HERE to learn how to use masks.
-Add your name and copyright and you're done!

Here's a tag I made featuring a brand new cutie from Jack Anita. You can find her in the new releases section @ PSP Tubes Emporium :)
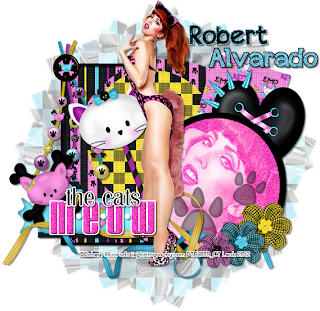
Sunday, January 22, 2012

This tutorial is of my own creation and any resemblance to any other tuts is purely coincidental. This tutorial is for personal use only, using it for monetary gain is against our TOU's.
Supplies Needed:
~Gimp (any version will do).
~Tube of choice. I used the artwork of Robert Alvarado, you must have a license to use this art which you can get from PSP Tubes Emporium HERE.
~Love to Love PTU scrapkit by Tasha's Playground which you can find HERE.
~Font of choice. I used Monika Italic.
Let's get started!!!!!
1. Open a new layer ( I prefer a large canvas, so I make mine 1050x656). Make your canvas transparent (Layer > Transparency > Color to alpha).
2. Open Frame 3, add drop shadow (Filters > Light & Shadow > Drop Shadow).
3. Open Paper 9 center it behind frame, remove excess paper using a cutting tool or eraser.
4. Open deco element (red lace), place it under frame 3 in your layer box.
5. Open tubes. I used both a full body tube and a close-up.
~Take the close up layer and move it (in your layer box) under Frame 3, but above the paper. Change the Mode on the tube to Hardlight (at the top of your Layer Box you will see where it says Mode, click the arrow and select Hardlight from the drop down menu). Remove excess tube layer using a cutting tool or eraser.
~Add drop shadow to the full body tube.
6. Open and place the following elements:
Balloon
Hearts
Cloud
Candyheart
Button 2
Button 3
Flower 3
Flower 4
Flower 6
Flower 7
Flowers 2
Folded Heart
Box
Cupcake
Candy
Frog
Wordart
~Some elements may need to be sized down. Using the Scale Tool in your tool box adjust pixels to desired size~
~Add drop shadow to all elements (except Flowers 2)~
7. Merge layers (Image > Merge Visible Layer).
8. Crop image (Image > Autocrop Image).
9. Scale image to desired size (Image > Scale Image).
10. Add copyright info and name.
11. Save as .png
You are finished :)
Saturday, January 21, 2012
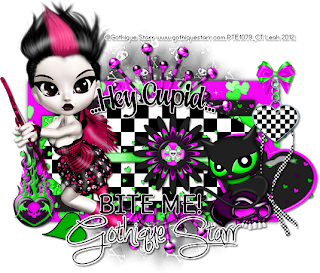
This tutorial is of my own creation and any resemblance to any other tuts is purely coincidental. This tutorial is for personal use only, using it for monetary gain is against our TOU's.
Supplies:
Gimp
Tube of choice. I am using the art of Gothique Starr. You must have a license to use these tubes. You can purchase this tube 1-22-12 at PSP Tubes Emporium HERE
FTU scrap kit from Kittz Kreationz called My Emo Valentine HERE
Template Hey Cupid...Bite Me from Sarah's Tags n Things HERE
Mask 138 from weescotslass HERE
Font- Simply Glamorous
Lets get strated!
-Open template. Delete credits. Image>Scale Image 450x296 px. Image>Canvas Size 600x600 px and click center.
-Let's add papers to the template layers. Make the template layer active (see below). Right click template layer in layer box and choose alpha to selection. Open paper (see below). Right click paper layer in layer box and choose add alpha channel. Layer>Scale Layer by 60%.Select>Invert. Press delete on your keyboard. Select>None. Delete the original template layer.Here are the template layers and which papers I used:
raster 2- paper 2 Filters>Light & Shadow>Drop Shadow 0,0,10,black,80
raster 3 & copy of raster 3- paper 4 Filters>Repeat Drop Shadow
raster 4 & copy of raster 4- paper 7 repeat drop shadow
raster 6- paper 6 repeat drop shadow
-Open tube. Move below the word art layers. Scale 75%. Place to the far left of tag. Add drop shadow of 2, 2, 2, black, 50.
-Repeat drop shadow on raster 5 & 8.
Elements:
50
43
74
6327
58
65
22
20
72
-Open paper 5. Make the bottom layer. Apply mask. Click HERE to learn how to use masks.
-Add your name and copyright.
You're finished!!


Here are a few CT tags I made using a lovely PTU kit from Tasha's Playground called Love To Love. Check out Tasha's blog HERE to purchase this kit :)
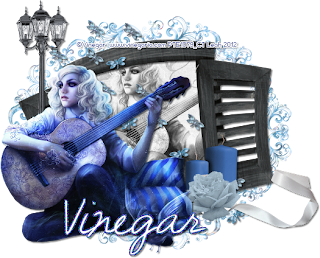
This tutorial is of my own creation and any resemblance to any other tuts is purely coincidental. This tutorial is for personal use only, using it for monetary gain is against our TOU's.
Supplies:
Gimp
Tube of choice. I am using the art of Vinegar. You must have a license to use these tubes. You can find this tube in the new release section at PSP tubes Emporium today HERE
FTU kit from A Taggers Scrap called Stargazing HERE
Font- Sunshine in my soul
Lets begin!
-File>New 600x600 px.
-Open frame 3. Layer>Scale Layer 60%. Select the magic wand. Click inside the frame. Select>Grow 5. Open paper 20. Move below the frame layer. Layer>Transparency>Add Alpha Channel. Scale 60%. Select>Invert. Press delete on your keyboard. Open tube. Move below the frame layer. Scale 60%. Place inside the frame. Delete. Select>None. Change the mode to value. Make the frame active. Filters>Light & Shadow>Drop Shdaow 2, 2, 2, black, 50.
-Open tube again. Scale 60%. Place to the bottom left of the frame. Filters>Repeat Drop Shadow.
Elements:
ribbon 9
lamp
butterflies
flower 6
candles
-Add your name and copyright.
All done!
Friday, January 20, 2012

This tutorial is of my own creation and any resemblance to any other tuts is purely coincidental. This tutorial is for personal use only, using it for monetary gain is against our TOU's.
Supplies Needed:
~Gimp (any version will do).
~Dance of Love PTU scrapkit by JRB Scraps which you can get from PTE HERE.
~Tube of choice. I used the artwork of Lix, you must have a license to use this art which you can also get from PTE HERE.
~Template of choice. I used Leah's template 67 which you can get on our blog HERE.
~Mask of choice. I used WSL mask 302 which you can get HERE.
~Font of choice. I used Japan Medium.
Let's get started!!!
1. Open a new layer ( I prefer a large canvas, so I make mine 1050x656). Make your canvas transparent (Layer > Transparency > Color to Alpha).
2. Open template in PSD format, move layers of template around until they are the way you like them.
~Add paper from scrapkit to individual layers of the template (Right click on template layer in layer box > Alpha to Selection > CTRL I > Select paper layer in layer box > Delete).
These are the papers I used:
Paper 4
Paper 8
Paper 9
~I added noise to some of the template layers to make them look glittery (Filters > Noise > RGB Noise).
~I colorized some of the template layers to better match the scrapkit (Colors > Colorize > play with the setting until you get the desired color).
~Add drop shadow to template layers (Filters > Light & Shadow > Drop Shadow).
3. Open tubes, I used both a full body and a close-up. I changed the mode on the close-up to Screen (at the top of your Layer Box you will see where it says Mode, click the arrow and select Screen from the drop down menu). The close-up has been added to the template in the same way you add paper (Right click on template layer in layer box > Alpha to Selection > CTRL I > Select tube layer in layer box > Delete). Add drop shadow to the full body tube.
4. Open and place the following elements:
element 1
element 2
element 3
element 5
element 10
element 11
element 15
element 16
element 17
element 18
element 19
element 20
element 21
~Some of the elements may need to be sized down. Using your scale tool in your tool box adjust the pixel size until element is the correct size.
~Add drop shadow to all elements~
5. Open Paper 6.
6. Open mask.
7. Add mask to paper (click HERE for a tutorial on using masks).
8. Merge Layers (Image > Merge Visible Layers).
9. Crop Image (Image > Autocrop Image).
10. Scale image to desired size (Image > Scale Image).
11. Add copyright info and name.
12. Save as .png
ALL DONE!!!!!!!!!!


Here's a tag I made using a sweet pup from Mrs. Homer Lynn. You can find this cutie in the new releases @ PSP Tubes Emporium.

This tag was made with a beautiful image pack from Jon Rattenbury. This pack will be available at PSP Tubes Emporium 1-21-12 HERE.
Thursday, January 19, 2012
This tutorial is of my own creation and any resemblance to any other tuts is purely coincidental. This tutorial is for personal use only, using it for monetary gain is against our TOU's.
Supplies:
Gimp
Tube of choice. I am using the art of Robert Alvarado. You must have a license to use his tubes. You can purchase this tube today. Just check out the new releases HERE at PSP tubes Emporium.
FTU kit from Lacarolita's Designz called Emo Kitty HERE
Template 37 by me HERE
Mask 143 by weescotslass HERE
Font- appleberry
-Open template. Delete credits. Image>Scale Image 450x365 px. Image>Canvas Size 600x600 px and click center.
-Let's add papers to the template layers. Make the template layer active (see below). Right click template layer in layer box and choose alpha to selection. Open paper (see below). Right click paper layer in layer box and choose add alpha channel. Layer>Scale Layer by 60%.Select>Invert. Press delete on your keyboard. Select>None. Delete the original template layer.Here are the template layers and which papers I used:
rect 1- paper 2 Filters>Light & Shadow>Drop Shadow 2, 2, 2, black, 50
circle 3- paper 4
circle 4- paper 7 Filters>Repeat Drop Shadow
rect 2- paper 8 repeat drop shadow
rect 3- paper 6
-Make the circle 1 layer active. Alpha to selection. Layer>New Layer. Change foreground color to f641b9. Select the bucket fill tool and fill selection. Filters>Noise>RGB Noise on default. Open tube. Place in selection. Invert & delete. Select none. Change mode to screen. Repeat drop shadow on pink circle layer.
-Make circle 2 layer active. Colors>Colorize. Change the lightness to -100. Repeat drop shadow. Repeat colorize & drop shadow on the frame layer.
-Make the cats layer active. Repeat colorize. Make the meow layer acitve. Alpha to selection. New layer. Fill with the same pink from before. Select none. Repeat noise. Filters>Decor>Add Bevel. Uncheck work on copy.-Open tube. Move below the word art layers. Scale 90%. Place in the middle of tag. Repeat drop shadow. Layer>Duplicate Layer. Filters>Blur>Gaussian Blur on default. Change the mode to soft light and lower the opacity to 60.
Elements:
spiked heart 2
candy 1
pearls on string
skull 3- Rotate -20
button 2
lollipop 1
paw- opacity 50- rotate 1 of the paws by 20
ribbons 4 & 5- rotate 90
flowers 5, 6, & 7
-Open paper 5. Move to the bottom layer. Apply mask. Click HERE to learn how to use masks.
-Add your name and copyright and you're finished!
Wednesday, January 18, 2012

This tutorial is of my own creation and any resemblance to any other tuts is purely coincidental. This tutorial is for personal use only, using it for monetary gain is against our TOU's.
Supplies Needed:
~Gimp (any version will do).
~Rock Love PTU scrapkit by Wicked Princess Scraps HERE.
~Tube of choice. I used the artwork of VeryMany, you must have a license to use this art. You can purchase this art from PFD HERE.
~Template of choice. I used Leah's template 121 which you can get on our blog HERE.
~Font of choice. I used Redhead Goddess.
Let's get started!!!
1. Open a new layer ( I prefer a large canvas, so I make mine 1050x656). Make your canvas transparent (Layer > Transparency > Color to Alpha).
2. Open template in PSD format, remove and move layers of template around until they are the way you like them.
~Add paper from scrapkit to individual layers of the template (Right click on template layer in layer box > Alpha to Selection > CTRL I > Select paper layer in layer box > Delete).
These are the papers I used:
Paper 1
Paper 4
Paper 7
Paper 9
~I added noise to some of the template layers to make them look glittery (Filters > Noise > RGB Noise).
~I colorized some of the template layers to better match the scrapkit (Colors > Colorize > play with the setting until you get the desired color).
~Add drop shadow to template layers (Filters > Light & Shadow > Drop Shadow).
3. Open tube, add drop shadow.
4. Open and place the following elements:
Flames
Piano keys
Acoustic guitar
Emo kitty skull
Emo kitty
Skull w/ bow
Ribbon 3
Candy
Cherry
Mic
Dollar sign
Ipod
Music 3
Skateboard
~Some of the elements may need to be sized down. Using your scale tool in your tool box adjust the pixel size until element is the correct size~
~Add drop shadow to all elements~
5. Merge Layers (Image > Merge Visible Layers).
6. Crop Image (Image > Autocrop Image).
7. Scale image to desired size (Image > Scale Image).
8. Add copyright info and name.
9. Save as .png
ALL DONE!!!!!!!!!!

Here's a tag I made featuring the art of Victoria Fox, this cutie will be available for purchase tomorrow @ PSP Tubes Emporium

This tutorial is of my own creation and any resemblance to any other tuts is purely coincidental. This tutorial is for personal use only, using it for monetary gain is against our TOU's.
Supplies:
Gimp
PTU kit from JRB Scraps called Persuasion. This kit will be realeased today at PSP Tubes Emporium HERE
Tube of choice. I am using the art of Jose Cano. You must have a license to use these tubes. You can purchase them at PTE HERE
Template 53 by me HERE
Mask 130 from weescotslass HERE
Font- Cinnamon Cake
-Open template. Delete credits, wordart & wordart back layers. Image>Scale Image 450x342 pixels. Image>Canvas Size 600x600 pixels and press center.
-Let's add papers to the template layers. Make the template layer active (see below). Right click template layer in layer box and choose alpha to selection. Open paper (see below). Right click paper layer in layer box and choose add alpha channel. Layer>Scale Layer by 60%.Select>Invert. Press delete on your keyboard. Select>None. Delete the original template layer.Here are the template layers and which papers I used:
square 1- paper 5 Filters>Light & Shadow>Drop Shadow 0, 0, 5, black, 80
square 2- paper 1 Filters>Repeat Drop Shadow
circle 1'1- paper 7 repeat drop shadow
circle 1- paper 6
circle 2- paper 6
-Open element 6. Make the top layer. Scale 60%. Place in middle of tag. Open tube. S cale 80%. Place on top of the frame. Layer>Duplicate Layer. Move duplicate tube below frame. Make the frame active. Select the magic wand and click inside frame. Select>Grow 5. Make the duplicate tube active. Invert & Delete. Select none. Make the original tube active. Select the eraser tool. Erase the legs of the thube, so it looks like she is sticking out of the frame.
Elements:
3
1
2
17
15
21
14- Rotate -20
-Open paper 2. Make the bottom layer and apply mask. Click HERE to learn how to use masks.
-Add your name and copyright.
All done!
Tuesday, January 17, 2012

This tutorial is of my own creation and any resemblance to any other tuts is purely coincidental. This tutorial is for personal use only, using it for monetary gain is against our TOU's.
Supplies Needed:
~Gimp (any version will do).
~Tube of choice. I used the artwork of Angela Newman , you must have a license to use this art which you can get from PSP Tubes Emporium HERE.
~Vintage Styling PTU scrapkit by A Taggers Scrap which you can get HERE.
~Font of choice. I used ALS Script.
Let's get started!!!!!
1. Open a new layer ( I prefer a large canvas, so I make mine 1050x656). Make your canvas transparent (Layer > Transparency > Color to alpha).
2. Open Frame 3 (round frame), add drop shadow (Filters > Light & Shadow > Drop Shadow).
3. Open Paper 9 center it behind frame, remove excess paper using a cutting tool or eraser.
4. Open Frame 13 (rectangular frame), add drop shadow.
5. Open Paper 27 center it behind frame, remove excess paper using a cutting tool or eraser.
6. Open tubes. I used both a full body tube and a close-up.
~Take the close up layer and move it (in your layer box) under Frame 13, but above the paper. Change the Mode on the tube to Grain Merge (at the top of your Layer Box you will see where it says Mode, click the arrow and select Grain Merge from the drop down menu). Remove excess tube layer using a cutting tool or eraser.
~Add drop shadow to the full body tube.
7. Open and place the following elements:
Torn paper 4
Photo corner
Lace bit
Flower 1
Flower 2
Clock
Stamp
Key
Feather
Metal box
Diamond 3
Diamond 4
Vase
Phone
Brooch 2
Teapot
Butterfly 1
Butterfly 2
~Some elements may need to be sized down. Using the Scale Tool in your tool box adjust pixels to desired size~
~Add drop shadow to all elements~
8. Merge layers (Image > Merge Visible Layer).
9. Crop image (Image > Autocrop Image).
10. Scale image to desired size (Image > Scale Image).
11. Add copyright info and name.
12. Save as .png
You are finished :)

This tutorial is of my own creation and any resemblance to any other tuts is purely coincidental. This tutorial is for personal use only, using it for monetary gain is against our TOU's.
Supplies Needed:
~Gimp (any version will do).
~Tube of choice. I used the artwork of Abril Andrade Griffith, this tube will be available for purchase 1/18/12. You must have a license to use this art which you can get @ PSP Tubes Emporium HERE.
~It's a Beautiful Life FTU scrapkit by Wicked Princess Scraps which you get on the Art of Giving blog HERE.
~Mask of choice. I used WSL mask 362 which you can get HERE.
~Font of choice. I used Respective.
Let's get started!!!!!
1. Open a new layer ( I prefer a large canvas, so I make mine 1050x656). Make your canvas transparent (Layer > Transparency > Color to alpha).
2. Open Circle frame 2, add drop shadow (Filters > Light & Shadow > Drop Shadow).
3. Open Paper 1 center it behind frame, remove excess paper using a cutting tool or eraser.
4. Open tube, add drop shadow.
~You will need to duplicate this tube so that you have 2 (at the bottom of your layer box click on the blue box. This will give you 2 tube layers).
~Select the top tube layer in your tool box. Add Gaussion Blur (Filters > Blur > Gaussion Blur, use default settings)
~On that same tube layer change the mode to Overlay (at the top of your Layer Box you will see where it says Mode, click the arrow and select Overlay from the drop down menu).
~Add drop shadow to bottom tube layer.
5. Open and place the following elements:
Frame (square wooden frame in background)
Leaves
Rose glittered 1
Rose glittered 2
Flower
Blooming flower 2
Trio flowers
Mushroom cluster
Pinecone
Wood
Fox
Hedgehog
Bird 2
Squirrel 2
Butterfly
Lamp
~Some elements may need to be sized down. Using the Scale Tool in your tool box adjust pixels to desired size~
~Add drop shadow to all elements~
6. Open Paper 14.
7. Open mask.
8. Add mask to paper (click HERE for a tut on using masks).
9. Merge layers (Image > Merge Visible Layer).
10. Crop image (Image > Autocrop Image).
11. Scale image to desired size (Image > Scale Image).
12. Add copyright info and name.
13. Save as .png
You are finished :)

Check out this cute little pup from MrsHomerLynn! This little guy will be avalible at PSP Tubes Emporium 1-18-12 HERE.
Monday, January 16, 2012
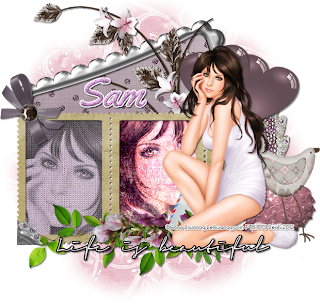
This tutorial is of my own creation and any resemblance to any other tuts is purely coincidental. This tutorial is for personal use only, using it for monetary gain is against our TOU's.
Supplies:
Gimp
PTU kit from Sam's Scraps called Lessons Of Love. You can purchase it at the PSP Project HERE
Tube of choice. I am using the art of Anna Liwanag. You must have a license to use these tubes. You can purchase them at PTE HERE
Mask 330 from weescotslass HERE
Fonts- Yellowtail & Signericia Fat
Let's begin!
-File>New 600x600 pixels.
-Open frame 2. Layer>Scale Layer 65%. Place towards the left of the canvas. Select your magic wand. Click inside the 1st square of the frame. Select>Grow 4. Open paper 16. Move paper below frame layer. Layer>Transparency>Add Alpha Channel. Select>Invert. Press delete on your keyboard. Open tube. Place tube in the selection. Delete. Select>None. Change the mode of the tube to value. Lower the opacity to 50. Make the frame active. Using the magic wand, click inside the 2nd square of frame. Add paper 13 (repeat steps above). Add your tube (same way as before). Change th mode of the tube to grain merge. Make the frame active. Filters>Light & Shadow>Drop Shadow 2, 2, 0, black, 50.
-Open tube again. Make the top layer. Scale 75%. Place at the end of frame (right side). Add drop shadow of 2, 2, 2, black, 50. Kayer>Duplicate Layer. Filters>Blur>Gaussian Blur on default. Change the mode to soft light and lower the opacity to 50.
-Open frame 3. Make the bottom layer. Scale 50%. Select the rotate tool. Click the canvas. In the angle box put -20. See my tag for placement. Add paper 3 to this frame. Repeat drop shadow on frame.
Elements:
photo corner
flower 2
leaves 1- rotate -90
element 1
love letter
bow 1
brad 1
heart 2
flower 1
bird
-Open paper 4. Apply mask. Click HERE to learn how to use masks.
-Make the top layer acitve. Select the text tool. Change font to Signericia Fat. Change the foreground color to white. Size 30. Click canvas and type "Life is beautiful'. Place text at bottom of tag. Layer>New Layer. Move new layer below text layer. Layer>Transparency>Alpha To Selection. Grow by 2. Change foreground to black. Select the bucket tool and fill selection. Select none. Repeat drop shadow.
-Add your name using the yellowtail font. Add your copyright.
All finished!
Sunday, January 15, 2012

Here is a sneak peek of a hot new tube by Jose Cano. Look for this tube at PSP Tubes Emporium 1-16-12 HERE
Subscribe to:
Comments
(Atom)
Snag Our Blinkies


Don't Be A Pirate!

