Wednesday, February 23, 2011

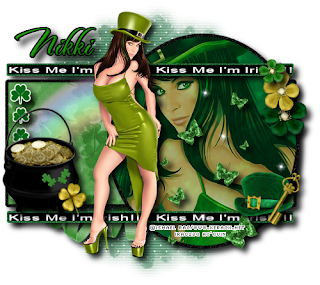
This tutorial is of my own creation and any resemblance to any other tuts is purely coincidental. This tutorial is for personal use only, using it for monetary gain is against our TOU's.
~Gimp (any version will do).
~Irish Pride PTU scrapkit which you can get from Creative Intentionz HERE.
~Tubes of choice. I used the art of Ismael Rac, you must have a license to use this art which you can get HERE.
~Template of choice. I used St.Paddy's template 2 from Stef @ Freebie Friends Scraps & More which you can get HERE.
~Mask of choice. I used Aqua mask 52 which you can get from Creative Misfits HERE.
~Font of choice. I used TheNautiGal.
Let's get started!!!
1. Open a new layer ( I prefer a large canvas, so I make mine 1050x656). Make your canvas transparent (Layer > Transparency > Color to Alpha).
2. Open template in PSD format, move layers of template around until they are the way you like them.
~Add paper from scrapkit to individual layers of the template (Right click on layer in layer box > Alpha to Selection > CTRL I > Select paper layer in layer box > Delete).
These are the papers I used:
Paper 1
Paper 5
~I added noise to some of the template layers to make them look glittery (Filters > Noise > RGB Noise).
~I colorized some of the template layers to better match the scrapkit (Colors > Colorize > play with the setting until you get the desired color).
~Add drop shadow to template layers (Filters > Light & Shadow > Drop Shadow).
3. Open tubes, I used both a full body and a close up. I changed the mode on the close-ups to Hard Light (at the top of the layer box you will see a box marked Mode. Click on the arrow and pick Hard Light from the drop down menu. See the image below). Add drop shadow to the full body tube.

4. Open and place the following elements:
Ribbon 1
Rainbow
Flower 1
Flower 2
Flower 3
Butterflies 1
Pot of Gold
Hat
Key 2
4 Leaf Clover 3
~Some of the elements may need to be sized down. Using your scale tool in your tool box adjust the pixel size until element is the correct size~
~Add drop shadow to all elements~
5. Open Paper 7
6. Open mask
7. Add mask to paper (click HERE for a tut on using masks)
8. Merge Layers (Image > Merge Visible Layers).
9. Crop Image (Image > Autocrop Image).
10. Scale image to desired size (Image > Scale Image).
11. Add copyright info and name
12. Save as .png
YOU ARE ALL DONE!!!!!!!!!!
Subscribe to:
Post Comments
(Atom)
Labels
12x12 Layout
A Taggers Scrap
Animated
Announcements
Art of Freya
Basic tuts
Blog Trains
CDO
Cluster Frame
CT tags
Extras
Forum Set
Freebies
FTU CU
FTU Kits
FTU tuts
Holiday
Jackie's Jewels
Kissing Kate
Masks
PTU Kits
PTU tuts
Quick Pages
Results
Results with Amys kits
Show Offs
Sweet Cravings Scraps
Tasha's Playground
Templates
Timeline Banners
Chit Chat
Blog Archive
-
▼
2011
(337)
-
▼
February
(20)
- New PTU tut "Spring is Calling"
- PTU tut- Dreams Do Come True
- New PTU tut "Kiss Me"
- Fairy Tale Templates
- New PTU tut "Emo Cutie"
- PTU tut- Lil' Emo
- PTU tut- Yo Ho Ho
- New PTU tut "Cats Meow"
- WOOT!!!!!! We joined a new CT!!!!!!!!!
- PTU tut- Vintage Gorjuss
- New PTU tut "Time Gone By"
- PTU tut- Midnight Poison
- Anti Valentines Templates
- New PTU tut "So Emo"
- New FTU tut "Be Mine"
- 80's Themed Templates
- PTU Tut- Love Hurts
- PU Valentine Quick Pages
- More Templates:)
- New PTU tut "Hit That"
-
▼
February
(20)


0 comments:
Post a Comment