Gimptastic Scraps Available Exclusively @

Gimptastic Scraps CT







Blog Trains

CU Licenses









Tuesday, August 30, 2011
 This tutorial is of my own creation and any resemblance to any other tuts is purely coincidental. This tutorial is for personal use only, using it for monetary gain is against our TOU's.
Supplies:
Gimp- Any version should work
Adorable PTU kit from Creative Intentionz called Autumn Romance HERE
Tube of choice. I am using pinuptoons. You must have a license to use them. You can get them HERE
Font- Showguide
Let's begin!
-File>New 500x500 pixels.
-Open wagon wheel 3. Layer>Scale Layer 75%. Move towards the top middle. Filters>Light & Shadow>Drop Shadow of 2, 2, 2, black, 50.
-Open hay bale 2. Scale 75%. Move to the bottom of the wagon wheel.
-Open hay bale 1. Scale 60%. Move this layer below hay bale 1 in your layer box. Place to the left of the other hay bale. Right click this layer in the layer box and choose layer to image size.
Layer>Duplicate Layer. Select your flip tool and click the canvas to flip your duplicte to the other side.
-Open fern 2. Move this layer below hay bale 1 in the layer box.
-Open wagon wheel 1. Scale 50%. Move this layer above the white wagon wheel in the layer box. Place to the bottom left of the white wheel. I had some of the brown wheel sticking out below the hay so I erased it. repeat drop shadow. Open wagon wheel 2 and repeat above.
-Open tube. Make the top layer. Scale 70%. Repeat drop shadow. Duplicate. Filters>Blur>Gaussian Blur on default. Change the mode (top of layer box) to soft light.
Lower the opacity (top of layer box) to 50.
Other Elements:
Add a drop shadow of 2, 2, 2, black, 50 to all element layers unless otherwse stated. See my tag for placement.
pumpkin 2
ladder
leaf 3
leaf 1
mushroom 2
leaf 2- flip
knot 3
hearts 3- no drop shadow
butterfly 3- rotate -20 no drop shadow
butterfly 5 rotate 20 no drop shadow
butterfly 1 no drop shadow
sun
-Add your name and copyright.
All done! I hope you enjoyed my tut!
This tutorial is of my own creation and any resemblance to any other tuts is purely coincidental. This tutorial is for personal use only, using it for monetary gain is against our TOU's.
Supplies:
Gimp- Any version should work
Adorable PTU kit from Creative Intentionz called Autumn Romance HERE
Tube of choice. I am using pinuptoons. You must have a license to use them. You can get them HERE
Font- Showguide
Let's begin!
-File>New 500x500 pixels.
-Open wagon wheel 3. Layer>Scale Layer 75%. Move towards the top middle. Filters>Light & Shadow>Drop Shadow of 2, 2, 2, black, 50.
-Open hay bale 2. Scale 75%. Move to the bottom of the wagon wheel.
-Open hay bale 1. Scale 60%. Move this layer below hay bale 1 in your layer box. Place to the left of the other hay bale. Right click this layer in the layer box and choose layer to image size.
Layer>Duplicate Layer. Select your flip tool and click the canvas to flip your duplicte to the other side.
-Open fern 2. Move this layer below hay bale 1 in the layer box.
-Open wagon wheel 1. Scale 50%. Move this layer above the white wagon wheel in the layer box. Place to the bottom left of the white wheel. I had some of the brown wheel sticking out below the hay so I erased it. repeat drop shadow. Open wagon wheel 2 and repeat above.
-Open tube. Make the top layer. Scale 70%. Repeat drop shadow. Duplicate. Filters>Blur>Gaussian Blur on default. Change the mode (top of layer box) to soft light.
Lower the opacity (top of layer box) to 50.
Other Elements:
Add a drop shadow of 2, 2, 2, black, 50 to all element layers unless otherwse stated. See my tag for placement.
pumpkin 2
ladder
leaf 3
leaf 1
mushroom 2
leaf 2- flip
knot 3
hearts 3- no drop shadow
butterfly 3- rotate -20 no drop shadow
butterfly 5 rotate 20 no drop shadow
butterfly 1 no drop shadow
sun
-Add your name and copyright.
All done! I hope you enjoyed my tut!
Monday, August 29, 2011
 This tutorial is of my own creation and any resemblance to any other tuts is purely coincidental. This tutorial is for personal use only, using it for monetary gain is against our TOU's.
Supplies Needed:
~Gimp (any version will do).
~Tube of choice. I used the artwork of Keith Garvey you must have a license to use this art which you can get @ PTE HERE.
~My Paradise FTU scrapkit by Polka Dot Scraps which you get HERE.
~Mask of choice. I used WSL mask 362 which you can get HERE.
~Font of choice. I used Pea Biggio.
Let's get started!!!!!
1. Open a new layer ( I prefer a large canvas, so I make mine 1050x656). Make your canvas transparent (Layer > Transparency > Color to alpha).
2. Open Frame 1, add drop shadow (Filters > Light & Shadow > Drop Shadow).
3. Open Paper 5 center it behind frame, remove excess paper using a cutting tool or eraser.
4. Open tube, add drop shadow.
5. Open and place the following elements:
element 1
element 4
element 5
element 7
element 8
element 9
element 10
element 18
element 22
element 27
element 28 (x2)
element 29
element 38
~Some elements may need to be sized down. Using the Scale Tool in your tool box adjust pixels to desired size~
~Add drop shadow to all elements~
6. Open Paper 3.
7. Open mask.
8. Add mask to paper (click HERE for a tut on using masks)
9. Merge layers (Image > Merge Visible Layer).
10. Crop image (Image > Autocrop Image).
11. Scale image to desired size (Image > Scale Image).
12. Add copyright info and name.
13. Save as .png
You are finished :)
This tutorial is of my own creation and any resemblance to any other tuts is purely coincidental. This tutorial is for personal use only, using it for monetary gain is against our TOU's.
Supplies Needed:
~Gimp (any version will do).
~Tube of choice. I used the artwork of Keith Garvey you must have a license to use this art which you can get @ PTE HERE.
~My Paradise FTU scrapkit by Polka Dot Scraps which you get HERE.
~Mask of choice. I used WSL mask 362 which you can get HERE.
~Font of choice. I used Pea Biggio.
Let's get started!!!!!
1. Open a new layer ( I prefer a large canvas, so I make mine 1050x656). Make your canvas transparent (Layer > Transparency > Color to alpha).
2. Open Frame 1, add drop shadow (Filters > Light & Shadow > Drop Shadow).
3. Open Paper 5 center it behind frame, remove excess paper using a cutting tool or eraser.
4. Open tube, add drop shadow.
5. Open and place the following elements:
element 1
element 4
element 5
element 7
element 8
element 9
element 10
element 18
element 22
element 27
element 28 (x2)
element 29
element 38
~Some elements may need to be sized down. Using the Scale Tool in your tool box adjust pixels to desired size~
~Add drop shadow to all elements~
6. Open Paper 3.
7. Open mask.
8. Add mask to paper (click HERE for a tut on using masks)
9. Merge layers (Image > Merge Visible Layer).
10. Crop image (Image > Autocrop Image).
11. Scale image to desired size (Image > Scale Image).
12. Add copyright info and name.
13. Save as .png
You are finished :) 
This tutorial is of my own creation and any resemblance to any other tuts is purely coincidental. This tutorial is for personal use only, using it for monetary gain is against our TOU's.
Supplies Needed:
~Gimp (any version will do).
~We're all Superstars PTU scrapkit which you can get from Creative Intentionz HERE.
~Tube of choice. I used the artwork of Lady Mishka, you must have a license to use this art which you can now get HERE.
~Template of choice. I used Template 24 which you can get from Candylicious Designz HERE.
~Font of choice. I used Segoe UI Semi-Bold.
Let's get started!!!
1. Open a new layer ( I prefer a large canvas, so I make mine 1050x656). Make your canvas transparent (Layer > Transparency > Color to Alpha).
2. Open template in PSD format, move layers of template around until they are the way you like them.
~Add paper from scrapkit to individual layers of the template (Right click on template layer in layer box > Alpha to Selection > CTRL I > Select paper layer in layer box > Delete).
These are the papers I used:
Paper 1
Paper 3
Paper 4
Paper 6
Paper 8
Paper 10
~I added noise to some of the template layers to make them look glittery (Filters > Noise > RGB Noise).
~I colorized some of the template layers to better match the scrapkit (Colors > Colorize > play with the setting until you get the desired color).
~Add drop shadow to template layers (Filters > Light & Shadow > Drop Shadow).
3. Open tube, add drop shadow.
4. Open and place the following elements:
Branch
Ribbon 1
Bear
Heartbrad 2
Heartbrad 3
Heartbrad 7
Rose 1
Rose 2
Rose 3
Rose 4
Rose 5
Flower 5
Flower 6
Flower 7
Flower 8
Flower 10
~Some of the elements may need to be sized down. Using your scale tool in your tool box adjust the pixel size until element is the correct size~
~Add drop shadow to all elements~
5. Merge Layers (Image > Merge Visible Layers).
6. Crop Image (Image > Autocrop Image).
7. Scale image to desired size (Image > Scale Image).
8. Add copyright info and name
9. Save as .png
ALL DONE!!!!!!!!!!
Sunday, August 28, 2011
 This tutorial is of my own creation and any resemblance to any other tuts is purely coincidental. This tutorial is for personal use only, using it for monetary gain is against our TOU's.
Supplies:
Gimp- Any version should work
7 tubes of choice. I am using the work of Isamel Rac. You must have a license to use his tubes. You can purchase them HERE
Fonts- Abstract, Satisfaction and Velvenda Cooler
Just a little warning....this is a bit tricky
Let's get started!
-File>New 600x225 pixels. Fill your background layer with white.
-Layer>New Layer. Name this layer 'one'. Select your rectangle select tool. Make a selection on the far left side.
This tutorial is of my own creation and any resemblance to any other tuts is purely coincidental. This tutorial is for personal use only, using it for monetary gain is against our TOU's.
Supplies:
Gimp- Any version should work
7 tubes of choice. I am using the work of Isamel Rac. You must have a license to use his tubes. You can purchase them HERE
Fonts- Abstract, Satisfaction and Velvenda Cooler
Just a little warning....this is a bit tricky
Let's get started!
-File>New 600x225 pixels. Fill your background layer with white.
-Layer>New Layer. Name this layer 'one'. Select your rectangle select tool. Make a selection on the far left side.
-Select your bucket fill tool. Change your foreground color to 83a742. Fill the selection. Select>None. Make another selection using the rectangle select tool right next to the one you just made.

-Continue to do this until you have 7 rectangles. Here (in order) are the rest of the colors I used.
a327f7
f7f027
f3e4bb
fa2690
f85d00
2796f7
 This next part is for the animation. If you wish not to animate your tag skip to where you see ******
-Layer>Duplicate Layer. Name this layer 'two'. Select your magic wand. Click the green rectangle. Select your bucket fill tool. Fill the selection with the blue we used earlier. Select none.
This next part is for the animation. If you wish not to animate your tag skip to where you see ******
-Layer>Duplicate Layer. Name this layer 'two'. Select your magic wand. Click the green rectangle. Select your bucket fill tool. Fill the selection with the blue we used earlier. Select none.

-Continue this until you have all your rectangles different than the original.
Purple- change to green
Yellow- change to purple
Cream- change to yellow
Pink- change to cream
Orange- change to pink
Blue- change to orange
 -Duplicate this layer. Name this layer 'three'. We are going to change the colors again.
Purple- change to green
Yellow- change to purple
Cream- change to yellow
Pink- change to cream
Orange- change to pink
Blue- change to orange
-Duplicate this layer. Name this layer 'three'. We are going to change the colors again.
Purple- change to green
Yellow- change to purple
Cream- change to yellow
Pink- change to cream
Orange- change to pink
Blue- change to orange
 -The above is for the animation part of the tag. So close off the layers named two & three by clicking the eye next to it in the layer box.. You should have layer one visible.
******
-Using the magic wand, click the 1st rectangle (green). Now open your 1st tube. Place her inside of the selection.
-The above is for the animation part of the tag. So close off the layers named two & three by clicking the eye next to it in the layer box.. You should have layer one visible.
******
-Using the magic wand, click the 1st rectangle (green). Now open your 1st tube. Place her inside of the selection.

-Press Select>Invert. Press delete on your keyboard. Select None.

-Continue this until you have a tube in all the rectagnles EXCEPT the cream colored one. The reason for this is that you will place your main tube in the middle, so this square will be mostly covered.

-Now you need to merge all your tube layers together. Start off by making the top tube layer (in your layer box) active. Go to Layer>Merge Down. Do this until all the tubes are on 1 layer.
Change the mode (top of layer box) to value for this layer only. Name this layer tubes. Make sure it is right above layer three.
This is what your layer box should look like.

-Now open your main tube. Make the top layer and center her on the canvas. Right click this tube layer in the layer box and choose layer to image size.

-Right click layer again in the layer box and choose alpha to selection. Select>Grow by 2. Add a new layer below tube. Fill selection with white. Grow again by 2. Add a new layer below this layer. Fill with the purple from before. Select none. Filters>Noise>RGB Noise. Uncheck independent RGB. Change all the sliders execpt alpha to 0.50.
-Duplicate the purple glitter layer. Make the bottom one active. Filters>Blur>Gaussian Blur at 20.0. Now go to Filters>Distorts>Blinds.

-I duplicated this layer 2 times and merged them together. This is optional.
-Make your top layer active. Add a new layer. Select your magic wand and click the canvas. Set you foreground color to the blue we used earlier. Set your background color to the green. Select your gradient tool.

-Click at the top left corner and drag down to the bottom right corner. Select>Shrink by 7. Press delete. Grow by 4. Add a new layer on top. Fill with black. Shrink by 1. Press delete. Shrink 5. Fill with black. Shrink by 1 and press delete. Select none.

-Select your text tool. Using the velvenda cooler font, size 60, foreground white, type 'Rac N' Roll'. Place in the lower right corner. I changed the color of some of the letters like I did when I changed the colors of the rectangles. I also added some noise to the colored letters. Right click layer in layer box- alpha to selection. grow by 1. Add new layer below text. Fill with black. Duplicate black layer. Make the bottom one active. Add gaussian blur of 5.0.
-Select your text tool. using the abstract font, size 8, color black type 'rac n' roll' again. Move it to the upper left of tag. Change the opacity (top of layer box) to 40. Duplicate and move to the lower right side above the other text.
-Add your name with the satisfaction font.
_Add your copyright info.
Time to animate!
-We need to merge all the layers EXCEPT the bottom 5 (background, one, two, three & tubes). So make your top layer active and go to Layer>Merge Down until you reach the tube layer. Name this newly merged layer 'merged'. Here is what your layer box should look like.

-Set your background color to white. Right click on layer 'one' and choose remove alpha channel. This should add a white background to it. Do the same for layers 'two' & 'three'. You can delete the background layer.
-Now we need to duplicate layers. Start with making the tubes layer active. Layer>Duplicate Layer twice. You should have a total of 3 tube layers. Duplicate your 'merged' layer twice for a total of 3.
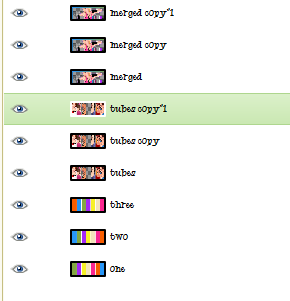

-Next, we need to rearrange our layers. It's easier just to show a screenshot rather than try to explain lol.

So it goes:
ONE
TUBES
MERGED
TWO
TUBES COPY
MERGED COPY
THREE
TUBES COPY #1
MERGED COPY #1
-We need to merge each set together (a rectangle layer, a tube layer, a merged layer). First we need to merge the tube layer with the rectangle layer. This is because if we merge it differently the mode of the tube will change. So merge tube copy #1 & three.

-Now merge merged copy #1 & three.
-Now that is 1 set. You need to merge the next set. So start of by merging tubes copy and two. Now merge merged copy with two.

-Now merge tubes with one. Then merge merged with one.

-Now it's time to see the animation in action! Go to Filters>Animation>Playback and press play.
Time to save
-Go to File>Save As Gif. Press save.


Thursday, August 25, 2011
 This tutorial is of my own creation and any resemblance to any other tuts is purely coincidental. This tutorial is for personal use only, using it for monetary gain is against our TOU's.
Supplies Needed:
~Gimp (any version will do).
~Bad Ass Chick FTU scrapkit by Kittz Kreationz HERE.
~Tubes of choice. I used the artwork of Marco Guaglione, you must have a license to use this art. You can purchase this art from PTE HERE.
~Template of choice. I used Leah's template 93 which you can get on our blog HERE.
~Mask of choice. I use WSL mask 363 which you can get HERE.
~Font of choice. I used Heather.
Let's get started!!!
1. Open a new layer ( I prefer a large canvas, so I make mine 1050x656). Make your canvas transparent (Layer > Transparency > Color to Alpha).
2. Open template in PSD format, remove and move layers of template around until they are the way you like them.
~Add paper from scrapkit to individual layers of the template (Right click on template layer in layer box > Alpha to Selection > CTRL I > Select paper layer in layer box > Delete).
These are the papers I used:
Paper 2
Paper 15
Paper 002
Paper 0038
~I added noise to some of the template layers to make them look glittery (Filters > Noise > RGB Noise).
~I colorized some of the template layers to better match the scrapkit (Colors > Colorize > play with the setting until you get the desired color).
~Add drop shadow to template layers (Filters > Light & Shadow > Drop Shadow).
3. Open tubes, I used both a full body and a close up.
~Open full body tube, you will need to duplicate this tube so that you have 2 (at the bottom of your layer box click on the blue box. This will give you 2 tube layers).
~Select the top tube layer in your tool box. Add Gaussion Blur (Filters > Blur > Gaussion Blur, use default settings)
~On that same tube layer change the mode to Screen (at the top of your Layer Box you will see where it says Mode, click the arrow and select Screen from the drop down menu).
~Add drop shadow to bottom tube layer.
~I changed the mode on the close-up to Hardlight (at the top of your Layer Box you will see where it says Mode, click the arrow and select Hardlight from the drop down menu). This tube has been added to the template in the same way you add paper (Right click on template layer in layer box > Alpha to Selection > CTRL I > Select tube layer in layer box > Delete).
4. Open and place the following elements:
Stars
Star 1
Light Ray
Candleabra
Flower
Skull 2
Metal Skull
G-String Bow
Mended Heart
Bottle
Collar
Whip
Shoe
Mask
BAD 1
~Some of the elements may need to be sized down. Using your scale tool in your tool box adjust the pixel size until element is the correct size~
~Add drop shadow to all elements (except Light Ray)~
5. Open Paper 12.
6. Open mask.
7. Add mask to paper (click HERE for a tut on using masks)
8. Merge Layers (Image > Merge Visible Layers).
9. Crop Image (Image > Autocrop Image).
10. Scale image to desired size (Image > Scale Image).
11. Add copyright info and name
12. Save as .png
ALL DONE!!!!!!!!!!
This tutorial is of my own creation and any resemblance to any other tuts is purely coincidental. This tutorial is for personal use only, using it for monetary gain is against our TOU's.
Supplies Needed:
~Gimp (any version will do).
~Bad Ass Chick FTU scrapkit by Kittz Kreationz HERE.
~Tubes of choice. I used the artwork of Marco Guaglione, you must have a license to use this art. You can purchase this art from PTE HERE.
~Template of choice. I used Leah's template 93 which you can get on our blog HERE.
~Mask of choice. I use WSL mask 363 which you can get HERE.
~Font of choice. I used Heather.
Let's get started!!!
1. Open a new layer ( I prefer a large canvas, so I make mine 1050x656). Make your canvas transparent (Layer > Transparency > Color to Alpha).
2. Open template in PSD format, remove and move layers of template around until they are the way you like them.
~Add paper from scrapkit to individual layers of the template (Right click on template layer in layer box > Alpha to Selection > CTRL I > Select paper layer in layer box > Delete).
These are the papers I used:
Paper 2
Paper 15
Paper 002
Paper 0038
~I added noise to some of the template layers to make them look glittery (Filters > Noise > RGB Noise).
~I colorized some of the template layers to better match the scrapkit (Colors > Colorize > play with the setting until you get the desired color).
~Add drop shadow to template layers (Filters > Light & Shadow > Drop Shadow).
3. Open tubes, I used both a full body and a close up.
~Open full body tube, you will need to duplicate this tube so that you have 2 (at the bottom of your layer box click on the blue box. This will give you 2 tube layers).
~Select the top tube layer in your tool box. Add Gaussion Blur (Filters > Blur > Gaussion Blur, use default settings)
~On that same tube layer change the mode to Screen (at the top of your Layer Box you will see where it says Mode, click the arrow and select Screen from the drop down menu).
~Add drop shadow to bottom tube layer.
~I changed the mode on the close-up to Hardlight (at the top of your Layer Box you will see where it says Mode, click the arrow and select Hardlight from the drop down menu). This tube has been added to the template in the same way you add paper (Right click on template layer in layer box > Alpha to Selection > CTRL I > Select tube layer in layer box > Delete).
4. Open and place the following elements:
Stars
Star 1
Light Ray
Candleabra
Flower
Skull 2
Metal Skull
G-String Bow
Mended Heart
Bottle
Collar
Whip
Shoe
Mask
BAD 1
~Some of the elements may need to be sized down. Using your scale tool in your tool box adjust the pixel size until element is the correct size~
~Add drop shadow to all elements (except Light Ray)~
5. Open Paper 12.
6. Open mask.
7. Add mask to paper (click HERE for a tut on using masks)
8. Merge Layers (Image > Merge Visible Layers).
9. Crop Image (Image > Autocrop Image).
10. Scale image to desired size (Image > Scale Image).
11. Add copyright info and name
12. Save as .png
ALL DONE!!!!!!!!!! This tutorial is of my own creation and any resemblance to any other tuts is purely coincidental. This tutorial is for personal use only, using it for monetary gain is against our TOU's.
Supplies
Gimp- Any version should work
Stunning PTU kit from Sweet Cravings Scraps called Escape HERE
Tube of choice. I am using Edward Reed. You must have a license to use his tubes. You can purchase them HERE
Template 53 by me HERE
Mask- WSL_mask41 HERE
Font- Sunshine in my soul
Let's get started!
-Open template. Delete credits & words. Layer>Scale Layer 500x380 pixels. Image>Canvas Size 600x600 pixels and press center.
-Let's add papers to the template layers. Make the template layer active (see below). Right click template layer in layer box and choose alpha to selection. Open paper (see below). Right click paper layer in layer box and choose add alpha channel. Layer>Scale Layer by 60%.
Select>Invert. Press delete on your keyboard. Select>None. Delete the original template layer.
Here are the template layers and which papers I used:
square 1- paper 3 Filters>Light & Shadow>Drop Shadow 1, 1, 10, black, 100
square 2- paper 6 Filters>Repeat Drop Shadow
circle 1 #1- paper 1 repeat drop shadow
circle 1- paper 18
circle 2- paper 17
-Open tube. Place on left side. Add drop shadow of 2, 2, 2, black, 50. Layer>Duplicate Layer. Filters>Blur>Gaussian Blur on default. Change the mode of the duplicate tube to screen. Lower the opacity of this tube to 50.
-Open frame 4. Scale 50%. Move frame layer below tube in the layer box. Repeat drop shadow.
Elements
Add drop shadow of 2, 2, 2, black, 50 to all element layers unless stated otherwise. See my tag for placement.
house opacity 50
well
horse opacity 50
cloud no drop shadow
flower 7 no drop shadow
pinecones
vine
stars 1 no drop shadow
mushroom
clock
string 2 no drop shadow
flare rotate -90
-Open paper 8 and move to the bottom layer. Apply masks. Click HERE to learn to use masks.
-Add your name and copyright.
All finished!
This tutorial is of my own creation and any resemblance to any other tuts is purely coincidental. This tutorial is for personal use only, using it for monetary gain is against our TOU's.
Supplies
Gimp- Any version should work
Stunning PTU kit from Sweet Cravings Scraps called Escape HERE
Tube of choice. I am using Edward Reed. You must have a license to use his tubes. You can purchase them HERE
Template 53 by me HERE
Mask- WSL_mask41 HERE
Font- Sunshine in my soul
Let's get started!
-Open template. Delete credits & words. Layer>Scale Layer 500x380 pixels. Image>Canvas Size 600x600 pixels and press center.
-Let's add papers to the template layers. Make the template layer active (see below). Right click template layer in layer box and choose alpha to selection. Open paper (see below). Right click paper layer in layer box and choose add alpha channel. Layer>Scale Layer by 60%.
Select>Invert. Press delete on your keyboard. Select>None. Delete the original template layer.
Here are the template layers and which papers I used:
square 1- paper 3 Filters>Light & Shadow>Drop Shadow 1, 1, 10, black, 100
square 2- paper 6 Filters>Repeat Drop Shadow
circle 1 #1- paper 1 repeat drop shadow
circle 1- paper 18
circle 2- paper 17
-Open tube. Place on left side. Add drop shadow of 2, 2, 2, black, 50. Layer>Duplicate Layer. Filters>Blur>Gaussian Blur on default. Change the mode of the duplicate tube to screen. Lower the opacity of this tube to 50.
-Open frame 4. Scale 50%. Move frame layer below tube in the layer box. Repeat drop shadow.
Elements
Add drop shadow of 2, 2, 2, black, 50 to all element layers unless stated otherwise. See my tag for placement.
house opacity 50
well
horse opacity 50
cloud no drop shadow
flower 7 no drop shadow
pinecones
vine
stars 1 no drop shadow
mushroom
clock
string 2 no drop shadow
flare rotate -90
-Open paper 8 and move to the bottom layer. Apply masks. Click HERE to learn to use masks.
-Add your name and copyright.
All finished! This tutorial is of my own creation and any resemblance to any other tuts is purely coincidental. This tutorial is for personal use only, using it for monetary gain is against our TOU's.
Supplies
Gimp- Any version should work
Beautiful PTU kit Welcom Autumn from KnC Scrapz HERE
Template 414 from Divine Intentionz HERE
Tube of choice. I am using Vinegar. You must have a license to use these tubes. You can purchase them HERE
Mask 10 by Vix HERE
Font- ALS Script
Let's begin!
-Open template. Delete credits. Layer>Scale Layer 500x301 pixels. Image>Canvas Size 600x600 pixels and press center.
-Let's add papers to the template layers. Make the template layer active (see below). Right click template layer in layer box and choose alpha to selection. Open paper (see below). Right click paper layer in layer box and choose add alpha channel. Layer>Scale Layer by 60%.
Select>Invert. Press delete on your keyboard. Select>None. Delete the original template layer.
Here are the template layers and which papers I used:
circle 3- paper 10
circle 5- paper 5 Filters>Light & Shadow>Drop Shadow 2, 2, 2, black, 50
circle 1- paper 4 Filters>Repeat Drop Shadow
square 2- paper 9 repeat drop shadow
square 1- paper 1 repeat drop shadow
-Make the frame back 3 layer active. Alpha to selection. Select your bucket fill tool. Set your foreground color to a8d51b. Fill the selection. Filters>Noise>RGB Noise on default. Open tube. Place face in the selection. Invert & delete. Select none. Change the mode of the tube to grain merge.
-Make the frame back 2 layer active. Alpha to selection. Fill the selection with 300100. Repeat noise. Open tube. Place in selection. Invert & delete. Select none. Change the mode to grain merge.
-Make the frame back layer active. Alpha to selection. Fill with ecd7a4. Repeat noise. Open tube and place in selection. Invert & delete. Select none. Change mode to grain merge.
-Repeat drop shadow on the frame, frame 2 & frame 3 layers.
-Make the brush layer active. Colors>Colorize. Leave the hue and saturation slider alone, but change the lightness slider to 100. Repeat drop shadow.
-Open tube. Make top layer. Scale 75%. Repeat drop shadow.
Elements
Add drop shadow of 2, 2, 2, black, 50 to all element layers unless stated otherwise. See my tag for placement.
red floer
green ribbon no drop shadow
branch no drop shadow
paper bird
leaf 1 no drop shadow
basket no drop shadow
ring
element 3
welcome sign
leaves no drop shadow
violin
plastic leaf no drop shadow
-Open paper 8. Make bottom layer. Apply mask.
-Add your name and copyright.
You're finished!
We would love to see your results. Send them to Gimptasticblog@yahoo.com.
This tutorial is of my own creation and any resemblance to any other tuts is purely coincidental. This tutorial is for personal use only, using it for monetary gain is against our TOU's.
Supplies
Gimp- Any version should work
Beautiful PTU kit Welcom Autumn from KnC Scrapz HERE
Template 414 from Divine Intentionz HERE
Tube of choice. I am using Vinegar. You must have a license to use these tubes. You can purchase them HERE
Mask 10 by Vix HERE
Font- ALS Script
Let's begin!
-Open template. Delete credits. Layer>Scale Layer 500x301 pixels. Image>Canvas Size 600x600 pixels and press center.
-Let's add papers to the template layers. Make the template layer active (see below). Right click template layer in layer box and choose alpha to selection. Open paper (see below). Right click paper layer in layer box and choose add alpha channel. Layer>Scale Layer by 60%.
Select>Invert. Press delete on your keyboard. Select>None. Delete the original template layer.
Here are the template layers and which papers I used:
circle 3- paper 10
circle 5- paper 5 Filters>Light & Shadow>Drop Shadow 2, 2, 2, black, 50
circle 1- paper 4 Filters>Repeat Drop Shadow
square 2- paper 9 repeat drop shadow
square 1- paper 1 repeat drop shadow
-Make the frame back 3 layer active. Alpha to selection. Select your bucket fill tool. Set your foreground color to a8d51b. Fill the selection. Filters>Noise>RGB Noise on default. Open tube. Place face in the selection. Invert & delete. Select none. Change the mode of the tube to grain merge.
-Make the frame back 2 layer active. Alpha to selection. Fill the selection with 300100. Repeat noise. Open tube. Place in selection. Invert & delete. Select none. Change the mode to grain merge.
-Make the frame back layer active. Alpha to selection. Fill with ecd7a4. Repeat noise. Open tube and place in selection. Invert & delete. Select none. Change mode to grain merge.
-Repeat drop shadow on the frame, frame 2 & frame 3 layers.
-Make the brush layer active. Colors>Colorize. Leave the hue and saturation slider alone, but change the lightness slider to 100. Repeat drop shadow.
-Open tube. Make top layer. Scale 75%. Repeat drop shadow.
Elements
Add drop shadow of 2, 2, 2, black, 50 to all element layers unless stated otherwise. See my tag for placement.
red floer
green ribbon no drop shadow
branch no drop shadow
paper bird
leaf 1 no drop shadow
basket no drop shadow
ring
element 3
welcome sign
leaves no drop shadow
violin
plastic leaf no drop shadow
-Open paper 8. Make bottom layer. Apply mask.
-Add your name and copyright.
You're finished!
We would love to see your results. Send them to Gimptasticblog@yahoo.com.
Subscribe to:
Posts
(Atom)
Snag Our Blinkies





Don't Be A Pirate!

