Gimptastic Scraps Available Exclusively @

Gimptastic Scraps CT


Blog Trains

CU Licenses


Sunday, August 28, 2011
 This tutorial is of my own creation and any resemblance to any other tuts is purely coincidental. This tutorial is for personal use only, using it for monetary gain is against our TOU's.
Supplies:
Gimp- Any version should work
7 tubes of choice. I am using the work of Isamel Rac. You must have a license to use his tubes. You can purchase them HERE
Fonts- Abstract, Satisfaction and Velvenda Cooler
Just a little warning....this is a bit tricky
Let's get started!
-File>New 600x225 pixels. Fill your background layer with white.
-Layer>New Layer. Name this layer 'one'. Select your rectangle select tool. Make a selection on the far left side.
This tutorial is of my own creation and any resemblance to any other tuts is purely coincidental. This tutorial is for personal use only, using it for monetary gain is against our TOU's.
Supplies:
Gimp- Any version should work
7 tubes of choice. I am using the work of Isamel Rac. You must have a license to use his tubes. You can purchase them HERE
Fonts- Abstract, Satisfaction and Velvenda Cooler
Just a little warning....this is a bit tricky
Let's get started!
-File>New 600x225 pixels. Fill your background layer with white.
-Layer>New Layer. Name this layer 'one'. Select your rectangle select tool. Make a selection on the far left side.
-Select your bucket fill tool. Change your foreground color to 83a742. Fill the selection. Select>None. Make another selection using the rectangle select tool right next to the one you just made.

-Continue to do this until you have 7 rectangles. Here (in order) are the rest of the colors I used.
a327f7
f7f027
f3e4bb
fa2690
f85d00
2796f7
 This next part is for the animation. If you wish not to animate your tag skip to where you see ******
-Layer>Duplicate Layer. Name this layer 'two'. Select your magic wand. Click the green rectangle. Select your bucket fill tool. Fill the selection with the blue we used earlier. Select none.
This next part is for the animation. If you wish not to animate your tag skip to where you see ******
-Layer>Duplicate Layer. Name this layer 'two'. Select your magic wand. Click the green rectangle. Select your bucket fill tool. Fill the selection with the blue we used earlier. Select none.

-Continue this until you have all your rectangles different than the original.
Purple- change to green
Yellow- change to purple
Cream- change to yellow
Pink- change to cream
Orange- change to pink
Blue- change to orange
 -Duplicate this layer. Name this layer 'three'. We are going to change the colors again.
Purple- change to green
Yellow- change to purple
Cream- change to yellow
Pink- change to cream
Orange- change to pink
Blue- change to orange
-Duplicate this layer. Name this layer 'three'. We are going to change the colors again.
Purple- change to green
Yellow- change to purple
Cream- change to yellow
Pink- change to cream
Orange- change to pink
Blue- change to orange
 -The above is for the animation part of the tag. So close off the layers named two & three by clicking the eye next to it in the layer box.. You should have layer one visible.
******
-Using the magic wand, click the 1st rectangle (green). Now open your 1st tube. Place her inside of the selection.
-The above is for the animation part of the tag. So close off the layers named two & three by clicking the eye next to it in the layer box.. You should have layer one visible.
******
-Using the magic wand, click the 1st rectangle (green). Now open your 1st tube. Place her inside of the selection.

-Press Select>Invert. Press delete on your keyboard. Select None.

-Continue this until you have a tube in all the rectagnles EXCEPT the cream colored one. The reason for this is that you will place your main tube in the middle, so this square will be mostly covered.

-Now you need to merge all your tube layers together. Start off by making the top tube layer (in your layer box) active. Go to Layer>Merge Down. Do this until all the tubes are on 1 layer.
Change the mode (top of layer box) to value for this layer only. Name this layer tubes. Make sure it is right above layer three.
This is what your layer box should look like.

-Now open your main tube. Make the top layer and center her on the canvas. Right click this tube layer in the layer box and choose layer to image size.

-Right click layer again in the layer box and choose alpha to selection. Select>Grow by 2. Add a new layer below tube. Fill selection with white. Grow again by 2. Add a new layer below this layer. Fill with the purple from before. Select none. Filters>Noise>RGB Noise. Uncheck independent RGB. Change all the sliders execpt alpha to 0.50.
-Duplicate the purple glitter layer. Make the bottom one active. Filters>Blur>Gaussian Blur at 20.0. Now go to Filters>Distorts>Blinds.

-I duplicated this layer 2 times and merged them together. This is optional.
-Make your top layer active. Add a new layer. Select your magic wand and click the canvas. Set you foreground color to the blue we used earlier. Set your background color to the green. Select your gradient tool.

-Click at the top left corner and drag down to the bottom right corner. Select>Shrink by 7. Press delete. Grow by 4. Add a new layer on top. Fill with black. Shrink by 1. Press delete. Shrink 5. Fill with black. Shrink by 1 and press delete. Select none.

-Select your text tool. Using the velvenda cooler font, size 60, foreground white, type 'Rac N' Roll'. Place in the lower right corner. I changed the color of some of the letters like I did when I changed the colors of the rectangles. I also added some noise to the colored letters. Right click layer in layer box- alpha to selection. grow by 1. Add new layer below text. Fill with black. Duplicate black layer. Make the bottom one active. Add gaussian blur of 5.0.
-Select your text tool. using the abstract font, size 8, color black type 'rac n' roll' again. Move it to the upper left of tag. Change the opacity (top of layer box) to 40. Duplicate and move to the lower right side above the other text.
-Add your name with the satisfaction font.
_Add your copyright info.
Time to animate!
-We need to merge all the layers EXCEPT the bottom 5 (background, one, two, three & tubes). So make your top layer active and go to Layer>Merge Down until you reach the tube layer. Name this newly merged layer 'merged'. Here is what your layer box should look like.

-Set your background color to white. Right click on layer 'one' and choose remove alpha channel. This should add a white background to it. Do the same for layers 'two' & 'three'. You can delete the background layer.
-Now we need to duplicate layers. Start with making the tubes layer active. Layer>Duplicate Layer twice. You should have a total of 3 tube layers. Duplicate your 'merged' layer twice for a total of 3.
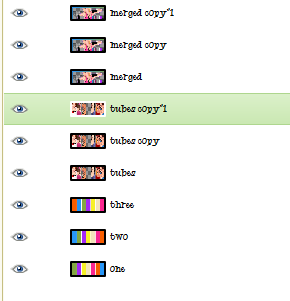

-Next, we need to rearrange our layers. It's easier just to show a screenshot rather than try to explain lol.

So it goes:
ONE
TUBES
MERGED
TWO
TUBES COPY
MERGED COPY
THREE
TUBES COPY #1
MERGED COPY #1
-We need to merge each set together (a rectangle layer, a tube layer, a merged layer). First we need to merge the tube layer with the rectangle layer. This is because if we merge it differently the mode of the tube will change. So merge tube copy #1 & three.

-Now merge merged copy #1 & three.
-Now that is 1 set. You need to merge the next set. So start of by merging tubes copy and two. Now merge merged copy with two.

-Now merge tubes with one. Then merge merged with one.

-Now it's time to see the animation in action! Go to Filters>Animation>Playback and press play.
Time to save
-Go to File>Save As Gif. Press save.


Subscribe to:
Post Comments
(Atom)
Snag Our Blinkies


Don't Be A Pirate!


0 comments:
Post a Comment