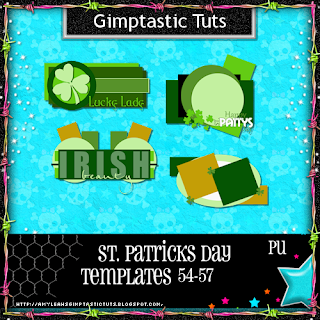
Gimptastic Scraps Available Exclusively @

Gimptastic Scraps CT


Blog Trains

CU Licenses


 This tutorial is of my own creation and any resemblance to any other tuts is purely coincidental. This tutorial is for personal use only, using it for monetary gain is against our TOU's.
Supplies Needed:
~Gimp (any version will do).
~Tube of choice. I used the art of Elias Chatzoudis, you must have a license to use this art which you can now get HERE.
~Banner style template. I used the Signature Tag Template by Rieka Rafita which you can get HERE.
~Font of choice. I used Velvenda Heavy, Pixelette & TheNautiGal.
Let's get started!!!
1. Open a new layer ( I prefer a large canvas, so I make mine 1050x656). Make your canvas transparent (Layer > Transparency > Color to Alpha).
2. Open template in PSD format.
3. Open 2 tubes, merge the tubes together (Right click on top tube layer in layer box > Merge Down) Once the tubes are merged together smudge the tubes together using your Smudge Tool in your tool box. Be sure to erase any excess that may smudge outside of the size of your template. See image below for an example of smudged tubes...
4. To get the glow effect you see in the bottom right corner go to Filters > Light & Shadow > Super Nova. Change the color to match your tubes.
This tutorial is of my own creation and any resemblance to any other tuts is purely coincidental. This tutorial is for personal use only, using it for monetary gain is against our TOU's.
Supplies Needed:
~Gimp (any version will do).
~Tube of choice. I used the art of Elias Chatzoudis, you must have a license to use this art which you can now get HERE.
~Banner style template. I used the Signature Tag Template by Rieka Rafita which you can get HERE.
~Font of choice. I used Velvenda Heavy, Pixelette & TheNautiGal.
Let's get started!!!
1. Open a new layer ( I prefer a large canvas, so I make mine 1050x656). Make your canvas transparent (Layer > Transparency > Color to Alpha).
2. Open template in PSD format.
3. Open 2 tubes, merge the tubes together (Right click on top tube layer in layer box > Merge Down) Once the tubes are merged together smudge the tubes together using your Smudge Tool in your tool box. Be sure to erase any excess that may smudge outside of the size of your template. See image below for an example of smudged tubes...
4. To get the glow effect you see in the bottom right corner go to Filters > Light & Shadow > Super Nova. Change the color to match your tubes.


 This tutorial is of my own creation and any resemblance to any other tuts is purely coincidental. This tutorial is for personal use only, using it for monetary gain is against our TOU's.
Supplies Needed:
~Gimp (any version will do).
~GirlyLicious PTU scrapkit by Rieka Rafita which you can get HERE.
~Tube of choice. I used the artwork of Celine, you must have a license to use this art which you can get HERE.
~Template of choice. I used the Prettier Template which you can get from Crazy Cakes Scraps HERE.
~Mask of choice. I used WSL mask 223 which you can get HERE.
~Font of choice. I used ZeroHour.
Let's get started!!!
1. Open a new layer ( I prefer a large canvas, so I make mine 1050x656). Make your canvas transparent (Layer > Transparency > Color to Alpha).
2. Open template in PSD format, move layers of template around until they are the way you like them.
~Add paper from scrapkit to individual layers of the template (Right click on template layer in layer box > Alpha to Selection > CTRL I > Select paper layer in layer box > Delete).
These are the papers I used:
Paper 8
Paper 11
Paper 18
Paper 20
~I added noise to some of the template layers to make them look glittery (Filters > Noise > RGB Noise).
~I colorized some of the template layers to better match the scrapkit (Colors > Colorize > play with the setting until you get the desired color).
~Add drop shadow to template layers (Filters > Light & Shadow > Drop Shadow).
3. Open tubes, add drop shadow.
4. Open and place the following elements:
Flower 1
Skull 1
Skull 2
Skull 4
Glitter
Corset
FluffyHeart
Star
Lips
Shoe
Makeup
Perfume
~Some of the elements may need to be sized down. Using your scale tool in your tool box adjust the pixel size until element is the correct size~
~Add drop shadow to all elements~
5. Open Paper 19
6. Open mask
7. Add mask to paper (click HERE for a tut on using masks)
8. Merge Layers (Image > Merge Visible Layers).
9. Crop Image (Image > Autocrop Image).
10. Scale image to desired size (Image > Scale Image).
11. Add copyright info and name
12. Save as .png
ALL DONE!!!!!!!!!!
This tutorial is of my own creation and any resemblance to any other tuts is purely coincidental. This tutorial is for personal use only, using it for monetary gain is against our TOU's.
Supplies Needed:
~Gimp (any version will do).
~GirlyLicious PTU scrapkit by Rieka Rafita which you can get HERE.
~Tube of choice. I used the artwork of Celine, you must have a license to use this art which you can get HERE.
~Template of choice. I used the Prettier Template which you can get from Crazy Cakes Scraps HERE.
~Mask of choice. I used WSL mask 223 which you can get HERE.
~Font of choice. I used ZeroHour.
Let's get started!!!
1. Open a new layer ( I prefer a large canvas, so I make mine 1050x656). Make your canvas transparent (Layer > Transparency > Color to Alpha).
2. Open template in PSD format, move layers of template around until they are the way you like them.
~Add paper from scrapkit to individual layers of the template (Right click on template layer in layer box > Alpha to Selection > CTRL I > Select paper layer in layer box > Delete).
These are the papers I used:
Paper 8
Paper 11
Paper 18
Paper 20
~I added noise to some of the template layers to make them look glittery (Filters > Noise > RGB Noise).
~I colorized some of the template layers to better match the scrapkit (Colors > Colorize > play with the setting until you get the desired color).
~Add drop shadow to template layers (Filters > Light & Shadow > Drop Shadow).
3. Open tubes, add drop shadow.
4. Open and place the following elements:
Flower 1
Skull 1
Skull 2
Skull 4
Glitter
Corset
FluffyHeart
Star
Lips
Shoe
Makeup
Perfume
~Some of the elements may need to be sized down. Using your scale tool in your tool box adjust the pixel size until element is the correct size~
~Add drop shadow to all elements~
5. Open Paper 19
6. Open mask
7. Add mask to paper (click HERE for a tut on using masks)
8. Merge Layers (Image > Merge Visible Layers).
9. Crop Image (Image > Autocrop Image).
10. Scale image to desired size (Image > Scale Image).
11. Add copyright info and name
12. Save as .png
ALL DONE!!!!!!!!!!
This tutorial is of my own creation and any resemblance to any other tuts is purely coincidental. This tutorial is for personal use only, using it for monetary gain is against our TOU's. Supplies Needed: ~Gimp (any version will do). ~Spring Promises PTU scrapkit by Artmama Made, check her blog HERE to see which stores she is currentlt selling in. ~Tube of choice. I used the art of Alayna Magnan, you must have a license to use this art which you can now get HERE. ~Template of choice. I used Leah's template 64 which you can find on our blog HERE. ~Mask of choice. I used WSL mask 302 which you can get HERE. ~Font of choice. I used CAC Shishoni Brush. Let's get started!!! 1. Open a new layer ( I prefer a large canvas, so I make mine 1050x656). Make your canvas transparent (Layer > Transparency > Color to Alpha). 2. Open template in PSD format, move layers of template around until they are the way you like them. ~Add paper from scrapkit to individual layers of the template (Right click on template layer in layer box > Alpha to Selection > CTRL I > Select paper layer in layer box > Delete). These are the papers I used: Paper 1 Paper 11 Paper 13 Paper 14 ~I added noise to some of the template layers to make them look glittery (Filters > Noise > RGB Noise). ~I colorized some of the template layers to better match the scrapkit (Colors > Colorize > play with the setting until you get the desired color). ~Add drop shadow to template layers (Filters > Light & Shadow > Drop Shadow). 3. Open tubes, add drop shadow. 4. Open and place the following elements: embellie 8 embellie 5 embellie 28 embellie 24 embellie 29 embellie 27 embellie 30 embellie 31 embellie 16 embellie 22 embellie 23 ~Some of the elements may need to be sized down. Using your scale tool in your tool box adjust the pixel size until element is the correct size~ ~Add drop shadow to all elements~ 5. Open Paper 10 6. Open mask 7. Add mask to paper (click HERE for a tut on using masks) 8. Merge Layers (Image > Merge Visible Layers). 9. Crop Image (Image > Autocrop Image). 10. Scale image to desired size (Image > Scale Image). 11. Add copyright info and name 12. Save as .png
 This tutorial is of my own creation and any resemblance to any other tuts is purely coincidental. This tutorial is for personal use only, using it for monetary gain is against our TOU's.
Supplies Needed:
~Gimp (any version will do).
~Tube of choice. I used the art of Elias Chatzoudis. You must have a license to use this art which you can now get HERE.
~Easter Parade PTU scrapkit which you can get from Sweet Cravings Scraps HERE.
~Mask of choice. I used WSL mask 363 which you can get HERE.
~Font of choice. I used Angelina.
Let's get started!!!!!
1. Open a new layer ( I prefer a large canvas, so I make mine 1050x656). Make your canvas transparent (Layer > Transparency > Color to alpha).
2. Open Frame 7, add drop shadow (Filters > Light & Shadow > Drop Shadow).
3. Open Paper 1 center it behind frame, remove excess paper using a cutting tool or eraser from your tool box.
4. Open your tube, add drop shadow.
5. Open and place the following elements:
Bubbles 1
Grass
Kite 1
Bunny 1
Bunny 3
Bunny 4
Bow 6
Eggs
Egg 1
Egg 2
Egg 3
CocoPop Bunny
Basket
Carrot
Chick 1
Owl 2
Flower 1
Flower 2
~Some elements may need to be sized down, use the Scale Tool in your tool box to adjust pixel size~
~Add drop shadow to all elements~
6. Open Paper 20.
7. Open mask.
8. Add mask to paper (click HERE for a tut on using masks).
9. Merge layers (Image > Merge Visible Layer).
10. crop image (Image > Autocrop Image).
11. Scale image to desired size (Image > Scale Image).
12. Add copyright info and name.
13. Save as .png
You are finished :)
This tutorial is of my own creation and any resemblance to any other tuts is purely coincidental. This tutorial is for personal use only, using it for monetary gain is against our TOU's.
Supplies Needed:
~Gimp (any version will do).
~Tube of choice. I used the art of Elias Chatzoudis. You must have a license to use this art which you can now get HERE.
~Easter Parade PTU scrapkit which you can get from Sweet Cravings Scraps HERE.
~Mask of choice. I used WSL mask 363 which you can get HERE.
~Font of choice. I used Angelina.
Let's get started!!!!!
1. Open a new layer ( I prefer a large canvas, so I make mine 1050x656). Make your canvas transparent (Layer > Transparency > Color to alpha).
2. Open Frame 7, add drop shadow (Filters > Light & Shadow > Drop Shadow).
3. Open Paper 1 center it behind frame, remove excess paper using a cutting tool or eraser from your tool box.
4. Open your tube, add drop shadow.
5. Open and place the following elements:
Bubbles 1
Grass
Kite 1
Bunny 1
Bunny 3
Bunny 4
Bow 6
Eggs
Egg 1
Egg 2
Egg 3
CocoPop Bunny
Basket
Carrot
Chick 1
Owl 2
Flower 1
Flower 2
~Some elements may need to be sized down, use the Scale Tool in your tool box to adjust pixel size~
~Add drop shadow to all elements~
6. Open Paper 20.
7. Open mask.
8. Add mask to paper (click HERE for a tut on using masks).
9. Merge layers (Image > Merge Visible Layer).
10. crop image (Image > Autocrop Image).
11. Scale image to desired size (Image > Scale Image).
12. Add copyright info and name.
13. Save as .png
You are finished :)  This tutorial is of my own creation and any resemblance to any other tuts is purely coincidental. This tutorial is for personal use only, using it for monetary gain is against our TOU's.
Supplies:
Gimp- Any version should work
Lovely PTU kit from Artmama called 'Spring Morning'. Check out her blog HERE to see the store she sells in
I am using the work of Suzanne Woolcott. you must have a licence to use her tubes. You can purchase them HERE
WSL_Mask229 HERE
Font- Miss Brooks
Let's get started!
-File>New. Open a canvas with the size of 600x600 pixels.
-Open embellie 04. Layer>Scale layer by 65%. Select your magic wand. Click inside the frame. Select>Grow by 5. Open paper 5. Move paper layer below the frame layer in the layer box. Scale by 50%. Select>Invert. Press delete on your keyboard. Select>None. Make the frame layer active .
Filters>Light & Shadow>Drop Shadow of 2, 2, 2, black, 50.
-Open your tube. Move under the frame layer. Place to the far left of the frame.Layer>Duplicate Layer. Select your flip tool and click the canvas to flip the duplicate tube. Move to the far right of the frame. Duplicate. Place this tube layer in the middle of the other 2 tube layers. Make the top tube layer active. Layer>Merge Down. Merge down again to merge all the tube layers together. Make the paper layer below the frame layer active. Right click the paper layer in the layer box and choose alpha to selection. Make the tube layer active. Invert and delete. Select none.
Change the mode to screen.
-Open tube again. Make the top layer. Place on top of the frame. Filters>Repeat Drop Shdaow. Duplicate. Filters>Blur>Gaussian Blur on the default settings. Change the mode to overlay.
-Open embelli 01. Scale by 50%. Move to bottom layer. Select your rotate tool. Click the canvas. In the angle box put 90 and click rotate. Right click layer in the layer box and choose layer to image size. Dulpicate and flip. Using the magic wand click inside the frame. Grow by 5.
Open paper 1. Move layer below frame layer. Right click layer in layer box and choose add alpha channel. Scale by 50%. Invert and delete. Select none. Repeat drop shadow on the frame layer. Add paper 14 to the other frame repeating the steps above.
Elements:
Add drop shadow of 2, 2, 2, black, 50 to all element layers. See my tag for placement.
23- no scale-duplicate-flip
22- no scale- flip
36- no scale
24- no scale- duplicate-flip
27- scale 75%
31- scale 50%
-Open paper 08. Move to bottom layer. Apply mask. If you don't know how to use masks click HERE. Scale mask layer by 85%.
-Add your name and copyright.
You're finished!
This tutorial is of my own creation and any resemblance to any other tuts is purely coincidental. This tutorial is for personal use only, using it for monetary gain is against our TOU's.
Supplies:
Gimp- Any version should work
Lovely PTU kit from Artmama called 'Spring Morning'. Check out her blog HERE to see the store she sells in
I am using the work of Suzanne Woolcott. you must have a licence to use her tubes. You can purchase them HERE
WSL_Mask229 HERE
Font- Miss Brooks
Let's get started!
-File>New. Open a canvas with the size of 600x600 pixels.
-Open embellie 04. Layer>Scale layer by 65%. Select your magic wand. Click inside the frame. Select>Grow by 5. Open paper 5. Move paper layer below the frame layer in the layer box. Scale by 50%. Select>Invert. Press delete on your keyboard. Select>None. Make the frame layer active .
Filters>Light & Shadow>Drop Shadow of 2, 2, 2, black, 50.
-Open your tube. Move under the frame layer. Place to the far left of the frame.Layer>Duplicate Layer. Select your flip tool and click the canvas to flip the duplicate tube. Move to the far right of the frame. Duplicate. Place this tube layer in the middle of the other 2 tube layers. Make the top tube layer active. Layer>Merge Down. Merge down again to merge all the tube layers together. Make the paper layer below the frame layer active. Right click the paper layer in the layer box and choose alpha to selection. Make the tube layer active. Invert and delete. Select none.
Change the mode to screen.
-Open tube again. Make the top layer. Place on top of the frame. Filters>Repeat Drop Shdaow. Duplicate. Filters>Blur>Gaussian Blur on the default settings. Change the mode to overlay.
-Open embelli 01. Scale by 50%. Move to bottom layer. Select your rotate tool. Click the canvas. In the angle box put 90 and click rotate. Right click layer in the layer box and choose layer to image size. Dulpicate and flip. Using the magic wand click inside the frame. Grow by 5.
Open paper 1. Move layer below frame layer. Right click layer in layer box and choose add alpha channel. Scale by 50%. Invert and delete. Select none. Repeat drop shadow on the frame layer. Add paper 14 to the other frame repeating the steps above.
Elements:
Add drop shadow of 2, 2, 2, black, 50 to all element layers. See my tag for placement.
23- no scale-duplicate-flip
22- no scale- flip
36- no scale
24- no scale- duplicate-flip
27- scale 75%
31- scale 50%
-Open paper 08. Move to bottom layer. Apply mask. If you don't know how to use masks click HERE. Scale mask layer by 85%.
-Add your name and copyright.
You're finished!
 This tutorial is of my own creation and any resemblance to any other tuts is purely coincidental. This tutorial is for personal use only, using it for monetary gain is against our TOU's.
Supplies Needed:
~Gimp (any version will do).
~Girly PTU scrapkit which you can get from Addictive Pleasures HERE.
~Tube of choice. I used the artwork of Celine, you must have a license to use this art which you can get HERE.
~Template of choice. I used Template 31 by Artmama which you can get HERE.
~Font of choice. I used Glider Girls.
Let's get started!!!
1. Open a new layer ( I prefer a large canvas, so I make mine 1050x656). Make your canvas transparent (Layer > Transparency > Color to Alpha).
2. Open template in PSD format, move layers of template around until they are the way you like them.
~Add paper from scrapkit to individual layers of the template (Right click on template layer in layer box > Alpha to Selection > CTRL I > Select paper layer in layer box > Delete).
These are the papers I used:
Paper 4
Paper 10
Paper 11
Notepaper
~I added noise to some of the template layers to make them look glittery (Filters > Noise > RGB Noise).
~I colorized some of the template layers to better match the scrapkit (Colors > Colorize > play with the setting until you get the desired color).
~Add drop shadow to template layers (Filters > Light & Shadow > Drop Shadow).
3. Open tube, add drop shadow.
4. Open and place the following elements:
Glitter 2
Netting
Paperclip
Paperclips
Clock
Glass Button 2
Book
Flower
Flower 2
MP3player
Headphones
Pencil
XO
Lips
~Some of the elements may need to be sized down. Using your scale tool in your tool box adjust the pixel size until element is the correct size~
~Add drop shadow to all elements~
5. Merge Layers (Image > Merge Visible Layers).
6. Crop Image (Image > Autocrop Image).
7. Scale image to desired size (Image > Scale Image).
8. Add copyright info and name
9. Save as .png
ALL DONE!!!!!!!!!!
This tutorial is of my own creation and any resemblance to any other tuts is purely coincidental. This tutorial is for personal use only, using it for monetary gain is against our TOU's.
Supplies Needed:
~Gimp (any version will do).
~Girly PTU scrapkit which you can get from Addictive Pleasures HERE.
~Tube of choice. I used the artwork of Celine, you must have a license to use this art which you can get HERE.
~Template of choice. I used Template 31 by Artmama which you can get HERE.
~Font of choice. I used Glider Girls.
Let's get started!!!
1. Open a new layer ( I prefer a large canvas, so I make mine 1050x656). Make your canvas transparent (Layer > Transparency > Color to Alpha).
2. Open template in PSD format, move layers of template around until they are the way you like them.
~Add paper from scrapkit to individual layers of the template (Right click on template layer in layer box > Alpha to Selection > CTRL I > Select paper layer in layer box > Delete).
These are the papers I used:
Paper 4
Paper 10
Paper 11
Notepaper
~I added noise to some of the template layers to make them look glittery (Filters > Noise > RGB Noise).
~I colorized some of the template layers to better match the scrapkit (Colors > Colorize > play with the setting until you get the desired color).
~Add drop shadow to template layers (Filters > Light & Shadow > Drop Shadow).
3. Open tube, add drop shadow.
4. Open and place the following elements:
Glitter 2
Netting
Paperclip
Paperclips
Clock
Glass Button 2
Book
Flower
Flower 2
MP3player
Headphones
Pencil
XO
Lips
~Some of the elements may need to be sized down. Using your scale tool in your tool box adjust the pixel size until element is the correct size~
~Add drop shadow to all elements~
5. Merge Layers (Image > Merge Visible Layers).
6. Crop Image (Image > Autocrop Image).
7. Scale image to desired size (Image > Scale Image).
8. Add copyright info and name
9. Save as .png
ALL DONE!!!!!!!!!! This tutorial is of my own creation and any resemblance to any other tuts is purely coincidental. This tutorial is for personal use only, using it for monetary gain is against our TOU's.
Supplies:
Gimp- Any version should work
Adorable PTU kit from Sweet Cravings Scraps called 'Easter Parade' HERE
Tube of choice. I am using pinuptoons. You must have a licence to use them. You can purchase them HERE
Template 63 by me HERE
Mask- WSL_Mask147 HERE
Fonts- Airplanes in the night sky
Let's get started!
-Open template. Delete the credits. Image>Scale Image 500x330 pixels. Image>Canvas Size of 600x600 pixels and make sure to press center.
-Let's add papers to the template layers. Make the template layer active (see below). Right click template layer in layer box and choose alpha to selection. Open paper (see below). Right click paper layer in layer box and choose add alpha channel. Layer>Scale Layer by 60%.
Select>Invert. Press delete on your keyboard. Select>None. Delete the original template layer.
Here are the template layers and which papers I used:
circle 1- paper 2 FIlters>Light & Shadow>Drop Shadow of 2, 2, 2, black, 50
circle 2- paper 16 Filters>Repeat Drop Shadow
square 1- paper 1 repeat drop shadow
circle 3- paper 21 repeat drop shadow
circle 4- paper 23
rect 1 & rect 2- paper 5 repeat drop shadow
square 2- paper 3 Add a drop shadow of 2, 2, 10, black, 80
-Make the words back layer active. Add a drop shadow of 2, 2, 2, black, 50.
-Open tube. Move tube below the word layers in the layer box. Scale by 80%. Repeat drop shadow.
Elements:
eggs- scale 60%
frame 2- scale 50%
egg 3- scale 25%
egg 2- scale 20%
flower 8- scale 40%
cute bunny 2- scale 25%
candy stick 1- scale 70%
candy stick 2- scale 65%
candy stick 3- scale 60%
bead shower- scale 35% NO drop shadow
cute bunny 3- scale 35%
-Open paper 24 and move to the bottom layer. Apply mask. If you don't know how to use a mask click HERE.
-Add your name and copyright and you are finished!!!!!
This tutorial is of my own creation and any resemblance to any other tuts is purely coincidental. This tutorial is for personal use only, using it for monetary gain is against our TOU's.
Supplies:
Gimp- Any version should work
Adorable PTU kit from Sweet Cravings Scraps called 'Easter Parade' HERE
Tube of choice. I am using pinuptoons. You must have a licence to use them. You can purchase them HERE
Template 63 by me HERE
Mask- WSL_Mask147 HERE
Fonts- Airplanes in the night sky
Let's get started!
-Open template. Delete the credits. Image>Scale Image 500x330 pixels. Image>Canvas Size of 600x600 pixels and make sure to press center.
-Let's add papers to the template layers. Make the template layer active (see below). Right click template layer in layer box and choose alpha to selection. Open paper (see below). Right click paper layer in layer box and choose add alpha channel. Layer>Scale Layer by 60%.
Select>Invert. Press delete on your keyboard. Select>None. Delete the original template layer.
Here are the template layers and which papers I used:
circle 1- paper 2 FIlters>Light & Shadow>Drop Shadow of 2, 2, 2, black, 50
circle 2- paper 16 Filters>Repeat Drop Shadow
square 1- paper 1 repeat drop shadow
circle 3- paper 21 repeat drop shadow
circle 4- paper 23
rect 1 & rect 2- paper 5 repeat drop shadow
square 2- paper 3 Add a drop shadow of 2, 2, 10, black, 80
-Make the words back layer active. Add a drop shadow of 2, 2, 2, black, 50.
-Open tube. Move tube below the word layers in the layer box. Scale by 80%. Repeat drop shadow.
Elements:
eggs- scale 60%
frame 2- scale 50%
egg 3- scale 25%
egg 2- scale 20%
flower 8- scale 40%
cute bunny 2- scale 25%
candy stick 1- scale 70%
candy stick 2- scale 65%
candy stick 3- scale 60%
bead shower- scale 35% NO drop shadow
cute bunny 3- scale 35%
-Open paper 24 and move to the bottom layer. Apply mask. If you don't know how to use a mask click HERE.
-Add your name and copyright and you are finished!!!!!

This tutorial is of my own creation and any resemblance to any other tuts is purely coincidental. This tutorial is for personal use only, using it for monetary gain is against our TOU's. Supplies Needed: ~Gimp (any version will do). ~Tubes of choice. I used the awesome artwork of Lix, you must have a license to use this art which you can now get HERE. ~Sweet Punky PTU scrapkit by Rieka Rafita which you get HERE. ~Mask of choice. I used Gems mask 206 which you can get from Gems Taggin Scraps HERE. ~Font of choice. I used Twelve Ton Goldfish. Let's get started!!!!! 1. Open a new layer ( I prefer a large canvas, so I make mine 1050x656). Make your canvas transparent (Layer > Transparency > Color to alpha). 2. Open Frame 1, add drop shadow (Filters > Light & Shadow > Drop Shadow). 3. Open Paper 12 center it behind frame, remove excess paper using a cutting tool or eraser. 4. Open Frame 3, add drop shadow. 5. Open Paper 8 center it behind frame, remove excess paper using a cutting tool or eraser. 6. Open tubes. I used both a full body tube and a close-up. I lowered the opacity on the close-up to 50 (at the top of the layer box you will see a bar you can slide to change the opacity of the selected layer). Add drop shadow to the full body tube. 7. Open and place the following elements: Glittery Bits Skull 2 Skull 3 Ribbon 1 Flower 1 Flower 2 Star 1 Poison Cupcake Lips Cat Wordart ~Some elements may need to be sized down. Using the Scale Tool in your tool box adjust pixels to desired size~ ~Add drop shadow to all elements~ 8. Open Paper 6. 9. Open mask. 10. Add mask to paper (click HERE for a tut on using masks) 11. Merge layers (Image > Merge Visible Layer). 12. Crop image (Image > Autocrop Image). 13. Scale image to desired size (Image > Scale Image). 14. Add copyright info and name. 15. Save as .png You are finished :)

This tutorial is of my own creation and any resemblance to any other tuts is purely coincidental. This tutorial is for personal use only, using it for monetary gain is against our TOU's. Supplies: Gimp- Any version should work FTU kit from cinnamon Scraps called 'Dress Me Up' HERE Tube of Choice. I used the work of Lady Mishka. You must have a licence to use her tubes. You can purchase them HERE WSL_Mask152 HERE Font- Will & Grace and PetraScriptEF Let's Begin! -Open Gimp. Go to File>New and open a canvas with the size of 600x600 pixels. -Open frame 3. Select your rotate tool. Click the canvas. In the angle box put 90. Layer>Cale Layer by 70%. Select your magic wand. Click inside the frame. Select>grow by 3. Open paper 6. Move this layer below the frame layer in the layer box. Right click paper layer in the layer box and choose add alpha channel. Scale by 70%. Select>Invert. Press delete on your computer. Select>None. Make the frame layer active. Filters>Light & Shadow>Drop Shadow of 2, 2, 10, black, 80. -Open frame 2. Move this layerto the top. Scale by 65%. Click inside frame with magic wand. Frop by 3. Open ppaer 4 and move this layer below frame layer. Add alpha channel. Scale by 70%. Invert & delete. Select none. Add drop shadow of 2, 2, 2, black, 50 to frame layer. -Open tube. Make the top layer. Scale by 65%. Layer>Duplicate Layer. Move the duplicate tube layer below the circle frame in the layer box. Make the circle frame layer active. Using the magic wand, click indise the frame. Grow by 7. Make the duplicate tube layer active. Invert & delete. Select none. Make the original tube layer active. Select your eraser tool. Erase her bottom leg. See mine. -Open frame 5. Move to the bottom layer. Scale by 65%. Rotate by 45. Using the magic wand click inside the frame. Grow by 3. Open paper 18 and move layer below frame. Add alpha channel. Scale by 70%. Invert & delete. Select none. Repeat drop shadow on frame. Elements Add a drop shadow of 2, 2, 2, black, 50 to all element layers. See my tag for placement. flower 3- scale 50% doodle 2- scale 65% gem flower 4- scale 50% tag 3- scale 60% butterfly 1- scale 35% - rotate 25 - duplicate - flip -Using the Will & Grace font, zise 60, foreground color black, type the first letter of your name. Place it inside tag 3. Repeat drop shadow. -Open paper 17. Move layer to bottom. Apply mask. -Add your name using the PetraScriptEF font. Add your copyright and you are finished!!!!!!!
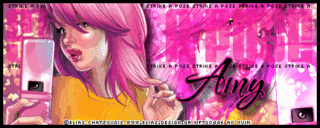
 This tutorial is of my own creation and any resemblance to any other tuts is purely coincidental. This tutorial is for personal use only, using it for monetary gain is against our TOU's.
Supplies:
Gimp- Any version should work
Beautiful PTU kit from Addictive Pleasures called 'Amour' HERE
Tube of choice. I am using the work of Elias Chatzoudis. You must have a license to use his tubes. You can purchase them HERE
Template 58 by me (Leah) HERE
Mask- Vix_Mask_Valentine15 HERE
Font- Scriptina
Let's begin!
-Open template. Delete the credits. Image>Canvas Size of 600x600 pixels. Make sure to click center.
-Let's add papers to the template layers. Make the template layer active (see below). Right click template layer in layer box and choose alpha to selection. Open paper (see below). Right click paper layer in layer box and choose add alpha channel. Layer>Scale Layer by 70%.
Select>Invert. Press delete on your keyboard. Select>None. Delete the original template layer.
Here are the template layers and which papers I used:
square1- paper 6 Filters>Light and Shadow>Drop Shadow of 2, 2, 15, black, 80.
circle 1- paper 3 Filters>Repeat Drop Shadow
circle 2- paper 8 Repeat drop shadow
rect 7- paper 1
rect 1 & rect 2- paper 2 Add drop shadow of 2, 2, 2, black, 50
rect 3 & rect 4- paper 7 Repeat drop shadow
rect 5 & rect 6- paper 9 Repeat drop shadow
-Open tube. Move tube to top layer in the layer box. Scale by 85%. Place in the middle of the tag. Repeat drop shadow. Layer>Duplicate Layer. Filters>Blur>Gaussian Blur on the default settings. Change the mode to soft light.
Elements:
Add drop shadow of 2, 2, 2, black, 50 to all element layers. See my tag for placement.
35- scale 60%
34- scale 75% Right click this element layer in the layer box and choose layer to image size. Duplicate. Select your flip tool. Click canvas to flip duplicate layer.
29- scale 65%
62- no scale
1- scale 50% layer to image size duplicate and flip
11- scale 45%
22- scale 85% layer to image size duplicate and flip
65- scale 35%
33- no scale & no drop shadow layer to image size duplicate & flip
43- scale 65%
66- scale 90%
-Open paper 10. Apply mask.
This tutorial is of my own creation and any resemblance to any other tuts is purely coincidental. This tutorial is for personal use only, using it for monetary gain is against our TOU's.
Supplies:
Gimp- Any version should work
Beautiful PTU kit from Addictive Pleasures called 'Amour' HERE
Tube of choice. I am using the work of Elias Chatzoudis. You must have a license to use his tubes. You can purchase them HERE
Template 58 by me (Leah) HERE
Mask- Vix_Mask_Valentine15 HERE
Font- Scriptina
Let's begin!
-Open template. Delete the credits. Image>Canvas Size of 600x600 pixels. Make sure to click center.
-Let's add papers to the template layers. Make the template layer active (see below). Right click template layer in layer box and choose alpha to selection. Open paper (see below). Right click paper layer in layer box and choose add alpha channel. Layer>Scale Layer by 70%.
Select>Invert. Press delete on your keyboard. Select>None. Delete the original template layer.
Here are the template layers and which papers I used:
square1- paper 6 Filters>Light and Shadow>Drop Shadow of 2, 2, 15, black, 80.
circle 1- paper 3 Filters>Repeat Drop Shadow
circle 2- paper 8 Repeat drop shadow
rect 7- paper 1
rect 1 & rect 2- paper 2 Add drop shadow of 2, 2, 2, black, 50
rect 3 & rect 4- paper 7 Repeat drop shadow
rect 5 & rect 6- paper 9 Repeat drop shadow
-Open tube. Move tube to top layer in the layer box. Scale by 85%. Place in the middle of the tag. Repeat drop shadow. Layer>Duplicate Layer. Filters>Blur>Gaussian Blur on the default settings. Change the mode to soft light.
Elements:
Add drop shadow of 2, 2, 2, black, 50 to all element layers. See my tag for placement.
35- scale 60%
34- scale 75% Right click this element layer in the layer box and choose layer to image size. Duplicate. Select your flip tool. Click canvas to flip duplicate layer.
29- scale 65%
62- no scale
1- scale 50% layer to image size duplicate and flip
11- scale 45%
22- scale 85% layer to image size duplicate and flip
65- scale 35%
33- no scale & no drop shadow layer to image size duplicate & flip
43- scale 65%
66- scale 90%
-Open paper 10. Apply mask.  Anyway...jump on over to Sarah's blog HERE to check out this awesome tut!
 The aim of the award is to bring recognition to blogs with minimal followers. Since we have accepted the award we must pass it on to at least 3 other blogs (but not more than 5), that have inspired us and we feel deserve a bit more attention. The rules are to say thank you on our blog to the one who passed it on to us (THANK YOU LUCIANNA!!!!!!!) and link to their blog (see above). Pick the blogs to pass the award on to, leave a note on their blog and then list them with links to their blogs...
You can download them HERE
 This tutorial is of my own creation and any resemblance to any other tuts is purely coincidental. This tutorial is for personal use only, using it for monetary gain is against our TOU's.
Supplies:
Gimp- Any version should work
Sweet PTU kit from Addictive Pleasures called 'Tattoo' HERE
Tube of choice. I am using the art of Elias Chatzoudis. You must have a license to use his tubes. You cn purchase them HERE
WSL_Mask141 form weescotslass HERE
Fonts- Misfit & Pea Noodle's Girlfriend
Let's get started!
-Open gimp. File>New 600x600 pixels.
-Open frame 4. Layer>Scale Layer by 60%. Select your magic wand. Click inside the frame. Select>Grow by 5. Add a new layer below this layer. Select your bucket fill tool. Set your foreground color to black. Fill the selection. Select>None. Make the frame layer active.
Filters>Light & Shadow>Drop Shadow of 2, 2, 2, black, 50.
-Open tube. Move tube to the 2nd layer in the layer box. Layer>Duplicate Layer. Hide the duplicate tube by clicking the eye next to it in the layer box. Make the black circle )fill layer) active. Right click layer in layer box and choose alpha to selection.
Select>Invert. Make the visible tube active. Press delete on your keyboard. Select none. Change the mode to value.
-Unhide your duplicate tube layer. Scale by 75%. Repeat drop shadow. Dulpicate. Filters>Blur>Gaussian Blur on the default settings. Change the mode to soft light.
-Open frame 3. Scale by 70%. Move this layer below the main tube layer in the layer box. Repeat drop shadow.
Elements:
Add a drop shadow od 2, 2, 2, black, 50 to all element layers. See my tag for placement.
wax seal- scale 65%
seal- no scale
flames 2- scale 50%
beads- no scale
tattoo 5- scale 50%
netting- no scale and no drop shadow
glitter- scale 65%
ribbon 4- scale 50%
star- no scale and no drop shadow
Open paper 12. Move this paper layer to the bottom in your layer box. Apply mask. If you don't know how to use masks click HERE.
This tutorial is of my own creation and any resemblance to any other tuts is purely coincidental. This tutorial is for personal use only, using it for monetary gain is against our TOU's.
Supplies:
Gimp- Any version should work
Sweet PTU kit from Addictive Pleasures called 'Tattoo' HERE
Tube of choice. I am using the art of Elias Chatzoudis. You must have a license to use his tubes. You cn purchase them HERE
WSL_Mask141 form weescotslass HERE
Fonts- Misfit & Pea Noodle's Girlfriend
Let's get started!
-Open gimp. File>New 600x600 pixels.
-Open frame 4. Layer>Scale Layer by 60%. Select your magic wand. Click inside the frame. Select>Grow by 5. Add a new layer below this layer. Select your bucket fill tool. Set your foreground color to black. Fill the selection. Select>None. Make the frame layer active.
Filters>Light & Shadow>Drop Shadow of 2, 2, 2, black, 50.
-Open tube. Move tube to the 2nd layer in the layer box. Layer>Duplicate Layer. Hide the duplicate tube by clicking the eye next to it in the layer box. Make the black circle )fill layer) active. Right click layer in layer box and choose alpha to selection.
Select>Invert. Make the visible tube active. Press delete on your keyboard. Select none. Change the mode to value.
-Unhide your duplicate tube layer. Scale by 75%. Repeat drop shadow. Dulpicate. Filters>Blur>Gaussian Blur on the default settings. Change the mode to soft light.
-Open frame 3. Scale by 70%. Move this layer below the main tube layer in the layer box. Repeat drop shadow.
Elements:
Add a drop shadow od 2, 2, 2, black, 50 to all element layers. See my tag for placement.
wax seal- scale 65%
seal- no scale
flames 2- scale 50%
beads- no scale
tattoo 5- scale 50%
netting- no scale and no drop shadow
glitter- scale 65%
ribbon 4- scale 50%
star- no scale and no drop shadow
Open paper 12. Move this paper layer to the bottom in your layer box. Apply mask. If you don't know how to use masks click HERE.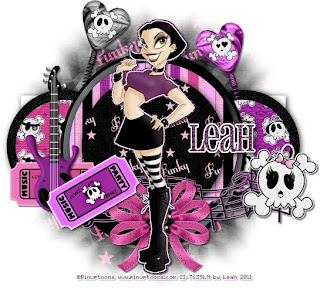 This tutorial is of my own creation and any resemblance to any other tuts is purely coincidental. This tutorial is for personal use only, using it for monetary gain is against our TOU's.
Supplies:
Great FTU kit from Lacarolita called 'Funky Punky' HERE
Tube of choice. I am using pinuptoons. You must have a license to use them. You can purchase them HERE
Template 59 by me (Leah) HERE
WSL_Mask138 from weescotslass HERE
Font- Pharmacy
Let's get started!
-Open template. Delete the credits. Image>Scale Image 500x287 pixels. Image>Canvas Size 600x600 pixels and make sure to click center.
-Let's add papers to the template layers. Make the template layer active (see below). Right click template layer in layer box and choose alpha to selection. Open paper (see below). Right click paper layer in layer box and choose add alpha channel. Layer>Scale Layer by 60%.
Select>Invert. Press delete on your keyboard. Select>None. Delete the original template layer.
Here are the template layers and which papers I used:
circle 1- paper 1 Filters>Light & Shadow>Drop Shadow 2, 2, 15, black, 80
circle 2- paper 9 Filters>Repeat Drop Shadow
circle 3- paper 4
circle 4- paper 3
-Make the rect layer active. Colors>Colorize. Leave the hue and saturation sliders where they are at. Change the lightness slider to 100. Repeat drop shadow.
-Make the circle 5 layer active. Filters>Noise>RGB Noise. Uncheck Independent RGB. Leave the rest of the settings. Repeat drop shadow. Do the same to the circle 6 layer.
-Open tube. Move the tube layer to the top in the layer box. Scale by 85%. Alpha to selection. Select>Grow by 1. Add a new layer below this layer. Select your bucket fill tool and make your foreground color white. Fill the selection. Grow by 2. Add new layer below this layer. Set your foreground color to 622d5b. Fill the selection. Select none. Add noise but change the red, green & blue sliders to 0.40. Add a drop shadow of 2, 2, 2, black, 50.
Elements:
Add a drop shadow of 2, 2, 2, black, 50 to all element layers. See my tag for placement.
musical notes- scale 50%
punky skull 1- scale 25%
spiral heart 1- scale 35%
spiral heart 3- scale 35% select your flip tool and click canvas
ticket 2- scale 30% select your rotate tool. In the angle box put -30
ticket 1- scale 30%
bow 2- scale 35%
1 bass guitar- scale 25%
LP1- scale 35%
-Open paper 2 and apply mask.
-Add your name and copyright and you're finished!!!
This tutorial is of my own creation and any resemblance to any other tuts is purely coincidental. This tutorial is for personal use only, using it for monetary gain is against our TOU's.
Supplies:
Great FTU kit from Lacarolita called 'Funky Punky' HERE
Tube of choice. I am using pinuptoons. You must have a license to use them. You can purchase them HERE
Template 59 by me (Leah) HERE
WSL_Mask138 from weescotslass HERE
Font- Pharmacy
Let's get started!
-Open template. Delete the credits. Image>Scale Image 500x287 pixels. Image>Canvas Size 600x600 pixels and make sure to click center.
-Let's add papers to the template layers. Make the template layer active (see below). Right click template layer in layer box and choose alpha to selection. Open paper (see below). Right click paper layer in layer box and choose add alpha channel. Layer>Scale Layer by 60%.
Select>Invert. Press delete on your keyboard. Select>None. Delete the original template layer.
Here are the template layers and which papers I used:
circle 1- paper 1 Filters>Light & Shadow>Drop Shadow 2, 2, 15, black, 80
circle 2- paper 9 Filters>Repeat Drop Shadow
circle 3- paper 4
circle 4- paper 3
-Make the rect layer active. Colors>Colorize. Leave the hue and saturation sliders where they are at. Change the lightness slider to 100. Repeat drop shadow.
-Make the circle 5 layer active. Filters>Noise>RGB Noise. Uncheck Independent RGB. Leave the rest of the settings. Repeat drop shadow. Do the same to the circle 6 layer.
-Open tube. Move the tube layer to the top in the layer box. Scale by 85%. Alpha to selection. Select>Grow by 1. Add a new layer below this layer. Select your bucket fill tool and make your foreground color white. Fill the selection. Grow by 2. Add new layer below this layer. Set your foreground color to 622d5b. Fill the selection. Select none. Add noise but change the red, green & blue sliders to 0.40. Add a drop shadow of 2, 2, 2, black, 50.
Elements:
Add a drop shadow of 2, 2, 2, black, 50 to all element layers. See my tag for placement.
musical notes- scale 50%
punky skull 1- scale 25%
spiral heart 1- scale 35%
spiral heart 3- scale 35% select your flip tool and click canvas
ticket 2- scale 30% select your rotate tool. In the angle box put -30
ticket 1- scale 30%
bow 2- scale 35%
1 bass guitar- scale 25%
LP1- scale 35%
-Open paper 2 and apply mask.
-Add your name and copyright and you're finished!!! This tutorial is of my own creation and any resemblance to any other tuts is purely coincidental. This tutorial is for personal use only, using it for monetary gain is against our TOU's.
Supplies Needed:
~Gimp (any version will do).
~Tube of choice. I used the art of Celine. You must have a license to use this art which you can get HERE.
~Yolanda Clover PTU scrapkit which you can get from Addictive Pleasures HERE.
~Mask of choice. I used mask 19 from Leah which you can get on our blog HERE.
~Font of choice. I used TheNautiGal.
Let's get started!!!!!
1. Open a new layer ( I prefer a large canvas, so I make mine 1050x656). Make your canvas transparent (Layer > Transparency > Color to alpha).
2. Open Frame 5, add drop shadow (Filters > Light & Shadow > Drop Shadow).
3. Open Paper 4 center it behind the frame , remove excess paper a cutting tool or eraser from your tool box.
4. Open tube, add drop shadow.
5. Open and place the following elements:
Bouquet
Pot of Gold
Jewels
Hat
Harp
Heart
Horse Shoe 2
Clover
Clover 4
Butterfly
~Some of the elements may need to be sized down. Using your scale tool in your tool box adjust the pixel size until element is the correct size~
~Add drop shadow to all elements~
6. Open Paper 11.
7. Open mask.
8. Add mask to paper (click HERE for a tut on using masks)
9. Merge layers (Image > Merge Visible Layer).
10. Autocrop image (Image > Autocrop Image).
11. Scale image to desired size (Image > Scale Image).
12. Add copyright info and name.
13. Save as .png
You are finished :)
This tutorial is of my own creation and any resemblance to any other tuts is purely coincidental. This tutorial is for personal use only, using it for monetary gain is against our TOU's.
Supplies Needed:
~Gimp (any version will do).
~Tube of choice. I used the art of Celine. You must have a license to use this art which you can get HERE.
~Yolanda Clover PTU scrapkit which you can get from Addictive Pleasures HERE.
~Mask of choice. I used mask 19 from Leah which you can get on our blog HERE.
~Font of choice. I used TheNautiGal.
Let's get started!!!!!
1. Open a new layer ( I prefer a large canvas, so I make mine 1050x656). Make your canvas transparent (Layer > Transparency > Color to alpha).
2. Open Frame 5, add drop shadow (Filters > Light & Shadow > Drop Shadow).
3. Open Paper 4 center it behind the frame , remove excess paper a cutting tool or eraser from your tool box.
4. Open tube, add drop shadow.
5. Open and place the following elements:
Bouquet
Pot of Gold
Jewels
Hat
Harp
Heart
Horse Shoe 2
Clover
Clover 4
Butterfly
~Some of the elements may need to be sized down. Using your scale tool in your tool box adjust the pixel size until element is the correct size~
~Add drop shadow to all elements~
6. Open Paper 11.
7. Open mask.
8. Add mask to paper (click HERE for a tut on using masks)
9. Merge layers (Image > Merge Visible Layer).
10. Autocrop image (Image > Autocrop Image).
11. Scale image to desired size (Image > Scale Image).
12. Add copyright info and name.
13. Save as .png
You are finished :) 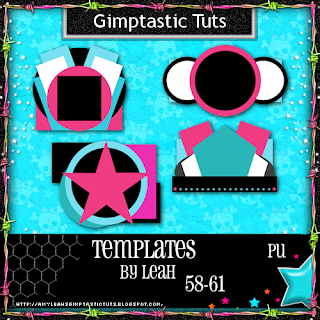
 This tutorial is of my own creation and any resemblance to any other tuts is purely coincidental. This tutorial is for personal use only, using it for monetary gain is against our TOU's.
Supplies:
Gimp- Any version should work
Awesome PTU kit from Rieka rafita called 'Sweet Punky' HERE
Tube of choice. I am using Lix. You must have a license to use these tubes. You can purchase them HERE
Mask 12 by me (Leah) HERE
Fonts- 1 Snappy DNA, ValentinaJF, Gabriola
Let's Begin!!!
-Open Gimp. File>New. Open a canvas with the size of 600x600 pixels.
-Open frame 3. Layer>Scale layer by 50%. Select your magic wand tool. Click inside the frame. Select>Grow by 3. Open paper 7. Move this paper layer below the frame layer in the layer box. Right click paper layer in the layer box and choose add alpha channel.
Scale by 40%. Select>Invert. Press delete on your keyboard. Select>None. Make the frame layer active. Filters>Light & Shadow>Drop Shadow of 2, 2, 15, black, 80.
-Open frame 4. Move to the left of the tag. Right click layer and choose layer to image size. Layer>Duplicate Layer. Select your flip tool and click the canvas. Repeat the steps above to add papers to the frames. On the left frame use paper 11. On the right frame use paper 10.
Repeat frop shadow on both frames.
-Open tube close up. Make the tube layer the 2nd layer in the layer box. Place inside the square frame. See mne. Make the green paper layer )right below the tube in the layer box) actvie. Right click layer in layer box and choose alpha to selection. Make the tube active. Invert and delete. Select none. Duplicate. On the duplicate tube, go to Filters>Blur>Gaussian Blur on the default settings. Change the mode to hard light. Duplicate again. Change the mode to screen and lower the opacity to 50.
-Open full body tube. Move to the top layer. Scale by 90%. Ass a drop shadow of 2, 2, 2, black, 50.
Elements
Add a drop shadow of 2, 2, 2, black, 50 to all element layers. See my tag for placement.
poison- scale 60%
screw- scale 30%
star 1- no scale
star 2- scale 65%
binder clip- no scale. Duplicate. Grab your flip tool. Press ctrl on your keyboard and click the canvas.
bow 1- scale 65%
flower 4- scale 20%
heart- scale 50%
beaded string- scale 50%
sparkle 2- no scale and no drop shadow
skull 4- scale 35%
button 3- scale 35%
-Using the ValentinaJF font, size 70 and foreground color set to black, type 'Poison'. Alpha to selection. Add a new layer below this layer. Grow by 1. Select your bucket fill tool. Fill selection with 2bfd20. Select none. Add a drop shadow of 2, 2, 2, black, 50.
-Using the Gabriola font, size 50, foreground color f41e84, type 'Pure'. Add a new layer below this layer. Alpha to selection. grow by 1. Fill selection with with. Repeat drop shadow.
-Open paper 8 and move layer to the very bottom. Apply mask. If you don't know how to use masks click HERE.
-Add your name with the 1 snappy DNA font. Add your copyright.
This tutorial is of my own creation and any resemblance to any other tuts is purely coincidental. This tutorial is for personal use only, using it for monetary gain is against our TOU's.
Supplies:
Gimp- Any version should work
Awesome PTU kit from Rieka rafita called 'Sweet Punky' HERE
Tube of choice. I am using Lix. You must have a license to use these tubes. You can purchase them HERE
Mask 12 by me (Leah) HERE
Fonts- 1 Snappy DNA, ValentinaJF, Gabriola
Let's Begin!!!
-Open Gimp. File>New. Open a canvas with the size of 600x600 pixels.
-Open frame 3. Layer>Scale layer by 50%. Select your magic wand tool. Click inside the frame. Select>Grow by 3. Open paper 7. Move this paper layer below the frame layer in the layer box. Right click paper layer in the layer box and choose add alpha channel.
Scale by 40%. Select>Invert. Press delete on your keyboard. Select>None. Make the frame layer active. Filters>Light & Shadow>Drop Shadow of 2, 2, 15, black, 80.
-Open frame 4. Move to the left of the tag. Right click layer and choose layer to image size. Layer>Duplicate Layer. Select your flip tool and click the canvas. Repeat the steps above to add papers to the frames. On the left frame use paper 11. On the right frame use paper 10.
Repeat frop shadow on both frames.
-Open tube close up. Make the tube layer the 2nd layer in the layer box. Place inside the square frame. See mne. Make the green paper layer )right below the tube in the layer box) actvie. Right click layer in layer box and choose alpha to selection. Make the tube active. Invert and delete. Select none. Duplicate. On the duplicate tube, go to Filters>Blur>Gaussian Blur on the default settings. Change the mode to hard light. Duplicate again. Change the mode to screen and lower the opacity to 50.
-Open full body tube. Move to the top layer. Scale by 90%. Ass a drop shadow of 2, 2, 2, black, 50.
Elements
Add a drop shadow of 2, 2, 2, black, 50 to all element layers. See my tag for placement.
poison- scale 60%
screw- scale 30%
star 1- no scale
star 2- scale 65%
binder clip- no scale. Duplicate. Grab your flip tool. Press ctrl on your keyboard and click the canvas.
bow 1- scale 65%
flower 4- scale 20%
heart- scale 50%
beaded string- scale 50%
sparkle 2- no scale and no drop shadow
skull 4- scale 35%
button 3- scale 35%
-Using the ValentinaJF font, size 70 and foreground color set to black, type 'Poison'. Alpha to selection. Add a new layer below this layer. Grow by 1. Select your bucket fill tool. Fill selection with 2bfd20. Select none. Add a drop shadow of 2, 2, 2, black, 50.
-Using the Gabriola font, size 50, foreground color f41e84, type 'Pure'. Add a new layer below this layer. Alpha to selection. grow by 1. Fill selection with with. Repeat drop shadow.
-Open paper 8 and move layer to the very bottom. Apply mask. If you don't know how to use masks click HERE.
-Add your name with the 1 snappy DNA font. Add your copyright. This tutorial is of my own creation and any resemblance to any other tuts is purely coincidental. This tutorial is for personal use only, using it for monetary gain is against our TOU's.
Supplies Needed:
~Gimp (any version will do).
~Tubes of choice. I used the art of Robert Alvarado. You must have a license to use this art which you can get HERE.
~Punkatude PTU scrapkit which you can get from Addictive Pleasures HERE.
~Mask of choice. I used WSL mask 363 which you can get HERE.
~Font of choice. I used Trashco.
Let's get started!!!!!
1. Open a new layer ( I prefer a large canvas, so I make mine 1050x656). Make your canvas transparent (Layer > Transparency > Color to alpha).
2. Open Frame 4, add drop shadow (Filters > Light & Shadow > Drop Shadow).
3. Open Paper 6 center it behind the frame ,remove excess paper with a cutting tool or eraser from your tool box.
4. Open Frame 3, add drop shadow.
5. Open Paper 4 center it behind star frame, remove excess paper with a cutting tool or eraser from your tool box.
6. Open tubes, I used 2 close-ups and a full body tube. Place the close-ups behind Frame 4 & change the mode on the close-ups to Hard Light (at the top of the layer box you will see a box marked Mode. Click on the arrow and pick Hard Light from the drop down menu. See the image below). Add drop shadow to the full body tube.
7. Open and place the following elements:
Netting
Beads
Feathers
Keychain 2
CD
Hearts
Blade
SequinStar
Skull
Skull 2
Leaf
~Some of the elements may need to be sized down. Using your scale tool in your tool box adjust the pixel size until element is the correct size~
~Add drop shadow to all elements~
8. Open Paper 11.
9. Open mask.
10. Add mask to paper
11. Merge layers (Image > Merge Visible Layer).
12. Autocrop image (Image > Autocrop Image).
13. Scale image to desired size (Image > Scale Image).
14. Add copyright info and name.
15. Save as .png
You are finished :)
This tutorial is of my own creation and any resemblance to any other tuts is purely coincidental. This tutorial is for personal use only, using it for monetary gain is against our TOU's.
Supplies Needed:
~Gimp (any version will do).
~Tubes of choice. I used the art of Robert Alvarado. You must have a license to use this art which you can get HERE.
~Punkatude PTU scrapkit which you can get from Addictive Pleasures HERE.
~Mask of choice. I used WSL mask 363 which you can get HERE.
~Font of choice. I used Trashco.
Let's get started!!!!!
1. Open a new layer ( I prefer a large canvas, so I make mine 1050x656). Make your canvas transparent (Layer > Transparency > Color to alpha).
2. Open Frame 4, add drop shadow (Filters > Light & Shadow > Drop Shadow).
3. Open Paper 6 center it behind the frame ,remove excess paper with a cutting tool or eraser from your tool box.
4. Open Frame 3, add drop shadow.
5. Open Paper 4 center it behind star frame, remove excess paper with a cutting tool or eraser from your tool box.
6. Open tubes, I used 2 close-ups and a full body tube. Place the close-ups behind Frame 4 & change the mode on the close-ups to Hard Light (at the top of the layer box you will see a box marked Mode. Click on the arrow and pick Hard Light from the drop down menu. See the image below). Add drop shadow to the full body tube.
7. Open and place the following elements:
Netting
Beads
Feathers
Keychain 2
CD
Hearts
Blade
SequinStar
Skull
Skull 2
Leaf
~Some of the elements may need to be sized down. Using your scale tool in your tool box adjust the pixel size until element is the correct size~
~Add drop shadow to all elements~
8. Open Paper 11.
9. Open mask.
10. Add mask to paper
11. Merge layers (Image > Merge Visible Layer).
12. Autocrop image (Image > Autocrop Image).
13. Scale image to desired size (Image > Scale Image).
14. Add copyright info and name.
15. Save as .png
You are finished :)  This tutorial is of my own creation and any resemblance to any other tuts is purely coincidental. This tutorial is for personal use only, using it for monetary gain is against our TOU's.
Supplies:
Gimp- any version should work
Awesome PTU kit from Addictive Pleasures called Yolanda Clover HERE
Tube of choice. I am using Ismael Rac. You must have a license to use his tubes. You can purchase them HERE
Template 55 by me (Leah) HERE
Font- Celtic
Let's Begin!
-Open template. Delete credits. Image>Scale Image 500x462 pixels. Image>Canvas Size 600x600 and make sure to click center.
-Let's add papers to the template layers. Make the template layer active (see below). Right click template layer in layer box and choose alpha to selection. Open paper (see below). Right click paper layer in layer box and choose add alpha channel. Layer>Scale Layer by 60%.
Select>Invert. Press delete on your keyboard. Select>None. Delete the original template layer.
Here are the template layers and which papers I used:
circle 1- paper 7 Filters>Light & Shadow>Drop Shadow of 2, 2, 15, black, 80
circle 2- paper 2 Filters>Repeat Drop Shadow
square 1- paper 10 Repeat drop shadow
square 2- paper 3 Repeat drop shadow
square 3- paper 6 Add drop shadow of 2, 2, 2, black, 50
rect 1- paper 9 re[eat drop shadow
rect 2- paper 4 Repeat drop shadow
-Make the clover pile layer active. Filters>Noise>RGB Noise. Uncheck independent RGB. Leave the rest of the settings. Filters>Decor>Add bevel. Uncheck work on copy. Repeat drop shadow.
-Make the happy layer active. Colors>Colorize. Leave the hue and saturation. Change the lightness to -100. Repeat drop shadow. Do the same to the day & st. layers.
-Make the pattys layer active. Add same bevel.
-Make the pattys back layer active. Add same noise and repeat drop shadow.
Open tube. Move the tube layer below the words in the layer box. Scale by 80%. Repeat drop shadow. Layer>Duplicate Layer. Filters>Blur>Gaussian Blur of 3. Change the mode to soft light.
Elements
Add a drop shadow of 2, 2, 2, black, 50 to all element layers. See my tag for placement.
horseshoe- no scale
pot of gold- scale 50%
clover 4- no scale
pearl swirl- no scale
flowers- no scale
netting- no scale & no drop shadow
glitter- no scale
-Add your name and copyright. You're finished!
This tutorial is of my own creation and any resemblance to any other tuts is purely coincidental. This tutorial is for personal use only, using it for monetary gain is against our TOU's.
Supplies:
Gimp- any version should work
Awesome PTU kit from Addictive Pleasures called Yolanda Clover HERE
Tube of choice. I am using Ismael Rac. You must have a license to use his tubes. You can purchase them HERE
Template 55 by me (Leah) HERE
Font- Celtic
Let's Begin!
-Open template. Delete credits. Image>Scale Image 500x462 pixels. Image>Canvas Size 600x600 and make sure to click center.
-Let's add papers to the template layers. Make the template layer active (see below). Right click template layer in layer box and choose alpha to selection. Open paper (see below). Right click paper layer in layer box and choose add alpha channel. Layer>Scale Layer by 60%.
Select>Invert. Press delete on your keyboard. Select>None. Delete the original template layer.
Here are the template layers and which papers I used:
circle 1- paper 7 Filters>Light & Shadow>Drop Shadow of 2, 2, 15, black, 80
circle 2- paper 2 Filters>Repeat Drop Shadow
square 1- paper 10 Repeat drop shadow
square 2- paper 3 Repeat drop shadow
square 3- paper 6 Add drop shadow of 2, 2, 2, black, 50
rect 1- paper 9 re[eat drop shadow
rect 2- paper 4 Repeat drop shadow
-Make the clover pile layer active. Filters>Noise>RGB Noise. Uncheck independent RGB. Leave the rest of the settings. Filters>Decor>Add bevel. Uncheck work on copy. Repeat drop shadow.
-Make the happy layer active. Colors>Colorize. Leave the hue and saturation. Change the lightness to -100. Repeat drop shadow. Do the same to the day & st. layers.
-Make the pattys layer active. Add same bevel.
-Make the pattys back layer active. Add same noise and repeat drop shadow.
Open tube. Move the tube layer below the words in the layer box. Scale by 80%. Repeat drop shadow. Layer>Duplicate Layer. Filters>Blur>Gaussian Blur of 3. Change the mode to soft light.
Elements
Add a drop shadow of 2, 2, 2, black, 50 to all element layers. See my tag for placement.
horseshoe- no scale
pot of gold- scale 50%
clover 4- no scale
pearl swirl- no scale
flowers- no scale
netting- no scale & no drop shadow
glitter- no scale
-Add your name and copyright. You're finished!
 This tutorial is of my own creation and any resemblance to any other tuts is purely coincidental. This tutorial is for personal use only, using it for monetary gain is against our TOU's.
Supplies:
Gimp- Any version should work
Beautiful FTU scrap kit from Cinnamon Scraps called 'Green Galore' HERE
Tube of choice. I am using Elias Chatzoudis. You must have a license to use his tubes. You can purchase them HERE
Template 36 by me (Leah) HERE
Fonts- Schnookums, Mail Ray Stuff & Will&Grace
Let's get started!
-Open template. Delete the credits, words and bears 1 & 2 layers. Image>Scale Image 500x480 pixels. Image>Canvas Size 600x600 pixels and make sure to click center.
-Let's add papers to the template layers. Make the template layer active (see below). Right click template layer in layer box and choose alpha to selection. Open paper (see below). Right click paper layer in layer box and choose add alpha channel. Layer>Scale Layer by 60%.
Select>Invert. Press delete on your keyboard. Select>None. Delete the original template layer.
Here are the template layers and which papers I used:
square 1- paper 2
square 2- paper 10
circle 1- paper 5 Filters>Light & Shadow>Drop Shadow 2, 2, 10, black, 80
circle 2- paper 1 Filters>Repeat Drop Shadow
rect 1- paper 14 repeat drop shadow
rect 2- paper 13 repeat drop shadow
rect 3- paper 4 repeat drop shadow
-Make frame 1 #1 layer active. Colors>Colorize
Hue 180
Saturation 50
Lightness -100
Repeat drop shadow
-Make frame 1 layer active. Colorize.
Hue 75
Saturation 59
Lightness -26
Repeat drop shadow
-Open tube. Move this to the 2nd later in the layer box. Layer>Duplicate Layer. Hide the duplicate tube by clicking theeye next to it in the layer box. Place the original tube in smaller square on the green paper. Make sure it is below the frame layer. Make the green paper layer active. Alpha to selection. Make the tube active. Invert and press delete. Select none. Change the mode to multiply. Lower the opacity to 60. Unhide the duplicate tube. Move tube layer just above the black square paper in the layer box. Repeat the above to this tube.
-Open tube again. Scale by 75%. Move layer to the top. Add drop shadow of 2, 2, 2, black, 50. Duplicate. Move duplicate layer under green frame in layer box. Make the black paper (paper 10) active. Alpha to selection. Make the tube active. Invert and press delete. Select none. Make the original tube layer active. Erase the bottom part of the tube so it look like she is sticking out of the frame.
Elements
Add a drop shadow of 2, 2, 2, black, 50 to each element layer. See my tag for placement.
frame 4- scale 75%
mesh- scale 50% NO drop shadow
flower ribbon 1- scale 30%
flower 5- scale 25%
ribbon 2- scale 35%
tag 1- scale 50%
frame 7- scale 50%
paper heart 2- scale 20%
flower 7- scale 30%
bird- scale 30%
beaded charm- scale 50%
leaves 2- scale 50%
-Using the Schnookums font, size 100, foreground color a6daef, type out 'Sweet'. Alpha to selection. Add new layer below this layer. Select>Grow by 1. Using the bucket fill tool, fill the selection with black. Select none and repeat frop shadow.
-Using the mail ray stuff font, size 60, foreground color c7db3d type 'pea'. Alpha to selection. Add new layer below this layer. Grow by 1. Fill selection with black. Select none and repeat drop shadow.
-Add your name and copyright.
All finished!
This tutorial is of my own creation and any resemblance to any other tuts is purely coincidental. This tutorial is for personal use only, using it for monetary gain is against our TOU's.
Supplies:
Gimp- Any version should work
Beautiful FTU scrap kit from Cinnamon Scraps called 'Green Galore' HERE
Tube of choice. I am using Elias Chatzoudis. You must have a license to use his tubes. You can purchase them HERE
Template 36 by me (Leah) HERE
Fonts- Schnookums, Mail Ray Stuff & Will&Grace
Let's get started!
-Open template. Delete the credits, words and bears 1 & 2 layers. Image>Scale Image 500x480 pixels. Image>Canvas Size 600x600 pixels and make sure to click center.
-Let's add papers to the template layers. Make the template layer active (see below). Right click template layer in layer box and choose alpha to selection. Open paper (see below). Right click paper layer in layer box and choose add alpha channel. Layer>Scale Layer by 60%.
Select>Invert. Press delete on your keyboard. Select>None. Delete the original template layer.
Here are the template layers and which papers I used:
square 1- paper 2
square 2- paper 10
circle 1- paper 5 Filters>Light & Shadow>Drop Shadow 2, 2, 10, black, 80
circle 2- paper 1 Filters>Repeat Drop Shadow
rect 1- paper 14 repeat drop shadow
rect 2- paper 13 repeat drop shadow
rect 3- paper 4 repeat drop shadow
-Make frame 1 #1 layer active. Colors>Colorize
Hue 180
Saturation 50
Lightness -100
Repeat drop shadow
-Make frame 1 layer active. Colorize.
Hue 75
Saturation 59
Lightness -26
Repeat drop shadow
-Open tube. Move this to the 2nd later in the layer box. Layer>Duplicate Layer. Hide the duplicate tube by clicking theeye next to it in the layer box. Place the original tube in smaller square on the green paper. Make sure it is below the frame layer. Make the green paper layer active. Alpha to selection. Make the tube active. Invert and press delete. Select none. Change the mode to multiply. Lower the opacity to 60. Unhide the duplicate tube. Move tube layer just above the black square paper in the layer box. Repeat the above to this tube.
-Open tube again. Scale by 75%. Move layer to the top. Add drop shadow of 2, 2, 2, black, 50. Duplicate. Move duplicate layer under green frame in layer box. Make the black paper (paper 10) active. Alpha to selection. Make the tube active. Invert and press delete. Select none. Make the original tube layer active. Erase the bottom part of the tube so it look like she is sticking out of the frame.
Elements
Add a drop shadow of 2, 2, 2, black, 50 to each element layer. See my tag for placement.
frame 4- scale 75%
mesh- scale 50% NO drop shadow
flower ribbon 1- scale 30%
flower 5- scale 25%
ribbon 2- scale 35%
tag 1- scale 50%
frame 7- scale 50%
paper heart 2- scale 20%
flower 7- scale 30%
bird- scale 30%
beaded charm- scale 50%
leaves 2- scale 50%
-Using the Schnookums font, size 100, foreground color a6daef, type out 'Sweet'. Alpha to selection. Add new layer below this layer. Select>Grow by 1. Using the bucket fill tool, fill the selection with black. Select none and repeat frop shadow.
-Using the mail ray stuff font, size 60, foreground color c7db3d type 'pea'. Alpha to selection. Add new layer below this layer. Grow by 1. Fill selection with black. Select none and repeat drop shadow.
-Add your name and copyright.
All finished!
You can get them HERE
 You can download them HERE.
 This tutorial is of my own creation and any resemblance to any other tuts is purely coincidental. This tutorial is for personal use only, using it for monetary gain is against our TOU's.
Supplies:
Gimp- Any version should work
Cute PTU kit from Creative Intentionz called 'Obsession' which you can purchase HERE
Tube of choice. I am using the work of Elias Chatzoudis. You must have a license to use his tubes. You can purchase them HERE
Template 186 from Blissfully Beth HERE
WSL_Mask141 HERE
Font- Pea Lisel
Let's Begin!!!
-Open template. Delete the cresits and the background layer. Image>Scale Image by 500x424 pixels. Image>Canvas Size of 600x600 pixels and make sure youi press center.
-Let's add papers to the template layers. Make the template layer active (see below). Right click template layer in layer box and choose alpha to selection. Open paper (see below). Right click paper layer in layer box and choose add alpha channel. Layer>Scale Layer by 60%.
Select>Invert. Press delete on your keyboard. Select>None. Delete the original template layer.
Here are the template layers and which papers I used:
white circle- paper 5
pink circle- paper 8
rect 1- paper 3
rect 2- paper 7
rect 3- paper 1
-Make the sm black circle layer active. Colors>Colorize
Hue: 0
Saturation: 64
Lightness: 77
Filters>Noise>RGB Noise on default settings. Uncheck independent RGB.Filters>Light & Shadow Drop Shadow of 2, 2, 2, black, 50.
-Make the circle frame layer active. Colorize.
Hue: 180
Saturation: 50
Lightness: 100
Filters>Repeat Drop Shadow.
-Make the rect frame layer active. Colorize.
Hue: 311
Saturation: 92
Lightness: 22
Repeat noise and repeat drop shadow.
-Make copy of rect frame layer active. Colorize.
Hue: 125
Saturation: 82
Lightness: 81
Repeat noise and drop shadow.
-Make copy (2) of rect frame layer active. Colorize.
Hue: 180
Saturation: 85
Lightness: 76
Repeat noise and drop shadow.
-Make the wordart layer active. Add a drop shadow of 2, 2, 2, black, 25. Add the same drop shadow to the dots layer.
-Open the folded ribbon element. Make the top layer in your layer box. Scale by 60%. Place at the bottom of your tag (see mine). Add drop shadow of 2, 2, 2, black, 50.
-Open tube. Move this layer below the folded ribbon layer in the layer box. Scale by 75%. Erase the part of the tube beneath the ribbon. Repeat drop shadow.
Elements:
Add a drop shadow of 2, 2, 2, black, 50 to all element layers. See my tag for placement.
branch- no scale select your rotate too and click the canvas. In the angle box put 90 and click rotate.
bow 2- scale 35%
two hearts- scale 60% erase bottom
butterfly- scale 35%
sparkle- scale 75% no drop shadow
puppy- scale 30%
sunflower- no scale
button 2- scale 15%
-Open paper 9 and apply mask.
-Add your name and copyright and you are finished!!!!!
This tutorial is of my own creation and any resemblance to any other tuts is purely coincidental. This tutorial is for personal use only, using it for monetary gain is against our TOU's.
Supplies:
Gimp- Any version should work
Cute PTU kit from Creative Intentionz called 'Obsession' which you can purchase HERE
Tube of choice. I am using the work of Elias Chatzoudis. You must have a license to use his tubes. You can purchase them HERE
Template 186 from Blissfully Beth HERE
WSL_Mask141 HERE
Font- Pea Lisel
Let's Begin!!!
-Open template. Delete the cresits and the background layer. Image>Scale Image by 500x424 pixels. Image>Canvas Size of 600x600 pixels and make sure youi press center.
-Let's add papers to the template layers. Make the template layer active (see below). Right click template layer in layer box and choose alpha to selection. Open paper (see below). Right click paper layer in layer box and choose add alpha channel. Layer>Scale Layer by 60%.
Select>Invert. Press delete on your keyboard. Select>None. Delete the original template layer.
Here are the template layers and which papers I used:
white circle- paper 5
pink circle- paper 8
rect 1- paper 3
rect 2- paper 7
rect 3- paper 1
-Make the sm black circle layer active. Colors>Colorize
Hue: 0
Saturation: 64
Lightness: 77
Filters>Noise>RGB Noise on default settings. Uncheck independent RGB.Filters>Light & Shadow Drop Shadow of 2, 2, 2, black, 50.
-Make the circle frame layer active. Colorize.
Hue: 180
Saturation: 50
Lightness: 100
Filters>Repeat Drop Shadow.
-Make the rect frame layer active. Colorize.
Hue: 311
Saturation: 92
Lightness: 22
Repeat noise and repeat drop shadow.
-Make copy of rect frame layer active. Colorize.
Hue: 125
Saturation: 82
Lightness: 81
Repeat noise and drop shadow.
-Make copy (2) of rect frame layer active. Colorize.
Hue: 180
Saturation: 85
Lightness: 76
Repeat noise and drop shadow.
-Make the wordart layer active. Add a drop shadow of 2, 2, 2, black, 25. Add the same drop shadow to the dots layer.
-Open the folded ribbon element. Make the top layer in your layer box. Scale by 60%. Place at the bottom of your tag (see mine). Add drop shadow of 2, 2, 2, black, 50.
-Open tube. Move this layer below the folded ribbon layer in the layer box. Scale by 75%. Erase the part of the tube beneath the ribbon. Repeat drop shadow.
Elements:
Add a drop shadow of 2, 2, 2, black, 50 to all element layers. See my tag for placement.
branch- no scale select your rotate too and click the canvas. In the angle box put 90 and click rotate.
bow 2- scale 35%
two hearts- scale 60% erase bottom
butterfly- scale 35%
sparkle- scale 75% no drop shadow
puppy- scale 30%
sunflower- no scale
button 2- scale 15%
-Open paper 9 and apply mask.
-Add your name and copyright and you are finished!!!!!
 4. Open and place the following elements:
Sparkle 2
Frame 5
Headphones
Skull 1
Skull 2
Bunny
Magic Cube
Radio
Butterfly
Cupcake
~Some of the elements may need to be sized down. Using your scale tool in your tool box adjust the pixel size until element is the correct size~
~Add drop shadow to all elements~
5. Open Paper 17
6. Open mask
7. Add mask to paper (click HERE for a tut on using masks)
8. Merge Layers (Image > Merge Visible Layers).
9. Crop Image (Image > Autocrop Image).
10. Scale image to desired size (Image > Scale Image).
11. Add copyright info and name
12. Save as .png
ALL DONE!!!!!!!!!!
4. Open and place the following elements:
Sparkle 2
Frame 5
Headphones
Skull 1
Skull 2
Bunny
Magic Cube
Radio
Butterfly
Cupcake
~Some of the elements may need to be sized down. Using your scale tool in your tool box adjust the pixel size until element is the correct size~
~Add drop shadow to all elements~
5. Open Paper 17
6. Open mask
7. Add mask to paper (click HERE for a tut on using masks)
8. Merge Layers (Image > Merge Visible Layers).
9. Crop Image (Image > Autocrop Image).
10. Scale image to desired size (Image > Scale Image).
11. Add copyright info and name
12. Save as .png
ALL DONE!!!!!!!!!!

 This tutorial is of my own creation and any resemblance to any other tuts is purely coincidental. This tutorial is for personal use only, using it for monetary gain is against our TOU's.
Supplies Needed:
~Gimp (any version will do).
~Misfits Attitude FTU scrapkit by Rieka Rafita which you can get from Creative Misfits HERE.
~Tubes of choice. I used the super HOT art of Celine, you must have a license to use his art which you can get HERE.
~Template of choice. I used Missy Temp 355 which you can get at Divine Intentionz HERE
~Mask of choice. I used Winni mask 22.6 (you'll find it on page 2) which you can get HERE.
~Font of choice. I used My Nerd.
Let's get started!!!
1. Open a new layer ( I prefer a large canvas, so I make mine 1050x656). Make your canvas transparent (Layer > Transparency > Color to Alpha).
2. Open template in PSD format, move layers of template around until they are the way you like them.
~Add paper from scrapkit to individual layers of the template (Right click on template layer in layer box > Alpha to Selection > CTRL I > Select paper layer in layer box > Delete).
These are the papers I used:
Paper 1
Paper 4
Paper 5
Paper 9
~I added noise to some of the template layers to make them look glittery (Filters > Noise > RGB Noise).
~I colorized some of the template layers to better match the scrapkit (Colors > Colorize > play with the setting until you get the desired color).
~Add drop shadow to template layers (Filters > Light & Shadow > Drop Shadow).
3. Open tubes, I used both a full body and close up. I lowered the opacity of the close up to 40 (at the top of the layer box you will see a bar you can slide to change the opacity of the selected layer). Add drop shadow to the full body tube.
4. Open and place the following elements:
Sparkles 1
Flower 1
Flower 4
Skull 1
Skull 2
Bow 1
Star (x2)
Corset
Teddy
Beads
Cupcakes (x2)
Butterfly 1
~Some of the elements may need to be sized down. Using your scale tool in your tool box adjust the pixel size until element is the correct size~
~Add drop shadow to all elements~
5. Open Paper 7
6. Open mask
7. Add mask to paper
8. Merge Layers (Image > Merge Visible Layers).
9. Crop Image (Image > Autocrop Image).
10. Scale image to desired size (Image > Scale Image).
11. Add copyright info and name
12. Save as .png
ALL DONE!!!!!!!!!!
This tutorial is of my own creation and any resemblance to any other tuts is purely coincidental. This tutorial is for personal use only, using it for monetary gain is against our TOU's.
Supplies Needed:
~Gimp (any version will do).
~Misfits Attitude FTU scrapkit by Rieka Rafita which you can get from Creative Misfits HERE.
~Tubes of choice. I used the super HOT art of Celine, you must have a license to use his art which you can get HERE.
~Template of choice. I used Missy Temp 355 which you can get at Divine Intentionz HERE
~Mask of choice. I used Winni mask 22.6 (you'll find it on page 2) which you can get HERE.
~Font of choice. I used My Nerd.
Let's get started!!!
1. Open a new layer ( I prefer a large canvas, so I make mine 1050x656). Make your canvas transparent (Layer > Transparency > Color to Alpha).
2. Open template in PSD format, move layers of template around until they are the way you like them.
~Add paper from scrapkit to individual layers of the template (Right click on template layer in layer box > Alpha to Selection > CTRL I > Select paper layer in layer box > Delete).
These are the papers I used:
Paper 1
Paper 4
Paper 5
Paper 9
~I added noise to some of the template layers to make them look glittery (Filters > Noise > RGB Noise).
~I colorized some of the template layers to better match the scrapkit (Colors > Colorize > play with the setting until you get the desired color).
~Add drop shadow to template layers (Filters > Light & Shadow > Drop Shadow).
3. Open tubes, I used both a full body and close up. I lowered the opacity of the close up to 40 (at the top of the layer box you will see a bar you can slide to change the opacity of the selected layer). Add drop shadow to the full body tube.
4. Open and place the following elements:
Sparkles 1
Flower 1
Flower 4
Skull 1
Skull 2
Bow 1
Star (x2)
Corset
Teddy
Beads
Cupcakes (x2)
Butterfly 1
~Some of the elements may need to be sized down. Using your scale tool in your tool box adjust the pixel size until element is the correct size~
~Add drop shadow to all elements~
5. Open Paper 7
6. Open mask
7. Add mask to paper
8. Merge Layers (Image > Merge Visible Layers).
9. Crop Image (Image > Autocrop Image).
10. Scale image to desired size (Image > Scale Image).
11. Add copyright info and name
12. Save as .png
ALL DONE!!!!!!!!!! This tutorial is of my own creation and any resemblance to any other tuts is purely coincidental. This tutorial is for personal use only, using it for monetary gain is against our TOU's.
Supplies:
Gimp- Any version should work
I used a wicked PTU kit from Artmama called 'Magical Mishka'. Check out her blog HERE to see what stores she sells in.
Tube of Choice. I am using the work of Lady Mishka. You must have a license to use her tubes. You can purchase them HERE.
Template- square-2 by me (Leah) on the Creative Misfits blog HERE. (7th down)
WSL_Mask325 HEREFont- Katy Berry
Let's get started!!!!
-Open template. Delete the credits. Image>Scale Image by 500x430 pixels. Image>Canvas Size of 600x600 pixels and make sure to click center.
-Let's add some papers. Select the template layer (below). Right click the template layer in the layer box and choose alpha to selection. Open paper (below). Right click paper layer and choose add alpha channel. Layers>Scale Layer by 60%. Select>Invert. Press
delete on your keyboard. Select>None.
Square 2- paper 11- Filters>Light & Shadow>Drop Shadow of 2, 2, 15, black, 100
Square 3- paper 2- Filters>Repeat Drop Shadow
Rect 2- paper 1- Add drop shadow of 2, 2, 2, black, 50
Rect 3- paper 9- Add drop shadow of -2, -2, 2, black, 50
Square 4- paper 12- Add drop shadow of 2, 2, 2, black, 50
Rect 1- paper 14- Repeat drop shadow
Square 1- paper 16- Repeat drop shadow
-Open your tube. Place tube layer above pink paper layer in the layer box. Select the flip tool. Click your canvas to flip your tube. Layer>Dulpicate Layer. Hide the duplicate tube layer by clicking the eye next to it in the layer box. Make the visible tube active. Invert and delete.
Select none. Change the mode to grain merge. Unhide the duplicate tube layer. Place her body in the blue rectangle next to the pink square. Do exactly the same as above to add the tube to the blue rectangle. Change the opacity of this tube to 40.
-Make the crazy layer active. Set your foreground color to 09b64b. Alpha to selection. Using the bucket fill tool fill the selection. Add a new layer below this layer. Slect>Grow by 2. Fill the selection with white. Select none. Repeat drop shadow.
-Make the chick layer active. Filters>Noise>RGB Noise on the default settings. Alpha to selection. Add a new layer below. Grow by 2 and fill with white. Select none. Repeat drop shadow.
-Open the tube again. Move layer below the word art layers in the layer box. Scale by 60%. Place tube in center of the tag. Repeat drop shadow. Dulpicate. Filters>Blur>Gaussian Blur on the default settings. Change the mode to soft light.
Lower the opacity to 60.
Elements
Add drop shadow of 2, 2, 2, black, 50 to all element layers. See my tag for placement.
05- scale 85%- no drop shadow
16- scale 65%
08- no scale
39- scale 40%
23- scale 60%
14- scale 50%
35- scale 25%
37- scale 50%
38- scale 50%
-Open paper 8. Apply mask.
-Add your name and copyright and you're finished!!!!
This tutorial is of my own creation and any resemblance to any other tuts is purely coincidental. This tutorial is for personal use only, using it for monetary gain is against our TOU's.
Supplies:
Gimp- Any version should work
I used a wicked PTU kit from Artmama called 'Magical Mishka'. Check out her blog HERE to see what stores she sells in.
Tube of Choice. I am using the work of Lady Mishka. You must have a license to use her tubes. You can purchase them HERE.
Template- square-2 by me (Leah) on the Creative Misfits blog HERE. (7th down)
WSL_Mask325 HEREFont- Katy Berry
Let's get started!!!!
-Open template. Delete the credits. Image>Scale Image by 500x430 pixels. Image>Canvas Size of 600x600 pixels and make sure to click center.
-Let's add some papers. Select the template layer (below). Right click the template layer in the layer box and choose alpha to selection. Open paper (below). Right click paper layer and choose add alpha channel. Layers>Scale Layer by 60%. Select>Invert. Press
delete on your keyboard. Select>None.
Square 2- paper 11- Filters>Light & Shadow>Drop Shadow of 2, 2, 15, black, 100
Square 3- paper 2- Filters>Repeat Drop Shadow
Rect 2- paper 1- Add drop shadow of 2, 2, 2, black, 50
Rect 3- paper 9- Add drop shadow of -2, -2, 2, black, 50
Square 4- paper 12- Add drop shadow of 2, 2, 2, black, 50
Rect 1- paper 14- Repeat drop shadow
Square 1- paper 16- Repeat drop shadow
-Open your tube. Place tube layer above pink paper layer in the layer box. Select the flip tool. Click your canvas to flip your tube. Layer>Dulpicate Layer. Hide the duplicate tube layer by clicking the eye next to it in the layer box. Make the visible tube active. Invert and delete.
Select none. Change the mode to grain merge. Unhide the duplicate tube layer. Place her body in the blue rectangle next to the pink square. Do exactly the same as above to add the tube to the blue rectangle. Change the opacity of this tube to 40.
-Make the crazy layer active. Set your foreground color to 09b64b. Alpha to selection. Using the bucket fill tool fill the selection. Add a new layer below this layer. Slect>Grow by 2. Fill the selection with white. Select none. Repeat drop shadow.
-Make the chick layer active. Filters>Noise>RGB Noise on the default settings. Alpha to selection. Add a new layer below. Grow by 2 and fill with white. Select none. Repeat drop shadow.
-Open the tube again. Move layer below the word art layers in the layer box. Scale by 60%. Place tube in center of the tag. Repeat drop shadow. Dulpicate. Filters>Blur>Gaussian Blur on the default settings. Change the mode to soft light.
Lower the opacity to 60.
Elements
Add drop shadow of 2, 2, 2, black, 50 to all element layers. See my tag for placement.
05- scale 85%- no drop shadow
16- scale 65%
08- no scale
39- scale 40%
23- scale 60%
14- scale 50%
35- scale 25%
37- scale 50%
38- scale 50%
-Open paper 8. Apply mask.
-Add your name and copyright and you're finished!!!!

This tutorial is of my own creation and any resemblance to any other tuts is purely coincidental. This tutorial is for personal use only, using it for monetary gain is against our TOU's. Supplies: Gimp- Any version should work Adorable PTU kit from Sweet Cravings Scraps called 'What a Feeling' HERE Tube of choice. I am using pinuptoons. You must have a license to use them. You can purchase them HERE. WSL_Mask329 HERE Font- Pea Bhea Let's Begin! Go to File New and open a canvas with the size of 500x500 pixels. Open frame 10. Layer>Scale Layer by 40%. Select your magic wand and click inside the frame. Select>Grow by 5. Open paper 9. Move paper below frame layer in the layer box. Right click paper layer in the layer box and choose add alpha channel. Scale by 40%. Select>Invert. Press delete on your keyboard. Select>None. Make frame layer active.Filters>Light and Shadow>Drop Shadow of 2, 2, 2, black, 50. -Open tube. Scale by 70%. Filters>Repeat Drop Shadow. Move to the left of the frame. Laye>Duplicate Layer. Filters>Blur>Gaussian Blur on default settings. Change mode to soft light. -Open frame 8. Move this later to the bottom in the layer box. Scale by 50%. Using the magic wand, click inside the frame. Grow by 5. Open paper 14. Move paper layer below frame layer. Add alpha channel. Invert and press delete. Select none. Repeat drop shadow on frame. -Open frame 3. Move this layer to the bottom. Scale by 50%. Click inside the frame using the magic wand. Grow by 5. Open paper 3. Move paper layer below frame layer. Add alpha channel. Scale by 50%. Invert and press delete. Select none. Repeat drop shadow on frame layer. Elements Add a drop shadow of 2, 2, 2, black, 50 to all element layers. See my tag for placement. pillow 1- scale 50% pillow 2- scale 45% flower 5- scale 50% long bow 4- scale by 40% umbrella 1- scale 50% flower 7- scale 35% flower 3- scale 25% flower 6- scale 50% cute owl- scale 15% bubbles 2- scale 50% flower 9- scale scale 60% flower 1- scale 30% Open paper 12 and move to the bottom layer. Apply mask. If you don't know how to use masks click HERE. -Add your name and proper copyrights and you are finished!!!
 This tutorial is of my own creation and any resemblance to any other tuts is purely coincidental. This tutorial is for personal use only, using it for monetary gain is against our TOU's.
Supplies Needed:
~Gimp (any version will do).
~Tube of choice. I used the artwork of Lady Mishka, you must have a license to use this art which you can now get HERE.
~Magical Mishka PTU scrapkit by Artmama Made. Please stop by her blog HERE to see what stores she sells in.
~Mask of choice. I used WSL Mask 220 which you can get HERE.
~Font of choice. I used Black Boys on Mopeds.
Let's get started!!!!!
1. Open a new layer ( I prefer a large canvas, so I make mine 1050x656). Make your canvas transparent (Layer > Transparency > Color to alpha).
2. Open embellie 15 (frame), add drop shadow (Filters > Light & Shadow > Drop Shadow).
3. Open embellie 18 (ripped paper), center it behind frame. Remove excess using your eraser or circular cutting tool from your tool box. Add drop shadow.
4. Open Paper 7, center it behind frame and behind embellie 18. Remove excess using your eraser or circular cutting tool from your tool box.
5. Open tube, add drop shadow.
6. Open and place the following elements:
embellie 5
embellie 17
embellie 19
embellie 47
embellie 4
embellie 8
embellie 35
embellie 37
embellie 36
embellie 39
embellie 12
~Some elements may need to be sized down. Using the Scale Tool in your tool box adjust pixels to desired size~
~Add drop shadow to all elements~
7. Open Paper 9.
8. Open mask.
9. Add mask to paper
10. Merge layers (Image > Merge Visible Layer).
11. Crop image (Image > Autocrop Image).
12. Scale image to desired size (Image > Scale Image).
13. Add copyright info and name.
14. Save as .png
You are finished :)
This tutorial is of my own creation and any resemblance to any other tuts is purely coincidental. This tutorial is for personal use only, using it for monetary gain is against our TOU's.
Supplies Needed:
~Gimp (any version will do).
~Tube of choice. I used the artwork of Lady Mishka, you must have a license to use this art which you can now get HERE.
~Magical Mishka PTU scrapkit by Artmama Made. Please stop by her blog HERE to see what stores she sells in.
~Mask of choice. I used WSL Mask 220 which you can get HERE.
~Font of choice. I used Black Boys on Mopeds.
Let's get started!!!!!
1. Open a new layer ( I prefer a large canvas, so I make mine 1050x656). Make your canvas transparent (Layer > Transparency > Color to alpha).
2. Open embellie 15 (frame), add drop shadow (Filters > Light & Shadow > Drop Shadow).
3. Open embellie 18 (ripped paper), center it behind frame. Remove excess using your eraser or circular cutting tool from your tool box. Add drop shadow.
4. Open Paper 7, center it behind frame and behind embellie 18. Remove excess using your eraser or circular cutting tool from your tool box.
5. Open tube, add drop shadow.
6. Open and place the following elements:
embellie 5
embellie 17
embellie 19
embellie 47
embellie 4
embellie 8
embellie 35
embellie 37
embellie 36
embellie 39
embellie 12
~Some elements may need to be sized down. Using the Scale Tool in your tool box adjust pixels to desired size~
~Add drop shadow to all elements~
7. Open Paper 9.
8. Open mask.
9. Add mask to paper
10. Merge layers (Image > Merge Visible Layer).
11. Crop image (Image > Autocrop Image).
12. Scale image to desired size (Image > Scale Image).
13. Add copyright info and name.
14. Save as .png
You are finished :) 
Snag Our Blinkies


Don't Be A Pirate!

