Gimptastic Scraps Available Exclusively @

Gimptastic Scraps CT







Blog Trains

CU Licenses









Monday, June 20, 2011
 This tutorial is of my own creation and any resemblance to any other tuts is purely coincidental. This tutorial is for personal use only, using it for monetary gain is against our TOU's.
Supplies:
Gimp- Any version should work
Beautiful PTU kit from Sweet Cravings Scraps called Summer Breeze HERE
Tube of choice. I used Ismael Rac. You must have a license to use his tubes. You can purchase them HERE
WSL_Mask302 HERE
Font- Redhead Goddess
-File>New 600x600 pixels.
-Open frame 3. Layer>Scale Layer by 50%. Select your magic wand. Click inside the frame. Select>Grow by 5. Open paper 6 and move below frame layer. Right click paper in layer box and choose Add alpha channel. Scale by 40%. Select>Invert.
Press delete on your keyboard. Select>None. Make frame layer active. Filters>Light & Shadow>Drop Shadow of 2, 2, 2, black, 50.
-Open frame 4. Scale by 40%. Select your flip tool and click canvas. Add paper 1 to this frame the same way as above. Repeat drop shadow on frame layer.
-Open tube close up. Layers>Duplicate Layer. Flip on of the tubes and place in the top frame. Select your eraser tool and erase parts of the tube outside of the frame. Move the other tube to the bottom frame. Erase the parts of this tube that are outside of the frame. Change the mode of both tubes to grain merge.
-Open frame 2. Make the bottom layer. Scale 60%. Add paper 11 to this frame. Repeat drop shadow on the frame layer.
-Open tube again. Scale 60%. Repeat drop shadow. Duplicate. Filters>Blur>Gaussian Blur on default. Change mode of duplicate tube to soft light and lower the opacity to 80.
-Open oceanwave. Scale 60%. Place on tubes legs. Erase any part of the tube sticking out the bottom of the wave.
Elements
Add a drop shadow of 2, 2, 2, black, 5 to all element layers. See my tag for placement.
palm tree
seashells
kelp- no drop shadow
flower 5
vines- no drop shadow
life float
fish 1
fish 2
fern- no drop shadow
ocean bird 1- no drop shadow
ribbon 2- select rotate tool and rotate by 90- no drop shadow
beach fence
seashell
flower 11
-Open paper 10 and move to the bottom. Apply mask. If you don't know how to use masks click HERE.
-Add your name and copyright and you are finished!
This tutorial is of my own creation and any resemblance to any other tuts is purely coincidental. This tutorial is for personal use only, using it for monetary gain is against our TOU's.
Supplies:
Gimp- Any version should work
Beautiful PTU kit from Sweet Cravings Scraps called Summer Breeze HERE
Tube of choice. I used Ismael Rac. You must have a license to use his tubes. You can purchase them HERE
WSL_Mask302 HERE
Font- Redhead Goddess
-File>New 600x600 pixels.
-Open frame 3. Layer>Scale Layer by 50%. Select your magic wand. Click inside the frame. Select>Grow by 5. Open paper 6 and move below frame layer. Right click paper in layer box and choose Add alpha channel. Scale by 40%. Select>Invert.
Press delete on your keyboard. Select>None. Make frame layer active. Filters>Light & Shadow>Drop Shadow of 2, 2, 2, black, 50.
-Open frame 4. Scale by 40%. Select your flip tool and click canvas. Add paper 1 to this frame the same way as above. Repeat drop shadow on frame layer.
-Open tube close up. Layers>Duplicate Layer. Flip on of the tubes and place in the top frame. Select your eraser tool and erase parts of the tube outside of the frame. Move the other tube to the bottom frame. Erase the parts of this tube that are outside of the frame. Change the mode of both tubes to grain merge.
-Open frame 2. Make the bottom layer. Scale 60%. Add paper 11 to this frame. Repeat drop shadow on the frame layer.
-Open tube again. Scale 60%. Repeat drop shadow. Duplicate. Filters>Blur>Gaussian Blur on default. Change mode of duplicate tube to soft light and lower the opacity to 80.
-Open oceanwave. Scale 60%. Place on tubes legs. Erase any part of the tube sticking out the bottom of the wave.
Elements
Add a drop shadow of 2, 2, 2, black, 5 to all element layers. See my tag for placement.
palm tree
seashells
kelp- no drop shadow
flower 5
vines- no drop shadow
life float
fish 1
fish 2
fern- no drop shadow
ocean bird 1- no drop shadow
ribbon 2- select rotate tool and rotate by 90- no drop shadow
beach fence
seashell
flower 11
-Open paper 10 and move to the bottom. Apply mask. If you don't know how to use masks click HERE.
-Add your name and copyright and you are finished!
Sunday, June 19, 2011
 This tutorial is of my own creation and any resemblance to any other tuts is purely coincidental. This tutorial is for personal use only, using it for monetary gain is against our TOU's.
Supplies Needed:
~Gimp (any version will do).
~Tube of choice. I used the art of Suzanne Woolcott. You must have a license to use this art which you can get HERE.
~Summer Breeze PTU scrapkit which you can get from Sweet Cravngs Scraps HERE.
~Mask of choice. I used WSL mask 364 which you can get HERE.
~Font of choice. I used Yippy Skippy.
Let's get started!!!!!
1. Open a new layer ( I prefer a large canvas, so I make mine 1050x656). Make your canvas transparent (Layer > Transparency > Color to alpha).
2. Open Frame 2, add drop shadow (Filters > Light & Shadow > Drop Shadow).
3. Open Paper 8 center it behind frame, remove excess paper using a cutting tool or eraser from your tool box.
4. Open your tube, add drop shadow.
5. Open and place the following elements:
Fishing Net
Fern
Kelp 1
Anchor
Nautical Clock
SeaShell 2
SeaShell 3
Chains
Flower 1
Fish 1
Fish 2
Crab
~Some elements may need to be sized down, use the Scale Tool in your tool box to adjust pixel size~
~Add drop shadow to all elements~
6. Open Paper 11.
7. Open mask.
8. Add mask to paper (click HERE for a tut on using masks).
9. Merge layers (Image > Merge Visible Layer).
10. crop image (Image > Autocrop Image).
11. Scale image to desired size (Image > Scale Image).
12. Add copyright info and name.
13. Save as .png
You are finished :)
This tutorial is of my own creation and any resemblance to any other tuts is purely coincidental. This tutorial is for personal use only, using it for monetary gain is against our TOU's.
Supplies Needed:
~Gimp (any version will do).
~Tube of choice. I used the art of Suzanne Woolcott. You must have a license to use this art which you can get HERE.
~Summer Breeze PTU scrapkit which you can get from Sweet Cravngs Scraps HERE.
~Mask of choice. I used WSL mask 364 which you can get HERE.
~Font of choice. I used Yippy Skippy.
Let's get started!!!!!
1. Open a new layer ( I prefer a large canvas, so I make mine 1050x656). Make your canvas transparent (Layer > Transparency > Color to alpha).
2. Open Frame 2, add drop shadow (Filters > Light & Shadow > Drop Shadow).
3. Open Paper 8 center it behind frame, remove excess paper using a cutting tool or eraser from your tool box.
4. Open your tube, add drop shadow.
5. Open and place the following elements:
Fishing Net
Fern
Kelp 1
Anchor
Nautical Clock
SeaShell 2
SeaShell 3
Chains
Flower 1
Fish 1
Fish 2
Crab
~Some elements may need to be sized down, use the Scale Tool in your tool box to adjust pixel size~
~Add drop shadow to all elements~
6. Open Paper 11.
7. Open mask.
8. Add mask to paper (click HERE for a tut on using masks).
9. Merge layers (Image > Merge Visible Layer).
10. crop image (Image > Autocrop Image).
11. Scale image to desired size (Image > Scale Image).
12. Add copyright info and name.
13. Save as .png
You are finished :)
Friday, June 17, 2011
 This tutorial is of my own creation and any resemblance to any other tuts is purely coincidental. This tutorial is for personal use only, using it for monetary gain is against our TOU's.
Supplies Needed:
~Gimp (any version will do).
~Candy's Treats portion of the From the Heart blog train FTU scrapkit HERE.
~Tubes of choice. I used the artwork of Arthur Crowe, you must have a license to use this art which you can get HERE.
~Template of choice. I used template 344 which you can get from Divine Intentionz HERE.
~Mask of choice. I used Yez mask 68 which you can get HERE.
~Font of choice. I used Valentina JF.
Let's get started!!!
1. Open a new layer ( I prefer a large canvas, so I make mine 1050x656). Make your canvas transparent (Layer > Transparency > Color to Alpha).
2. Open template in PSD format, remove and move layers of template around until they are the way you like them.
~Add paper from scrapkit to individual layers of the template (Right click on template layer in layer box > Alpha to Selection > CTRL I > Select paper layer in layer box > Delete)
.
These are the papers I used:
Paper 4
Paper 5
Paper 9
Paper 10
~I added noise to some of the template layers to make them look glittery (Filters > Noise > RGB Noise).
~I colorized some of the template layers to better match the scrapkit (Colors > Colorize > play with the setting until you get the desired color).
~Add drop shadow to template layers (Filters > Light & Shadow > Drop Shadow).
3. Open tubes, I used both a full body and 2 close-ups. I changed the mode on the close-ups to HardLight (at the top of your Layer Box you will see where it says Mode, click the arrow and select HardLight from the drop down menu). The close-ups have been added to the template in the same way you add paper (Right click on template layer in layer box > Alpha to Selection > CTRL I > Select tube layer in layer box > Delete). Add drop shadow to the full body tube.
4. Open and place the following elements:
Splats
Drip Green x2
(place drip directly under close up tubes)
Cupcake 1 x2
HeartLine
Tag With Shadow 3
Flower 1
Flower 2 x2
Flower 3
Flower 4
Heartele 1
Heartele 2
Heartele 4
Ele7
~Some of the elements may need to be sized down. Using your scale tool in your tool box adjust the pixel size until element is the correct size~
~Add drop shadow to all elements (except Splats & Drip Green)~
5. Open Paper 13
6. Open mask
7. Add mask to paper (click HERE for a tut on using masks)
8. Merge Layers (Image > Merge Visible Layers).
9. Crop Image (Image > Autocrop Image).
10. Scale image to desired size (Image > Scale Image).
11. Add copyright info and name
12. Save as .png
ALL DONE!!!!!!!!!!
This tutorial is of my own creation and any resemblance to any other tuts is purely coincidental. This tutorial is for personal use only, using it for monetary gain is against our TOU's.
Supplies Needed:
~Gimp (any version will do).
~Candy's Treats portion of the From the Heart blog train FTU scrapkit HERE.
~Tubes of choice. I used the artwork of Arthur Crowe, you must have a license to use this art which you can get HERE.
~Template of choice. I used template 344 which you can get from Divine Intentionz HERE.
~Mask of choice. I used Yez mask 68 which you can get HERE.
~Font of choice. I used Valentina JF.
Let's get started!!!
1. Open a new layer ( I prefer a large canvas, so I make mine 1050x656). Make your canvas transparent (Layer > Transparency > Color to Alpha).
2. Open template in PSD format, remove and move layers of template around until they are the way you like them.
~Add paper from scrapkit to individual layers of the template (Right click on template layer in layer box > Alpha to Selection > CTRL I > Select paper layer in layer box > Delete)
.
These are the papers I used:
Paper 4
Paper 5
Paper 9
Paper 10
~I added noise to some of the template layers to make them look glittery (Filters > Noise > RGB Noise).
~I colorized some of the template layers to better match the scrapkit (Colors > Colorize > play with the setting until you get the desired color).
~Add drop shadow to template layers (Filters > Light & Shadow > Drop Shadow).
3. Open tubes, I used both a full body and 2 close-ups. I changed the mode on the close-ups to HardLight (at the top of your Layer Box you will see where it says Mode, click the arrow and select HardLight from the drop down menu). The close-ups have been added to the template in the same way you add paper (Right click on template layer in layer box > Alpha to Selection > CTRL I > Select tube layer in layer box > Delete). Add drop shadow to the full body tube.
4. Open and place the following elements:
Splats
Drip Green x2
(place drip directly under close up tubes)
Cupcake 1 x2
HeartLine
Tag With Shadow 3
Flower 1
Flower 2 x2
Flower 3
Flower 4
Heartele 1
Heartele 2
Heartele 4
Ele7
~Some of the elements may need to be sized down. Using your scale tool in your tool box adjust the pixel size until element is the correct size~
~Add drop shadow to all elements (except Splats & Drip Green)~
5. Open Paper 13
6. Open mask
7. Add mask to paper (click HERE for a tut on using masks)
8. Merge Layers (Image > Merge Visible Layers).
9. Crop Image (Image > Autocrop Image).
10. Scale image to desired size (Image > Scale Image).
11. Add copyright info and name
12. Save as .png
ALL DONE!!!!!!!!!!
We have joined the Creative Team over at Scrap-U-Nique!!!!!
Scrap-U-Nique is a store, with kits and other products from MANY awesome designers. You will see tuts coming through soon so keep your eyes peeled.
We are so excited to be part of this team!!!!!
Click the blinkie above to check out the store...
 This tutorial is of my own creation and any resemblance to any other tuts is purely coincidental. This tutorial is for personal use only, using it for monetary gain is against our TOU's.
Supplies:
Gimp- any version should work
Pretty PTU kit from Wicked Princess Scraps called Summer Cottage HERE
Temp 72 by me HERE
Tube of choice. I am using the wonderful art of Suzanne Woolcott. You must have a license to use her tubes. You can get them HERE
Mask- WSL_Mask226 HERE
Font- ValentinaJF
Let's get started!
-Open temp. Delete the credits. Image>Scaale Image by 500x358 pixels. Image>Canvas Size 600x600 pixels and press center.
-Let's add papers to the template layers. Make the template layer active (see below). Right click template layer in layer box and choose alpha to selection. Open paper (see below). Right click paper layer in layer box and choose add alpha channel. Layer>Scale Layer by 60%.
Select>Invert. Press delete on your keyboard. Select>None. Delete the original template layer.
Here are the template layers and which papers I used:
sqaure- paper 13
star- paper 1 Filters>Light & Shadow>Drop Shadow 3, 3, 3, black, 50
pentagon 1- paper 5 repeat drop shadow
pentagon 2- paper 12 repeat drop shadow
pentagon 3- paper 6 repeat drop shadow
rect 1 & 2- paper 8 repeat drop shadow
rect 3- paper 14 repeat drop shadow
-Open circle frame. Move to top layer. Scale 50%. Select your magic wand. Click inside the frame. Select>Grow by 5. Open paper 6 and move below frame layer. Add alpha channel. Scale by 35%. Invert and delete. Select none. Repeat drop shadow on the frame layer.
-Open tube. Scale by 75%. Add drop shadow of 2, 2, 2, black, 50. Layer>Duplicate Layer. Move duplicate tube layer below the frame layer. Select your eraser. Erase parts of the duplicate tube sticking out of frame. Make the original tube layer active.
Erase the bottom part of this tube so it looks like it is sticking out of the frame.
-Open tri frame. Scale 35%. Select your rotate tool and rotate by 90. Press shift and with your magic wand click inside all 3 frames. Select>Grow 5. Open paper 16. Move below frame layer. Add alpha channel. Scale 60%. Invert and delete.
Select none. Repeat drop shadow on frame.
Elements:
Add drop shadow of 2, 2, 2, black, 50 to all element layers unless otherwise stated. See my tag for placement.
dangle
cloud- no drop shadow
rose
mums
beads
flower buds
pink spray- no drop shadow
fuscia
fragipini
ivy
pearl blossom
clock trio
glitter butterfly
single rose
-Open paper 4 and move to bottom layer. Apply mask. To learn to use masks click HERE. Change the opacity to 55.
-Add your name and copyright and you're finished!
This tutorial is of my own creation and any resemblance to any other tuts is purely coincidental. This tutorial is for personal use only, using it for monetary gain is against our TOU's.
Supplies:
Gimp- any version should work
Pretty PTU kit from Wicked Princess Scraps called Summer Cottage HERE
Temp 72 by me HERE
Tube of choice. I am using the wonderful art of Suzanne Woolcott. You must have a license to use her tubes. You can get them HERE
Mask- WSL_Mask226 HERE
Font- ValentinaJF
Let's get started!
-Open temp. Delete the credits. Image>Scaale Image by 500x358 pixels. Image>Canvas Size 600x600 pixels and press center.
-Let's add papers to the template layers. Make the template layer active (see below). Right click template layer in layer box and choose alpha to selection. Open paper (see below). Right click paper layer in layer box and choose add alpha channel. Layer>Scale Layer by 60%.
Select>Invert. Press delete on your keyboard. Select>None. Delete the original template layer.
Here are the template layers and which papers I used:
sqaure- paper 13
star- paper 1 Filters>Light & Shadow>Drop Shadow 3, 3, 3, black, 50
pentagon 1- paper 5 repeat drop shadow
pentagon 2- paper 12 repeat drop shadow
pentagon 3- paper 6 repeat drop shadow
rect 1 & 2- paper 8 repeat drop shadow
rect 3- paper 14 repeat drop shadow
-Open circle frame. Move to top layer. Scale 50%. Select your magic wand. Click inside the frame. Select>Grow by 5. Open paper 6 and move below frame layer. Add alpha channel. Scale by 35%. Invert and delete. Select none. Repeat drop shadow on the frame layer.
-Open tube. Scale by 75%. Add drop shadow of 2, 2, 2, black, 50. Layer>Duplicate Layer. Move duplicate tube layer below the frame layer. Select your eraser. Erase parts of the duplicate tube sticking out of frame. Make the original tube layer active.
Erase the bottom part of this tube so it looks like it is sticking out of the frame.
-Open tri frame. Scale 35%. Select your rotate tool and rotate by 90. Press shift and with your magic wand click inside all 3 frames. Select>Grow 5. Open paper 16. Move below frame layer. Add alpha channel. Scale 60%. Invert and delete.
Select none. Repeat drop shadow on frame.
Elements:
Add drop shadow of 2, 2, 2, black, 50 to all element layers unless otherwise stated. See my tag for placement.
dangle
cloud- no drop shadow
rose
mums
beads
flower buds
pink spray- no drop shadow
fuscia
fragipini
ivy
pearl blossom
clock trio
glitter butterfly
single rose
-Open paper 4 and move to bottom layer. Apply mask. To learn to use masks click HERE. Change the opacity to 55.
-Add your name and copyright and you're finished!
Thursday, June 16, 2011
 This tutorial is of my own creation and any resemblance to any other tuts is purely coincidental. This tutorial is for personal use only, using it for monetary gain is against our TOU's.
Supplies:
Gimp- Any version should work
Awesome PTU kit from Rieka Rafita called Pirates of the Carribean HERE
Template 76 by me HERE
Tube of choice. I am using the art of Elias Chatzoudis. You must have a licence to use his tubes. You can purchase them HERE
Let's Begin!
-Open template. Delete the credits. Image>Scale Image by 500x381 pixels. Image>Canvas Size 600x600 pixels and press center.
-Let's add papers to the template layers. Make the template layer active (see below). Right click template layer in layer box and choose alpha to selection. Open paper (see below). Right click paper layer in layer box and choose add alpha channel. Layer>Scale Layer by 60%.
Select>Invert. Press delete on your keyboard. Select>None. Delete the original template layer.
Here are the template layers and which papers I used:
circle 1- paper 1 Filters>Light and Shadow>Drop Shadow of 3, 3, 7, black, 80
circle 2- paper 8
rect 3- paper 7 Filters>Repeat Drop Shadow
rect 6- paper 9 repeat drop shadow
square 2- paper 11 repeat drop shadow
square 3- paper 4 repeat drop shadow
square 1- paper 2 repeat drop shadow
rect 1- paper 6 repeat drop shadow
rect 2- paper 12 repeat drop shadow
rect 4- paper 5 repeat drop shadow
rect 5- paper 10 repeat drop shadow
-Make the thin circle layer active. Repeat drop shadow.
-Open your tube. Scale by 80%. Add a drop shadow of 2, 2, 2, black, 50.
Elements:
Add drop shadow of 2, 2, 2, black, 50 to all element layers unless otherwise stated. See my tag for placement.
rock
scroll
coin box 1
ship
frame 2
sign
maps
flag 1
coin 2
bag
palm tree
box 1
parrot 1
barrel 1
barrel 2
water- no drop shadow
boom
There you have it! I hope you've enjoyed this tutorial!
This tutorial is of my own creation and any resemblance to any other tuts is purely coincidental. This tutorial is for personal use only, using it for monetary gain is against our TOU's.
Supplies:
Gimp- Any version should work
Awesome PTU kit from Rieka Rafita called Pirates of the Carribean HERE
Template 76 by me HERE
Tube of choice. I am using the art of Elias Chatzoudis. You must have a licence to use his tubes. You can purchase them HERE
Let's Begin!
-Open template. Delete the credits. Image>Scale Image by 500x381 pixels. Image>Canvas Size 600x600 pixels and press center.
-Let's add papers to the template layers. Make the template layer active (see below). Right click template layer in layer box and choose alpha to selection. Open paper (see below). Right click paper layer in layer box and choose add alpha channel. Layer>Scale Layer by 60%.
Select>Invert. Press delete on your keyboard. Select>None. Delete the original template layer.
Here are the template layers and which papers I used:
circle 1- paper 1 Filters>Light and Shadow>Drop Shadow of 3, 3, 7, black, 80
circle 2- paper 8
rect 3- paper 7 Filters>Repeat Drop Shadow
rect 6- paper 9 repeat drop shadow
square 2- paper 11 repeat drop shadow
square 3- paper 4 repeat drop shadow
square 1- paper 2 repeat drop shadow
rect 1- paper 6 repeat drop shadow
rect 2- paper 12 repeat drop shadow
rect 4- paper 5 repeat drop shadow
rect 5- paper 10 repeat drop shadow
-Make the thin circle layer active. Repeat drop shadow.
-Open your tube. Scale by 80%. Add a drop shadow of 2, 2, 2, black, 50.
Elements:
Add drop shadow of 2, 2, 2, black, 50 to all element layers unless otherwise stated. See my tag for placement.
rock
scroll
coin box 1
ship
frame 2
sign
maps
flag 1
coin 2
bag
palm tree
box 1
parrot 1
barrel 1
barrel 2
water- no drop shadow
boom
There you have it! I hope you've enjoyed this tutorial!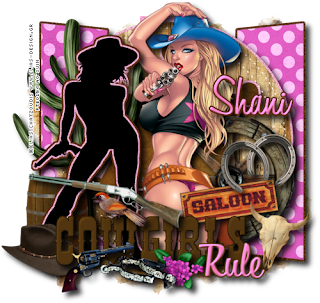
This tutorial is of my own creation and any resemblance to any other tuts is purely coincidental. This tutorial is for personal use only, using it for monetary gain is against our TOU's.
Supplies Needed:
~Gimp (any version will do).
~YeeHaw Baby PTU scrapkit by Wicked Princess Scraps which you can get HERE.
~Tube of choice. I used the artwork of Elias Chatzoudis, you must have a license to use this art which you can get HERE.
~Template of choice. I used Template 41 which you can get from Scraps Dimensions HERE.
~Mask of choice. I used WSL mask 363 which you can get HERE.
~Font of choice. I used Moonlight.
Let's get started!!!
1. Open a new layer ( I prefer a large canvas, so I make mine 1050x656). Make your canvas transparent (Layer > Transparency > Color to Alpha).
2. Open template in PSD format, move layers of template around until they are the way you like them.
~Add paper from scrapkit to individual layers of the template (Right click on template layer in layer box > Alpha to Selection > CTRL I > Select paper layer in layer box > Delete).
These are the papers I used:
Paper 1
Paper 2
Paper 14
~I added noise to some of the template layers to make them look glittery (Filters > Noise > RGB Noise).
~I colorized some of the template layers to better match the scrapkit (Colors > Colorize > play with the setting until you get the desired color).
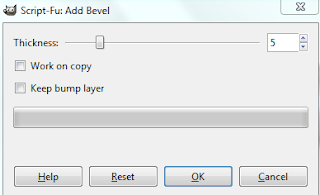
~I beveled the text on this template to give it a shiny effect (Filters > Decor > Add Bevel). See image below for settings I used:
 ~I added colored outlines to the full shadow figure on the template (right click on the template layer in your layer box > Alpha to Selection > Right click again> Select > Grow (by 2) > add a new transparent layer to your layer box (click the symbol that looks like a piece of paper at the bottom of your layer box) > place new layer under your tube layer > select a color and fill with your bucket fill tool from your tool box. Repeat these steps if you would like more then one outline.
~Add drop shadow to template layers (Filters > Light & Shadow > Drop Shadow).
3. Open tube, add drop shadow.
4. Open and place the following elements:
Cacti 2
Barrel
Wheel
Saloon Sign
Hat
Horseshoes
AnimalSkull
Gun 3
Forget-me-nots
Rifle
Spur 2
Bird
~Some of the elements may need to be sized down. Using your scale tool in your tool box adjust the pixel size until element is the correct size~
~Add drop shadow to all elements~
5. Open Paper 5
6. Open mask
7. Add mask to paper
8. Merge Layers (Image > Merge Visible Layers).
9. Crop Image (Image > Autocrop Image).
10. Scale image to desired size (Image > Scale Image).
11. Add copyright info and name
12. Save as .png
ALL DONE!!!!!!!!!!
~I added colored outlines to the full shadow figure on the template (right click on the template layer in your layer box > Alpha to Selection > Right click again> Select > Grow (by 2) > add a new transparent layer to your layer box (click the symbol that looks like a piece of paper at the bottom of your layer box) > place new layer under your tube layer > select a color and fill with your bucket fill tool from your tool box. Repeat these steps if you would like more then one outline.
~Add drop shadow to template layers (Filters > Light & Shadow > Drop Shadow).
3. Open tube, add drop shadow.
4. Open and place the following elements:
Cacti 2
Barrel
Wheel
Saloon Sign
Hat
Horseshoes
AnimalSkull
Gun 3
Forget-me-nots
Rifle
Spur 2
Bird
~Some of the elements may need to be sized down. Using your scale tool in your tool box adjust the pixel size until element is the correct size~
~Add drop shadow to all elements~
5. Open Paper 5
6. Open mask
7. Add mask to paper
8. Merge Layers (Image > Merge Visible Layers).
9. Crop Image (Image > Autocrop Image).
10. Scale image to desired size (Image > Scale Image).
11. Add copyright info and name
12. Save as .png
ALL DONE!!!!!!!!!!
Subscribe to:
Posts
(Atom)
Snag Our Blinkies





Don't Be A Pirate!

