Tuesday, July 26, 2011
 This tutorial is of my own creation and any resemblance to any other tuts is purely coincidental. This tutorial is for personal use only, using it for monetary gain is against our TOU's.
Supplies Needed:
~Gimp (any version will do).
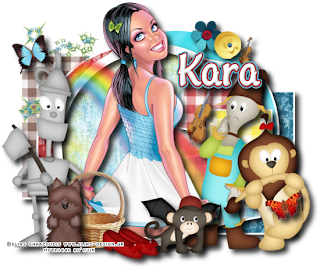
~Somewhere Over the Rainbow PTU scrapkit by Sweet Cravings Scraps HERE.
~Tube of choice. I used the artwork of Elias Chatzoudis, you must have a license to use this art which you can now get HERE.
~Template of choice. I used Template 70 by Leah which you can get on our blog HERE.
~Font of choice. I used Sinclair Medium Script.
Let's get started!!!
1. Open a new layer ( I prefer a large canvas, so I make mine 1050x656). Make your canvas transparent (Layer > Transparency > Color to Alpha).
2. Open template in PSD format, move layers of template around until they are the way you like them.
~Add paper from scrapkit to individual layers of the template (Right click on template layer in layer box > Alpha to Selection > CTRL I > Select paper layer in layer box > Delete).
These are the papers I used:
Paper 8
Paper 11
Paper 12
Paper 15
Paper 17
Paper 18
Paper 19
Paper 20
~I colorized some of the template layers to better match the scrapkit (Colors > Colorize > play with the setting until you get the desired color).
~Add drop shadow to template layers (Filters > Light & Shadow > Drop Shadow).
3. Open tube, add drop shadow.
4. Open and place the following elements:
Cute Tin Man
Cute Scarecrow
Cute Cowardly Lion
Cute Flying Monkey
Cute Toto
Flying Violins
Butterfly 1
Butterfly 2
Flower 11
Flower 12
Basket
Ruby Shoes
Glitter Sparkles 1
Rainbow
~Some of the elements may need to be sized down. Using your scale tool in your tool box adjust the pixel size until element is the correct size~
~Add drop shadow to all elements (except Rainbow & Glitter Sparkles 1)~
5. Merge Layers (Image > Merge Visible Layers).
6. Crop Image (Image > Autocrop Image).
7. Scale image to desired size (Image > Scale Image).
8. Add copyright info and name
9. Save as .png
ALL DONE!!!!!!!!!!
Labels:PTU tuts
Subscribe to:
Post Comments
(Atom)
Labels
12x12 Layout
A Taggers Scrap
Animated
Announcements
Art of Freya
Basic tuts
Blog Trains
CDO
Cluster Frame
CT tags
Extras
Forum Set
Freebies
FTU CU
FTU Kits
FTU tuts
Holiday
Jackie's Jewels
Kissing Kate
Masks
PTU Kits
PTU tuts
Quick Pages
Results
Results with Amys kits
Show Offs
Sweet Cravings Scraps
Tasha's Playground
Templates
Timeline Banners
Chit Chat
Blog Archive
-
▼
2011
(337)
-
▼
July
(24)
- FTU tut "Garden of Love"
- PTU tut "Feelin' Dotty"
- PTU tut "WHATEVER"
- PTU tut "We're not in Kansas anymore..."
- FTU tut "Independent Woman"
- PTU tut "Girly Girl"
- PTU tut- Tea for 2
- FTU tut "Bumpalicious"
- *Another Tut Result*
- FTU tut - Text on a Path
- PTU tut- Deep Sea Adventure
- PTU tut "♥ Emolution ♥"
- *Tut Results*
- PTU tut- Piece of Me
- PTU tut "High School Drama"
- PTU tut "Captivating"
- Summer Templates!
- PTU tut- Summer Beauty
- PTU tut "Fairy Fun"
- Baby Templates!
- PTU tut "A Mother's Love"
- PTU tut "Go on With Your Bad Self"
- PTU tut- Bleeding Hearts
- PTU Tut- Skull Rock
-
▼
July
(24)


0 comments:
Post a Comment