Gimptastic Scraps Available Exclusively @

Gimptastic Scraps CT







Blog Trains

CU Licenses









Tuesday, July 12, 2011
 This tutorial is of my own creation and any resemblance to any other tuts is purely coincidental. This tutorial is for personal use only, using it for monetary gain is against our TOU's.
Supplies:
Gimp- Any version should work
Fun PTU kit from Sweet Cravings Scraps HERE
Tube of choice. I am using Elias Chatzoudis. You must have a license to use his tubes. You can purchase them HERE
Font- Satisfaction
-File>New 600x600 px.
-Open frame 1. Layer>Scale Layer 50%. Select the magic wand and click inside of the frame. Select>Grow by 5. Open paper 14. Move below the frame in the layer box. Right click pape rlayer in the layer box and choose alpha to selection. Scale by 40%. Select>Invert. Press delete on your
keyboard. Select>None. Make the frame layer active. Filters>Light & Shadow>Drop Shadow of 2, 2, 2, black, 50.
-Open tube. Make the top layer. Scale 75%. Repeat drop shadow. Layer>Duplicate Layer. Move the duplicate tube layer below the frame. Make the paper layer active. Using the magic wand click outside of the paper. Make the duplicate tube active.
Press delete. Select none. Make the original tube layer active. Select the eraser tool. Erase the bottom part of the tube so she sticks out of the frame.
-Open frame 2. Move to the bottom layer. Scale 50%. Select the rotate tool and in the angle box put -15.00. Move to the lest side of the circle frame. Right click layer in layer box and choose layer to image size. Duplicate. Select the flip tool and click canvas.
Make the left frame active.Add paper 7 to this frame repeating the steps above. Add paper 6 to the right frame. Repeat drop shadow on both frame layers.
-Open frame 3. Make bottom layer. Scale 60%. Repeat drop shadow.
Elements:
Add drop shadow to all element layers unless otherwise stated. See my tag for placement.
flower 10
flower 11
ribbon 1
grass no drop shadow
flower 6
cute bird
tag 1
paper butterfly no drop shadow
air balloon
butterfly
pebble 1
pebble 2
cloud 1 no drop shadow
cloud 2 no drop shadow
-Add your name and copyright and you are finished!
This tutorial is of my own creation and any resemblance to any other tuts is purely coincidental. This tutorial is for personal use only, using it for monetary gain is against our TOU's.
Supplies:
Gimp- Any version should work
Fun PTU kit from Sweet Cravings Scraps HERE
Tube of choice. I am using Elias Chatzoudis. You must have a license to use his tubes. You can purchase them HERE
Font- Satisfaction
-File>New 600x600 px.
-Open frame 1. Layer>Scale Layer 50%. Select the magic wand and click inside of the frame. Select>Grow by 5. Open paper 14. Move below the frame in the layer box. Right click pape rlayer in the layer box and choose alpha to selection. Scale by 40%. Select>Invert. Press delete on your
keyboard. Select>None. Make the frame layer active. Filters>Light & Shadow>Drop Shadow of 2, 2, 2, black, 50.
-Open tube. Make the top layer. Scale 75%. Repeat drop shadow. Layer>Duplicate Layer. Move the duplicate tube layer below the frame. Make the paper layer active. Using the magic wand click outside of the paper. Make the duplicate tube active.
Press delete. Select none. Make the original tube layer active. Select the eraser tool. Erase the bottom part of the tube so she sticks out of the frame.
-Open frame 2. Move to the bottom layer. Scale 50%. Select the rotate tool and in the angle box put -15.00. Move to the lest side of the circle frame. Right click layer in layer box and choose layer to image size. Duplicate. Select the flip tool and click canvas.
Make the left frame active.Add paper 7 to this frame repeating the steps above. Add paper 6 to the right frame. Repeat drop shadow on both frame layers.
-Open frame 3. Make bottom layer. Scale 60%. Repeat drop shadow.
Elements:
Add drop shadow to all element layers unless otherwise stated. See my tag for placement.
flower 10
flower 11
ribbon 1
grass no drop shadow
flower 6
cute bird
tag 1
paper butterfly no drop shadow
air balloon
butterfly
pebble 1
pebble 2
cloud 1 no drop shadow
cloud 2 no drop shadow
-Add your name and copyright and you are finished!
Sunday, July 10, 2011
 This tutorial is of my own creation and any resemblance to any other tuts is purely coincidental. This tutorial is for personal use only, using it for monetary gain is against our TOU's.
Supplies Needed:
~Gimp (any version will do).
~Tube of choice. I used the artwork of Lix. You must have a license to use this art which you can now get HERE.
~Crush PTU scrapkit which you can get from Sweet Cravings Scraps HERE.
~Font of choice. I used Fineliner Script.
Let's get started!!!!!
1. Open a new layer ( I prefer a large canvas, so I make mine 1050x656). Make your canvas transparent (Layer > Transparency > Color to alpha).
2. Open Frame 4 (rectangular frame), add drop shadow (Filters > Light & Shadow > Drop Shadow).
3. Open Paper 12 center behind Frame 4, remove excess paper using a cutting tool or eraser in your tool box.
4. Open Frame 6 (oval frame), add drop shadow.
5. Open Paper 14 center behind Frame 6, remove excess paper using a cutting tool or eraser in your tool box.
6. Open tube, add drop shadow.
7. Open and place the following elements:
Cloud 1
Ribbon 4
Cute Bird
Cute Bunny
Flower 5
Flower 10
Flower 12
Grass
Butterfly
Paper Butterfly 2
~Some of the elements may need to be sized down. Using your scale tool in your tool box adjust the pixel size until element is the correct size~
~Add drop shadow to all elements (except Cloud 1)~
8. Merge layers (Image > Merge Visible Layer).
9. Autocrop image (Image > Autocrop Image).
10. Scale image to desired size (Image > Scale Image).
11. Add copyright info and name.
12. Save as .png
You are finished :)
This tutorial is of my own creation and any resemblance to any other tuts is purely coincidental. This tutorial is for personal use only, using it for monetary gain is against our TOU's.
Supplies Needed:
~Gimp (any version will do).
~Tube of choice. I used the artwork of Lix. You must have a license to use this art which you can now get HERE.
~Crush PTU scrapkit which you can get from Sweet Cravings Scraps HERE.
~Font of choice. I used Fineliner Script.
Let's get started!!!!!
1. Open a new layer ( I prefer a large canvas, so I make mine 1050x656). Make your canvas transparent (Layer > Transparency > Color to alpha).
2. Open Frame 4 (rectangular frame), add drop shadow (Filters > Light & Shadow > Drop Shadow).
3. Open Paper 12 center behind Frame 4, remove excess paper using a cutting tool or eraser in your tool box.
4. Open Frame 6 (oval frame), add drop shadow.
5. Open Paper 14 center behind Frame 6, remove excess paper using a cutting tool or eraser in your tool box.
6. Open tube, add drop shadow.
7. Open and place the following elements:
Cloud 1
Ribbon 4
Cute Bird
Cute Bunny
Flower 5
Flower 10
Flower 12
Grass
Butterfly
Paper Butterfly 2
~Some of the elements may need to be sized down. Using your scale tool in your tool box adjust the pixel size until element is the correct size~
~Add drop shadow to all elements (except Cloud 1)~
8. Merge layers (Image > Merge Visible Layer).
9. Autocrop image (Image > Autocrop Image).
10. Scale image to desired size (Image > Scale Image).
11. Add copyright info and name.
12. Save as .png
You are finished :)
Thursday, July 7, 2011
My partner in crime, Amy, is expecting a sweet baby girl (as you can see in the post below this!). I decided I would make some templates in her honor.
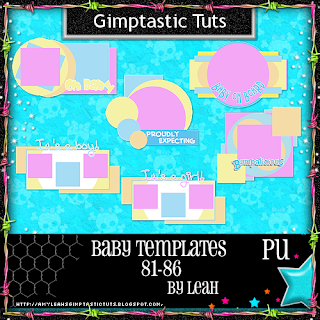
Get them HERE

Wednesday, July 6, 2011

♥ Thank you Shani, this kit is truly beautiful ♥
This tutorial is of my own creation and any resemblance to any other tuts is purely coincidental. This tutorial is for personal use only, using it for monetary gain is against our TOU's.
Supplies Needed:
~Gimp (any version will do).
~Libby's Lullaby PTU scrapkit by Wicked Princess Scraps which you can get HERE.
~Tube of choice. I used the artwork of Alfadesire, you must have a license to use this art which you can get HERE.
~Template of choice. I used Template 11 which you can get from Sass'd & Swagg'd Templates HERE.
~Mask of choice. I used WSL mask 84 which you can get HERE.
~Font of choice. I used Valentina JF.
Let's get started!!!
1. Open a new layer ( I prefer a large canvas, so I make mine 1050x656). Make your canvas transparent (Layer > Transparency > Color to Alpha).
2. Open template in PSD format, move layers of template around until they are the way you like them.
~Add paper from scrapkit to individual layers of the template (Right click on template layer in layer box > Alpha to Selection > CTRL I > Select paper layer in layer box > Delete).
These are the papers I used:
Paper 2
Paper 3
Paper 15
~I added noise to some of the template layers to make them look glittery (Filters > Noise > RGB Noise).
~I colorized some of the template layers to better match the scrapkit (Colors > Colorize > play with the setting until you get the desired color).
~I beveled the text on this template to give it a shiny effect (Filters > Decor > Add Bevel). See image below for settings I used:
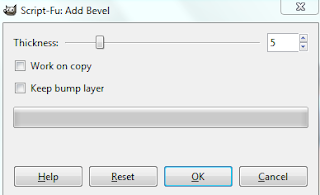
~Add drop shadow to template layers (Filters > Light & Shadow > Drop Shadow).
3. Open tube, add drop shadow.
4. Open and place the following elements:
Flowers
Star Trail
Bib
Carriage
Bottle
Pacifier
Mother & Child Cameo
Butterfly 1
Stork
~Some of the elements may need to be sized down. Using your scale tool in your tool box adjust the pixel size until element is the correct size~
~Add drop shadow to all elements~
5. Open Paper 8
6. Open mask
7. Add mask to paper
8. Merge Layers (Image > Merge Visible Layers).
9. Crop Image (Image > Autocrop Image).
10. Scale image to desired size (Image > Scale Image).
11. Add copyright info and name
12. Save as .png
ALL DONE!!!!!!!!!!
Tuesday, July 5, 2011
 This tutorial is of my own creation and any resemblance to any other tuts is purely coincidental. This tutorial is for personal use only, using it for monetary gain is against our TOU's.
Supplies Needed:
~Gimp (any version will do).
~Emo Cutie PTU scrapkit by Toxic Desirez which you can find HERE.
~Tubes of choice. I used the artwork of Alex Prihodko, you must have a license to use this art which you can get HERE.
~Template of choice. I used the Bad Self Template which you can get from Crazy Cakes Scraps HERE.
~Font of choice. I used Retrofit Light.
Let's get started!!!
1. Open a new layer ( I prefer a large canvas, so I make mine 1050x656). Make your canvas transparent (Layer > Transparency > Color to Alpha).
2. Open template in PSD format, move layers of template around until they are the way you like them.
~Add paper from scrapkit to individual layers of the template (Right click on template layer in layer box > Alpha to Selection > CTRL I > Select paper layer in layer box > Delete).
These are the papers I used:
Paper 18
Paper 25
Paper 31
~I added noise to some of the template layers to make them look glittery (Filters > Noise > RGB Noise).
~I colorized some of the template layers to better match the scrapkit (Colors > Colorize > play with the setting until you get the desired color).
~Add drop shadow to template layers (Filters > Light & Shadow > Drop Shadow).
3. Open tubes, I used both a full body and a close-up. I changed the mode on the close-up to HardLight (at the top of your Layer Box you will see where it says Mode, click the arrow and select HardLight from the drop down menu). The close-up has been added to the template in the same way you add paper (Right click on template layer in layer box > Alpha to Selection > CTRL I > Select tube layer in layer box > Delete). Add drop shadow to the full body tube.
4. Open and place the following elements:
Doodle
Flame
Razor Blade
Ribbon 2
Skull 5
Chrome Skull
Flower 1
Flower 2
Bomb
Spider
Butterfly 1
Sparkles
~Some of the elements may need to be sized down. Using your scale tool in your tool box adjust the pixel size until element is the correct size~
~Add drop shadow to all elements~
5. Open Background element from scrapkit. Place it under all other layers of the tag. This will give the effect of using a mask.
6. Merge Layers (Image > Merge Visible Layers).
7. Crop Image (Image > Autocrop Image).
8. Scale image to desired size (Image > Scale Image).
9. Add copyright info and name
10. Save as .png
ALL DONE!!!!!!!!!!
This tutorial is of my own creation and any resemblance to any other tuts is purely coincidental. This tutorial is for personal use only, using it for monetary gain is against our TOU's.
Supplies Needed:
~Gimp (any version will do).
~Emo Cutie PTU scrapkit by Toxic Desirez which you can find HERE.
~Tubes of choice. I used the artwork of Alex Prihodko, you must have a license to use this art which you can get HERE.
~Template of choice. I used the Bad Self Template which you can get from Crazy Cakes Scraps HERE.
~Font of choice. I used Retrofit Light.
Let's get started!!!
1. Open a new layer ( I prefer a large canvas, so I make mine 1050x656). Make your canvas transparent (Layer > Transparency > Color to Alpha).
2. Open template in PSD format, move layers of template around until they are the way you like them.
~Add paper from scrapkit to individual layers of the template (Right click on template layer in layer box > Alpha to Selection > CTRL I > Select paper layer in layer box > Delete).
These are the papers I used:
Paper 18
Paper 25
Paper 31
~I added noise to some of the template layers to make them look glittery (Filters > Noise > RGB Noise).
~I colorized some of the template layers to better match the scrapkit (Colors > Colorize > play with the setting until you get the desired color).
~Add drop shadow to template layers (Filters > Light & Shadow > Drop Shadow).
3. Open tubes, I used both a full body and a close-up. I changed the mode on the close-up to HardLight (at the top of your Layer Box you will see where it says Mode, click the arrow and select HardLight from the drop down menu). The close-up has been added to the template in the same way you add paper (Right click on template layer in layer box > Alpha to Selection > CTRL I > Select tube layer in layer box > Delete). Add drop shadow to the full body tube.
4. Open and place the following elements:
Doodle
Flame
Razor Blade
Ribbon 2
Skull 5
Chrome Skull
Flower 1
Flower 2
Bomb
Spider
Butterfly 1
Sparkles
~Some of the elements may need to be sized down. Using your scale tool in your tool box adjust the pixel size until element is the correct size~
~Add drop shadow to all elements~
5. Open Background element from scrapkit. Place it under all other layers of the tag. This will give the effect of using a mask.
6. Merge Layers (Image > Merge Visible Layers).
7. Crop Image (Image > Autocrop Image).
8. Scale image to desired size (Image > Scale Image).
9. Add copyright info and name
10. Save as .png
ALL DONE!!!!!!!!!! This tutorial is of my own creation and any resemblance to any other tuts is purely coincidental. This tutorial is for personal use only, using it for monetary gain is against our TOU's.
Supplies:
Gimp- Any version should work
PTU kit from Wicked Princess called Opposites Attract Dark HERE
Mask 178 from weescotslass HERE
Font- bleeding cowboys
Let's get started!
-File>New 600x600 pixels.
-Open torn frame. Layers>Scale Layer by 70%. Select the magic wand. Select>Grow by 5. Open paper 6. Move paper below frame layer in the layer box. Right click paper layer in layer box and choose add alpha channel. Scale by 50%. Select>Invert. Press delete on
your computer. Select>None. Make the frame layer active. Filters>Light & Shadow>Drop Shadow of 3, 3, 3, black, 80.
-Open tube. Scale 80%. Repeat drop shadow. Layers>Duplicate Layer. Filters>Blur>Gaussian Blur on default. Change the mode of the duplicate layer to overlay and lower the opacity to 40.
-Open circle frame. Scale 60%. Add paper 10 to this frame the same way we added the other paper to the torn frame. Repeat drop shadow on circle frame layer.
-Open the horned frame. Scale 50%. Click inside frame with magic wand. Grow by 5. Add new layer below this frame layer. Using the bucket fill tool, fill the selection with black. Open tube again. Place the face of your tube inside the selection.
Invert & delete. Select none. Change the mode of the tube to value and lower the opacity to 50. Repeat drop shadow on the horned frame layer.
Elements:
Add drop shadow of 2, 2, 2, black, 50 to all element layers. See my tag for placement.
canalabra
rose
blood splatter NO drop shadow
bling trim
hourglass
blood
doodle bow
tree NO drop shadow
music papers
old paper Rotate 15.00
-Add a new layer at the bottom. Fill with black. Apply mask.
-Add your name and copyright and you're finished!!
This tutorial is of my own creation and any resemblance to any other tuts is purely coincidental. This tutorial is for personal use only, using it for monetary gain is against our TOU's.
Supplies:
Gimp- Any version should work
PTU kit from Wicked Princess called Opposites Attract Dark HERE
Mask 178 from weescotslass HERE
Font- bleeding cowboys
Let's get started!
-File>New 600x600 pixels.
-Open torn frame. Layers>Scale Layer by 70%. Select the magic wand. Select>Grow by 5. Open paper 6. Move paper below frame layer in the layer box. Right click paper layer in layer box and choose add alpha channel. Scale by 50%. Select>Invert. Press delete on
your computer. Select>None. Make the frame layer active. Filters>Light & Shadow>Drop Shadow of 3, 3, 3, black, 80.
-Open tube. Scale 80%. Repeat drop shadow. Layers>Duplicate Layer. Filters>Blur>Gaussian Blur on default. Change the mode of the duplicate layer to overlay and lower the opacity to 40.
-Open circle frame. Scale 60%. Add paper 10 to this frame the same way we added the other paper to the torn frame. Repeat drop shadow on circle frame layer.
-Open the horned frame. Scale 50%. Click inside frame with magic wand. Grow by 5. Add new layer below this frame layer. Using the bucket fill tool, fill the selection with black. Open tube again. Place the face of your tube inside the selection.
Invert & delete. Select none. Change the mode of the tube to value and lower the opacity to 50. Repeat drop shadow on the horned frame layer.
Elements:
Add drop shadow of 2, 2, 2, black, 50 to all element layers. See my tag for placement.
canalabra
rose
blood splatter NO drop shadow
bling trim
hourglass
blood
doodle bow
tree NO drop shadow
music papers
old paper Rotate 15.00
-Add a new layer at the bottom. Fill with black. Apply mask.
-Add your name and copyright and you're finished!!
Monday, July 4, 2011
 This tutorial is of my own creation and any resemblance to any other tuts is purely coincidental. This tutorial is for personal use only, using it for monetary gain is against our TOU's.
Supplies:
Gimp- Any version should work
PTU kit Skull Rock from Rebellious Scraps HERE
Tube of choice. I am using Lix. You must have a license to use these tubes. You can get them HERE
Template 414 from Divine Intentionz HERE
Font- Weltron
Let's Begin!
-Open template. Delete credits. Image>Scale Image 500x301 pixels. Image>Canvas Size 600x600 pixles and press center.
-Let's add papers to the template layers. Make the template layer active (see below). Right click template layer in layer box and choose alpha to selection. Open paper (see below). Right click paper layer in layer box and choose add alpha channel. Layer>Scale Layer by 60%.
Select>Invert. Press delete on your keyboard. Select>None. Delete the original template layer.
Here are the template layers and which papers I used:
frame back 3- paper 3
frame back 2- paper 2
frame back- paper 8
circle 3- paper 4
circle 2- paper 7 Filters>Light and Shadow>Drop Shadow 3, 3, 3, black, 50
circle 1-paper 3 Repeat drop shadow
square 2- paper 9 Repeat drop shadow
square 1- paper 10 Repeat drop shadow
-Open frame 3. Colors>Colorize
Hue: 185
Saturation- 94
Lightness: -41
Filters>Noise>RGB Noise. Put all sliders except alpha on 0.50. Add drop shadow of 2, 2, 2, black, 50. Repeat for frame 2. Repeat drop shadow on frame layer.
Open tube. Move into the bottom frame. Right click the layer in the layer box and choose layer to image size. Layer>Dupicate Layer. Select the flip tool. Click the canvas. Place the duplicate tube in top frame. Select the eraser tool and erase parts of the tube outside of the frame.
Change the mode of the tube to screen. Lower the opacity to 45.
-Open tube again. Scale by 80%. Repeat drop shadow. Duplicate. Filters>Blur>Gaussian Blur on default. Change mode to soft light.
-Open frame 1. Move to the bottom. Place on the left of tag. Using the magic wand, click inside the frame. Select>Grow by 5. Open paper 12. Move layer below the frame layer. Add alpha channel. Scale by 50%. Invert & delete. Select none. Repeat drop shadow on frame.
-Open frame 3. Scale by 60%. Move above frame 3. Using the magic wand, click inside the first box. Add a new layer below the frame. Bucket fill selection with 45eeff. Select none. Repeat the above for the remaining boxes. I only have 3 showing. For the second, the color I used to bucket fill was f966c3. For the third boxI used the same blue as before. On the frame layer add a drop shadow of 1, 1, 1, black, 50. Add noise to all 3 squares.
Elements:
Add a drop shadow of 2, 2, 2, black, 50 to all element layers. See my tag for placement.
cds & vinyls
sign- rotate by 30
chain with spike
boot
boot 2
disco ball
screw 1
sign 2
chains
skull pillow
wire- no drop shadow
-Add your name and copyright and you are finished!
This tutorial is of my own creation and any resemblance to any other tuts is purely coincidental. This tutorial is for personal use only, using it for monetary gain is against our TOU's.
Supplies:
Gimp- Any version should work
PTU kit Skull Rock from Rebellious Scraps HERE
Tube of choice. I am using Lix. You must have a license to use these tubes. You can get them HERE
Template 414 from Divine Intentionz HERE
Font- Weltron
Let's Begin!
-Open template. Delete credits. Image>Scale Image 500x301 pixels. Image>Canvas Size 600x600 pixles and press center.
-Let's add papers to the template layers. Make the template layer active (see below). Right click template layer in layer box and choose alpha to selection. Open paper (see below). Right click paper layer in layer box and choose add alpha channel. Layer>Scale Layer by 60%.
Select>Invert. Press delete on your keyboard. Select>None. Delete the original template layer.
Here are the template layers and which papers I used:
frame back 3- paper 3
frame back 2- paper 2
frame back- paper 8
circle 3- paper 4
circle 2- paper 7 Filters>Light and Shadow>Drop Shadow 3, 3, 3, black, 50
circle 1-paper 3 Repeat drop shadow
square 2- paper 9 Repeat drop shadow
square 1- paper 10 Repeat drop shadow
-Open frame 3. Colors>Colorize
Hue: 185
Saturation- 94
Lightness: -41
Filters>Noise>RGB Noise. Put all sliders except alpha on 0.50. Add drop shadow of 2, 2, 2, black, 50. Repeat for frame 2. Repeat drop shadow on frame layer.
Open tube. Move into the bottom frame. Right click the layer in the layer box and choose layer to image size. Layer>Dupicate Layer. Select the flip tool. Click the canvas. Place the duplicate tube in top frame. Select the eraser tool and erase parts of the tube outside of the frame.
Change the mode of the tube to screen. Lower the opacity to 45.
-Open tube again. Scale by 80%. Repeat drop shadow. Duplicate. Filters>Blur>Gaussian Blur on default. Change mode to soft light.
-Open frame 1. Move to the bottom. Place on the left of tag. Using the magic wand, click inside the frame. Select>Grow by 5. Open paper 12. Move layer below the frame layer. Add alpha channel. Scale by 50%. Invert & delete. Select none. Repeat drop shadow on frame.
-Open frame 3. Scale by 60%. Move above frame 3. Using the magic wand, click inside the first box. Add a new layer below the frame. Bucket fill selection with 45eeff. Select none. Repeat the above for the remaining boxes. I only have 3 showing. For the second, the color I used to bucket fill was f966c3. For the third boxI used the same blue as before. On the frame layer add a drop shadow of 1, 1, 1, black, 50. Add noise to all 3 squares.
Elements:
Add a drop shadow of 2, 2, 2, black, 50 to all element layers. See my tag for placement.
cds & vinyls
sign- rotate by 30
chain with spike
boot
boot 2
disco ball
screw 1
sign 2
chains
skull pillow
wire- no drop shadow
-Add your name and copyright and you are finished!
Subscribe to:
Posts
(Atom)
Snag Our Blinkies





Don't Be A Pirate!

